

That lingering smell of yesterday’s fries clinging to your kitchen? The stubborn grease spots that refuse to budge from your crisper plate? Your Ninja Flip Air Fryer deserves better treatment. Proper cleaning isn’t just about appearances—it’s the secret to achieving crispy, evenly-cooked meals every single time. When you learn how to clean Ninja Flip Air Fryer components correctly, you’ll extend its lifespan, maintain peak performance, and prevent those frustrating cooking issues that make you wonder if it’s time for a replacement. This comprehensive guide delivers every step you need to restore your air fryer to pristine condition, from quick daily wipe-downs to deep monthly maintenance routines that keep your appliance functioning like new.
Never Skip the Cooling Period Before Cleaning
Rushing to clean while your air fryer is still hot causes more damage than you realize. Your Ninja Flip retains heat like a small oven, with metal components staying dangerously hot long after cooking ends—sometimes exceeding 400°F.
Follow the 30-minute rule: Set a timer after your last cooking cycle. This critical waiting period protects you from burns and prevents thermal shock that can damage the non-stick coating when cold water meets hot surfaces. The exterior might feel cool while internal components remain scalding.
Test for safety: Hold your hand 2 inches above the basket handle. If you feel heat radiating, wait another 10-15 minutes. Never assume it’s cool enough based on the outside appearance—this precaution prevents painful burns and costly mistakes when you’re trying to clean Ninja Flip Air Fryer components.
Unplug Before Any Cleaning Action Begins
Electrical safety is non-negotiable: Pull the plug from the wall outlet before touching anything else. Water and electricity create permanent damage—never let the main unit near your sink or submerge electrical components. This simple step prevents dangerous shocks and expensive replacements.
Create your cleaning station:
– Clear countertop space with towel underneath
– Warm water in sink or large basin
– Mild dish soap (avoid harsh chemicals)
– Non-abrasive sponge and soft brush
– Microfiber cloths for drying
Protect your surfaces: Place the air fryer on a thick towel or silicone mat. Cleaning solutions can stain countertops, especially if they contain vinegar or baking soda. This preparation makes your how to clean Ninja Flip Air Fryer process efficient and mess-free.
Remove All Components Properly
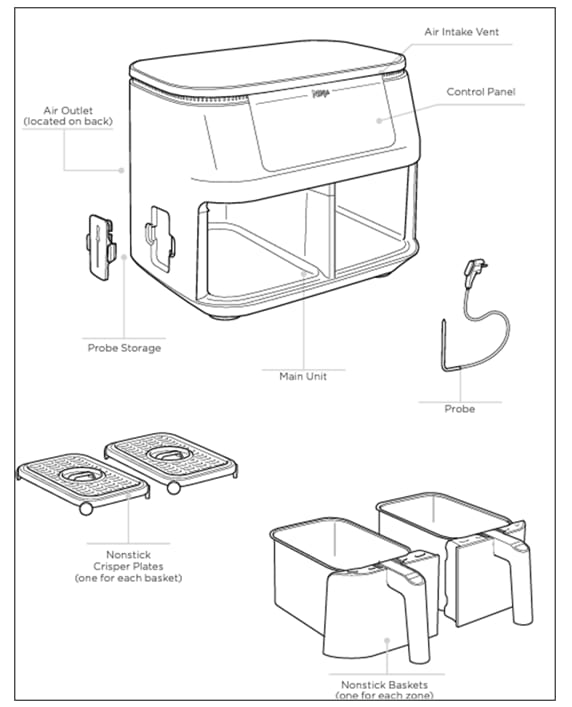
Basket removal: Grip the handle firmly and pull straight toward you. The Ninja Flip’s basket slides smoothly on built-in tracks—no wiggling needed. Set aside on your protected surface. Forcing the basket can damage the sliding mechanism.
Crisper plate extraction: Inside the basket sits the perforated metal tray responsible for that crispy finish. Use the provided removal tool or heat-resistant tongs to lift it out. Check plate edges for stuck-on food that cooked onto the rim—this hidden debris causes uneven cooking.
Accessory check: Remove any additional racks, skewers, or baking pans used during cooking. Each piece needs individual attention during cleaning. Never leave accessories inside when storing—residue attracts pests and creates stubborn odors.
Clean Basket and Crisper Plate Correctly
Dislodge Loose Debris First
Turn both components upside down over your trash can. Tap gently to dislodge loose crumbs and food particles. Use a soft-bristled brush to sweep out stuck bits from crisper plate perforations—work from multiple angles to ensure complete removal. This preliminary step prevents clogged holes that disrupt airflow.
Soak in Proper Cleaning Solution
Fill your sink with the hottest tap water your hands can tolerate. Add just 2-3 drops of mild dish soap—too much creates film that’s difficult to rinse. Submerge both pieces completely, ensuring water flows through all crisper plate holes. Set your timer for 15 minutes while the solution breaks down baked-on residue. Never use boiling water as it can warp plastic components.
Effective Scrubbing Techniques
After soaking, use your non-abrasive sponge in circular motions:
– Basket walls: Clean both interior and exterior, paying attention to the handle attachment points
– Crisper plate: Focus on perforations where oil accumulates
– Bottom surface: This collects the most grease—give extra attention
– Handle crevices: Use a soft brush for tight spots
Pro tip: For mesh areas, use a soft toothbrush in gentle back-and-forth motions rather than aggressive scrubbing that damages non-stick coatings.
Complete Rinse and Dry Protocol
Rinse under warm running water until zero soap residue remains. Check crisper plate holes—hold up to light to verify no food particles block airflow. Place on a clean dish rack for 30 minutes of air drying. Speed up drying by patting with microfiber cloth, but ensure crevices are moisture-free to prevent rust. Never reassemble while damp—this causes steam issues during next use.
Interior Cavity Deep Cleaning Process
Remove Hidden Crumbs and Debris
With the basket removed, carefully flip the entire unit upside down over your trash can. Most debris collects in the bottom cavity—give it a gentle shake. Use a soft brush to sweep out particles from the heating element area, working from the back toward the front opening. This prevents smoke during next use.
Clean Walls Without Damaging Components
Dampen your microfiber cloth with warm, soapy water. Wipe systematically:
– Side walls: Use vertical strokes to prevent streaking
– Top heating element cover: Gentle circular motions, avoiding direct contact with elements
– Bottom surface: Where the basket sits—usually the greasiest area
– Door seal: For flip models, clean the rubber gasket thoroughly
Critical warning: Never spray cleaning solutions directly into the interior—moisture can damage electrical components.
Heating Element Maintenance
Use a soft, dry brush (never wet) to gently sweep heating elements. Work parallel to the coils, not across them. This removes carbonized food particles without damaging the delicate metal. If elements look heavily soiled, apply baking soda paste (2 tbsp baking soda + 1 quart water) with a soft cloth, wait 15 minutes, then brush dry.
Monthly Deep Cleaning Solutions
Eliminate Stubborn Grease Buildup
Create a powerful cleaning paste: 2 tablespoons baking soda mixed with 1 quart warm water. Apply with a soft brush to areas showing stubborn grease accumulation. Let sit 15 minutes—set another timer—before scrubbing gently. This breaks down baked-on oils without harsh chemicals that damage surfaces.
Remove Persistent Odors
For lingering smells after you clean Ninja Flip Air Fryer, create this odor-eliminating paste:
– ½ cup baking soda
– 2-3 tablespoons water (add slowly for toothpaste consistency)
– 5 drops lemon essential oil (optional but effective)
Apply to interior surfaces using a soft cloth. The baking soda absorbs odors while lemon provides fresh scent. Let sit 30 minutes, then rinse thoroughly. Run empty at 400°F for 5 minutes to eliminate any remaining cleaning solution smell.
Flip Mechanism Special Care
The hinge mechanism on flip models needs extra attention. Clean the flip area with damp cloth, ensuring no food debris accumulates in the mechanism. Apply a tiny amount of food-grade silicone lubricant to hinges quarterly—think “grain of rice” size. This prevents squeaking and ensures smooth operation that extends your appliance’s lifespan.
Reassembly Verification Checklist
Confirm Complete Dryness
Before putting everything back together:
– [ ] All parts completely dry (zero moisture in crevices)
– [ ] Crisper plate sits flat without wobbling
– [ ] Basket slides smoothly on tracks
– [ ] Door closes securely with proper seal
Critical test: Shake each component near your ear—if you hear water sloshing, it’s not dry enough. Reassembly while damp causes steam issues and electrical problems.
Final Performance Test
Run the empty unit at 350°F for exactly 3 minutes. This serves two purposes: eliminates any remaining moisture that could cause steam issues, and verifies everything works correctly after cleaning. Listen for unusual sounds—grinding indicates improper reassembly that requires disassembly and correction.
Maintenance Schedule for Longevity
After Each Use:
– Empty basket completely
– Quick wipe of interior surfaces
– Clean crisper plate if used
Weekly Deep Clean:
– Complete basket and plate washing
– Exterior surface wipe-down
– Check for accumulated debris
Monthly Overhaul:
– Deep clean entire unit
– Inspect for wear or damage
– Deodorize if necessary
Quarterly Inspection:
– Comprehensive component check
– Professional assessment if issues found
– Review warranty coverage for replacements
Consistent maintenance prevents buildup that becomes impossible to remove. Your future self will thank you for these 15-minute cleaning sessions that keep your Ninja Flip delivering restaurant-quality results meal after meal. When you master how to clean Ninja Flip Air Fryer properly, you’ll extend its lifespan by years while ensuring optimal cooking performance every time you use it.


