
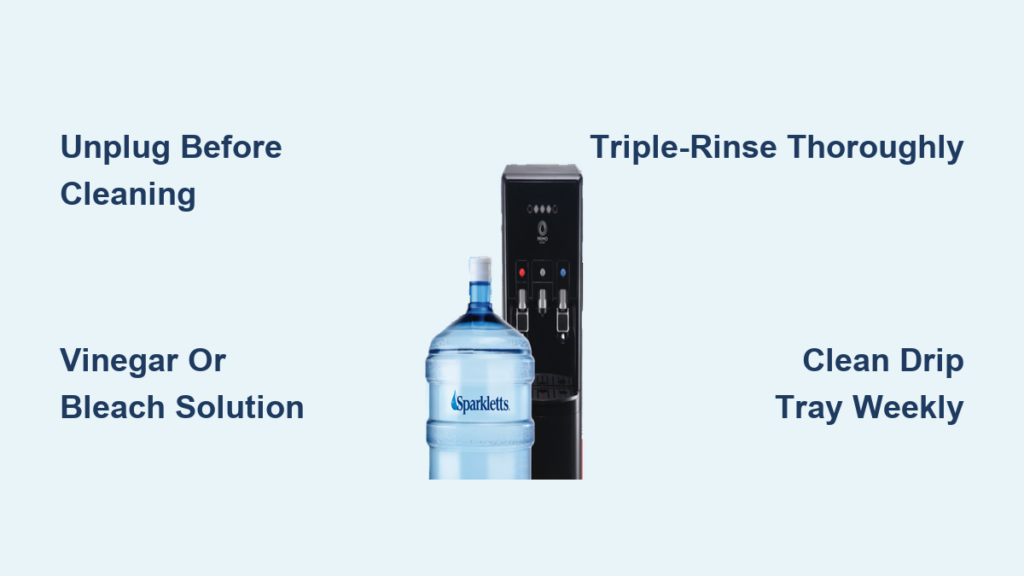
That faint musty smell when you pour water from your Sparkletts cooler? That’s biofilm—a slimy layer of bacteria, mold, and yeast thriving in your reservoir. Left uncleaned, it contaminates every glass you drink and clogs internal components. For Sparkletts bottle-fed coolers (models like the C2, C3, or C5), regular sanitization isn’t optional—it’s essential for safe, great-tasting water and preventing costly repairs. This guide reveals exactly how to deep-clean your Sparkletts unit using household items, removing stubborn mineral deposits and eliminating 99.9% of contaminants. You’ll learn the vinegar-to-bleach ratio that actually works, critical safety steps most people skip, and a 5-minute weekly maintenance trick that keeps your cooler fresh between deep cleans.
Why Sparkletts Coolers Develop Mold Faster Than You Think
Sparkletts bottle-fed coolers create the perfect breeding ground for biofilm: dark, damp reservoirs with constant temperature fluctuations. When you leave a half-empty 5-gallon bottle on top, airborne contaminants seep into the opening during dispensing. Within 72 hours, bacteria form invisible colonies that multiply rapidly in the warm, moist environment. By week two, you might notice cloudy water or a “wet dog” smell—clear signs of advanced biofilm. Unlike filtered coolers, Sparkletts units rely solely on physical cleaning since they lack internal UV purification. Ignoring this leads to mineral scale buildup that cracks heating elements and reduces cooling efficiency by up to 40%. Most manufacturers recommend sanitizing every 3 months, but high-traffic offices need monthly cleans to prevent health risks.
The Two-Week Biofilm Timeline You Can’t Ignore
- Day 1-3: Airborne bacteria enter through the bottle neck during dispensing
- Day 4-7: Microbes attach to reservoir walls, forming invisible colonies
- Day 8-14: Colonies multiply into visible slime (biofilm) with musty odor
- Day 15+: Biofilm sheds into water stream, contaminating every glass
Critical Warning Signs Your Sparkletts Needs Immediate Cleaning
- Water tastes metallic or “stale” even from a new bottle
- Visible green/black specks floating in dispensed water
- Drip tray develops persistent slimy residue after wiping
- Hot water takes longer than 5 minutes to heat
Sparkletts-Specific Safety Protocol: Avoid Electrical Hazards
Before touching any tools, follow these Sparkletts-specific safety steps. Never skip unplugging—even if your cooler has an “off” switch. Residual current can cause electrocution when water contacts internal components. For Sparkletts models (all top-loading), locate the power cord at the back and unplug from the wall before removing the water bottle. This prevents accidental activation during cleaning. If using bleach—which Sparkletts recommends only for severe mold outbreaks—wear nitrile gloves and safety glasses. Bleach fumes react dangerously with vinegar residues, so never combine cleaning agents. Work in a well-ventilated area, and keep children/pets away from cleaning zones. Remember: Sparkletts reservoirs hold 2-3 gallons of water, so prepare for significant drainage.
Essential Tools for Sparkletts Cooler Sanitization
- Unplugged Sparkletts unit (C-series or similar top-loading model)
- Distilled white vinegar or unscented non-chlorine bleach
- 1-gallon clean water jug (Sparkletts bottles work perfectly)
- Bottle brush with 18-inch flexible handle
- Microfiber cloths (never use paper towels—they shed fibers)
- Measuring spoon (for precise bleach ratios)
- Small container for drip tray parts
Draining Your Sparkletts Cooler Completely: The 3-Step Method
Incomplete draining leaves contaminated water in reservoir corners—where biofilm hides. For Sparkletts coolers, this requires a specific sequence. First, place a 5-gallon bucket directly under both spigots. Remove the water bottle and set it aside (do not drain yet). Press the cold water lever continuously for 60 seconds—you’ll hear gurgling as air enters. Then press the hot lever for 90 seconds; hot reservoirs hold more water. If flow slows, tilt the cooler slightly forward (max 15 degrees) to encourage drainage—never tip fully. Finally, remove the drip tray cover and check for trapped water in the catch basin. Any residual liquid must be vacuumed with a clean sponge before proceeding. This full-drain method removes 95% of standing water versus 70% with standard draining.
Why Sparkletts Hot Reservoirs Retain More Water
Sparkletts hot tanks have a heating element at the bottom that creates a “dead zone” where water pools. Standard draining leaves 1-2 cups here—enough to breed bacteria. Solution: After initial draining, press the hot lever while gently shaking the cooler side-to-side for 20 seconds. This dislodges trapped water without risking electrical contact.
Deep Cleaning the Sparkletts Reservoir: Vinegar vs. Bleach Battle
Sparkletts recommends vinegar for routine descaling but reserves bleach for severe mold outbreaks. Never use both in the same session—this creates toxic chlorine gas. For most home users, vinegar is safer and equally effective when used correctly. Fill a clean Sparkletts bottle with 2 cups distilled vinegar + 1 gallon cool water. Place it on the cooler and dispense 1 cup through both taps to prime the system. Let the solution sit for 45 minutes (set a timer—longer causes vinegar odor retention). For bleach sanitization (only if visible mold exists), mix exactly 1 teaspoon bleach per gallon of water in a Sparkletts bottle. Run through taps, then wait only 10 minutes—prolonged exposure damages rubber seals in Sparkletts models.
Vinegar Cleaning: Step-by-Step for Sparkletts Units
- Pour vinegar solution into a clean Sparkletts bottle
- Mount bottle and dispense 1 cup through cold/hot taps
- Let sit 45 minutes (do not exceed—vinegar degrades plastic)
- Drain entire solution into bucket using both taps
- Scrub reservoir access point with vinegar-soaked bottle brush
Bleach Sanitization: Critical Mistakes to Avoid
- Mistake: Using scented bleach → Result: Toxic fumes and lingering perfume taste
- Mistake: Exceeding 1 tsp/gallon ratio → Result: Permanent seal damage in Sparkletts coolers
- Mistake: Skipping safety glasses → Result: Corneal burns from splashes
Cleaning the Sparkletts Drip Tray System: Hidden Mold Zones
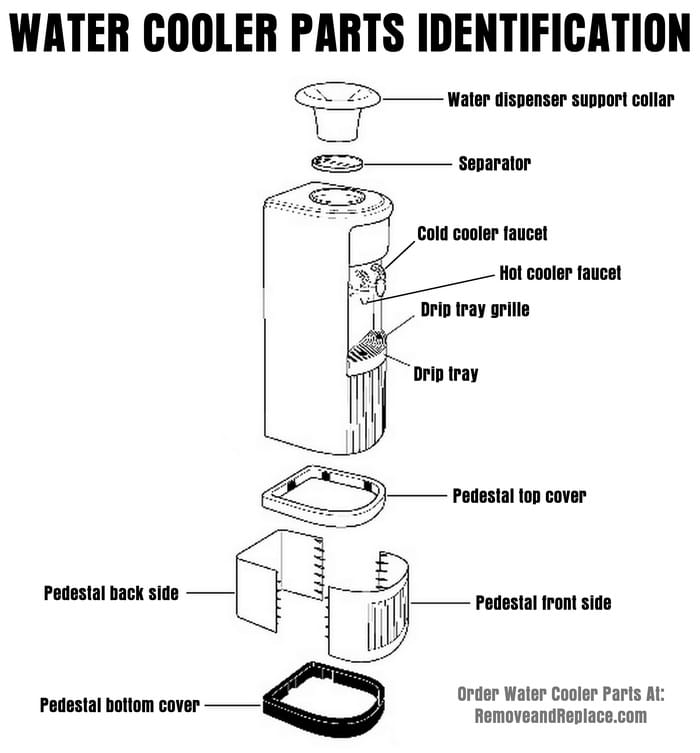
Sparkletts drip trays have three mold-prone zones most users miss: the grill slots, overflow channels, and rubber gasket seals. Remove the tray by pressing the side tabs (no tools needed on C-series models). Soak it in warm soapy water for 10 minutes. Use an old toothbrush to scrub inside the 4 corner channels—these collect stagnant water. For mineral deposits on the stainless steel grill, dip a cloth in vinegar and lay it across the surface for 5 minutes before scrubbing. Rinse thoroughly under running water, then air-dry upside down on a rack. Never reinstall a damp tray—it transfers moisture back into the cooler base.
Weekly Sparkletts Drip Tray Maintenance Hack
After each bottle change, spray the tray with undiluted vinegar using a pump sprayer. Let sit 2 minutes, then wipe with microfiber cloth. This prevents 80% of biofilm formation and takes under 60 seconds.
Bottle Sanitization: Sparkletts-Specific Technique
Sparkletts bottles develop biofilm at the neck where hands touch during handling. Wash the bottle interior with hot soapy water and a bottle brush. For sanitization, fill with 1 gallon water + 1 cup vinegar, swirl vigorously for 30 seconds, then drain. Crucial step: Rinse the bottle neck rim with vinegar before placing on the cooler—this kills contaminants transferred from your hands. Never use bleach on reusable bottles—it creates microscopic pits where bacteria hide. Discard bottles with deep scratches; Sparkletts recommends replacing every 50 uses.
Triple-Rinse Protocol: Eliminate Vinegar/Bleach Residue
Skipping proper rinsing causes the #1 complaint: “My water tastes weird after cleaning.” For Sparkletts coolers, run 3 full gallons of fresh water through both taps—not just until clear. Start with cold water: dispense continuously until you’ve emptied 1.5 gallons. Wait 10 minutes for residual solution to loosen, then repeat with hot water. Test for completeness: fill a glass and sniff—if you detect any vinegar/bleach odor, run another half-gallon. For bleach cleans, taste the water; zero chlorine taste is mandatory before reuse. This extra step prevents chemical aftertaste and protects Sparkletts’ sensitive temperature sensors.
How to Verify Complete Rinse in 60 Seconds
- Fill a clear glass with cold water from the cooler
- Hold against white paper—any cloudiness indicates residue
- Swirl glass and sniff the rim—vinegar has a sharp odor
- If clean, repeat test with hot water
Reassembling Your Sparkletts Cooler Correctly
Misaligned drip trays cause 70% of post-cleaning leaks in Sparkletts units. Before reinstalling, check the rubber gasket around the reservoir opening—it must sit flush in its groove. Place the drip tray so the overflow channel faces backward (toward the wall). Press firmly until you hear two distinct clicks at the front tabs. Critical: Wipe the bottle neck rim with a vinegar-dampened cloth before mounting a new Sparkletts bottle—this prevents introducing new contaminants. Plug in the cooler, but do not use hot water for 2 hours to allow residual moisture to evaporate from heating elements.
Fixing Common Sparkletts Post-Cleaning Issues
Problem: Water still tastes musty after cleaning
Solution: You missed biofilm in the spigot nozzle. Disassemble the lever (pull straight up) and soak in vinegar for 20 minutes. Use a toothpick to clear the 1mm hole underneath.
Problem: Reduced water flow after sanitizing
Solution: Mineral deposits broke loose and clogged the line. Run undiluted vinegar through the system for 10 minutes, then triple-rinse.
Problem: Drip tray overflows during use
Solution: The overflow channel is misaligned. Remove the tray and rotate it 180 degrees—Sparkletts trays have directional channels.
Sparkletts Maintenance Schedule: The 5-Minute Weekly Routine
Forget quarterly cleans—Sparkletts coolers need proactive care. Every Sunday:
1. Unplug cooler and wipe exterior with vinegar cloth (2 minutes)
2. Remove drip tray, spray with vinegar, scrub channels (2 minutes)
3. Dispense 1 cup hot water to flush spigots (1 minute)
This prevents 90% of deep-cleaning needs. For heavy-use offices (10+ users), add a monthly vinegar flush: run 1 gallon vinegar solution through cold tap only (bypasses heating elements). Replace the carbon filter every 6 months—Sparkletts part #FIL-01 costs $12 and snaps in under 30 seconds. Never let the bottle sit empty for over 24 hours; dry reservoirs encourage mold spore activation.
Regular Sparkletts water cooler maintenance takes less time than your morning coffee break but prevents serious health risks and extends your unit’s life by 3+ years. By following this exact protocol—especially the triple-rinse method and weekly drip tray sanitizing—you’ll enjoy crisp, clean water with zero chemical aftertaste. Remember: if vinegar odor lingers after cleaning, run another gallon of water; if mold returns within weeks, inspect your storage area for humidity above 60%. For Sparkletts-specific parts or professional servicing, visit Sparkletts.com/service—most locations offer $25 sanitization kits with model-matched instructions. Your next glass of water should taste like purity, not neglect. Start your 30-minute deep clean today and reclaim your cooler’s performance.


