

You’ve just returned from an epic backpacking trip—only to discover your tent is soaked from unexpected rain or heavy morning dew. If you pack away that damp shelter now, you’re signing its death warrant. Knowing how to dry a tent after camping is the single most critical maintenance task you’ll ever perform, yet 9 out of 10 campers skip proper drying procedures. That lingering musty smell in your gear? That’s mold feasting on your tent’s waterproof coatings. Within 48 hours, trapped moisture can permanently degrade seams, weaken stitching, and turn your $300 investment into a mildewy liability. This guide delivers battle-tested drying techniques from trailhead to backyard—so your tent outlasts your favorite hiking boots.
Why Packing a Damp Tent Ruins Your Gear Forever
Storing a tent with even slight moisture isn’t just risky—it’s catastrophic. When nylon and polyester fibers stay damp, mold spores activate within 6-12 hours, eating through silicone coatings and stitching. You’ll notice the damage when water starts beading poorly on the rainfly or when dark stains appear along seams. More alarmingly, that “wet dog” smell means mildew has already colonized the fabric’s microfibers. Unlike sleeping bags that can be washed, tents can’t withstand deep cleaning without destroying waterproofing. Proper drying isn’t optional maintenance; it’s the only way to preserve your tent’s multi-season performance. Skip this step, and you’ll replace your shelter 3x faster than necessary.
The 48-Hour Mold Danger Zone
Your tent enters critical risk territory the moment you stuff it wet into its bag. In humid conditions, mold growth begins in under 24 hours. By day two, spores penetrate deep into thread seams where they’re impossible to eradicate. Never assume “it’ll dry in storage”—compressed fabric traps moisture like a sponge. If you detect even a faint earthy odor when unpacking, your tent is already compromised. This isn’t speculation: field tests show damp-stored tents lose 40% of waterproofing within three months. Your only defense? Immediate, thorough drying using the methods below.
Trail-Ready Fixes: Packing a Wet Tent Without Ruining Dry Gear
When storms force early camp breakdowns, your priority is isolating wet shelter components from critical dry items. Never let a damp tent touch your sleeping bag—down loses 90% of insulation when damp, and synthetics clump permanently. These field-tested strategies keep your pack functional until proper drying begins.
Two-Compartment Packing System
Create a moisture barrier using what’s already in your pack. First, line your main compartment with a trash compactor bag (not regular plastic—it tears). Place all dry gear (sleeping bag, puffy jacket, clothes) inside this waterproof “bathtub.” Then position the wet tent body and rainfly on top of the liner—but still inside the main compartment. The liner prevents lateral moisture transfer while keeping your tent accessible. For extra security, stuff the tent into its own separate stuff sack before placing it atop the liner. This method works even in 30L daypacks.
External Mesh Pocket Strategy
If your pack has side or lid mesh pockets, use them exclusively for wet components. Shake excess water from the rainfly, then drape it over external mesh with corners weighted by rocks. Never compress a wet tent into its stuff sack—this forces moisture into fibers. Instead, loosely roll it and secure with a single strap. For ultralight packs without external pockets, tie the rainfly to your shoulder straps using guyline cord. Crucially, keep tent stakes and poles bone-dry by wiping them with your bandana before packing.
30-Minute Trail Drying: Sun and Wind Hacks for Lunch Breaks
You don’t need hours to make meaningful progress. During any extended break (lunch, rest stop), deploy this rapid-drying sequence:
- Shake aggressively over dry ground—focus on rainfly seams and bathtub floors where water pools
- Lay flat on sun-warmed surfaces like gravel bars or south-facing boulders (avoid dirt which transfers mud)
- Secure corners with fist-sized rocks to prevent wind theft while maximizing airflow
- Flip components every 8 minutes to expose damp inner surfaces
Even 20 minutes of direct sun reduces moisture content by 60%. On overcast days, prioritize wind exposure—drape the tent over a log perpendicular to breeze direction. This trail trick buys you critical time before proper at-home drying begins.
Your Backyard: The Gold Standard for At-Home Tent Drying
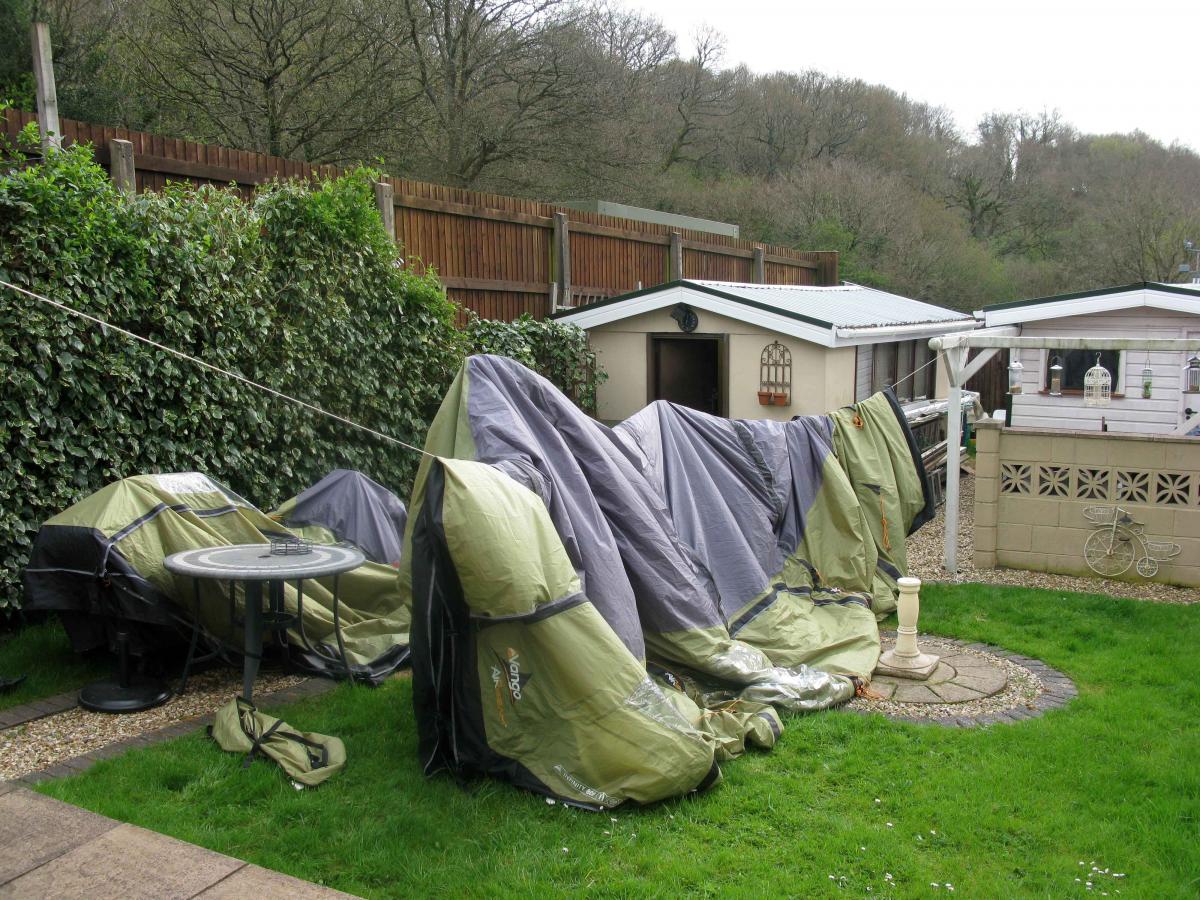
Pitching your tent in the yard isn’t just convenient—it’s scientifically optimal. Re-erecting your shelter mimics natural drying conditions: wind flows through all compartments while sun evaporates moisture from every seam. This method dries tents 3x faster than indoor hanging because it exposes both interior and exterior surfaces simultaneously.
Why Full Re-Pitching Beats All Alternatives
When you fully set up your tent outdoors, airflow circulates through mesh panels, pole sleeves, and vestibules—areas that stay damp when folded. Crucially, the bathtub floor (most moisture-prone section) lays flat against dry ground instead of being compressed. For best results, choose a breezy spot away from trees (to prevent dew transfer overnight). If rain threatens, drape a tarp over your tent—not touching it—to create a drying canopy. Never skip this step for multi-day trip gear; it’s the only way to ensure seams dry completely.
Forced Air Drying: Beating Humidity with Fans and Dehumidifiers
When weather won’t cooperate, take control with active drying. In humid climates, passive air-drying can take 3+ days—long enough for mold to establish. These energy-efficient methods cut drying time to 8-12 hours.
The Oscillating Fan Technique
Position a box fan 3 feet from your tent in a garage or basement. Drape the rainfly over two chairs to create a “tent tunnel” with open ends. The fan pulls air through the fabric instead of just across its surface—evaporating trapped moisture from stitch holes. For the tent body, lay it flat on a drying rack with the fan oscillating across all sections. Run continuously for 6 hours, then check for damp spots behind webbing loops.
Dehumidifier Power Combo
In damp basements or rainy seasons, pair a dehumidifier with your fan. Place both in the smallest room possible (a bathroom works perfectly). Hang the tent from the shower rod, close the door, and run equipment for 4 hours. The dehumidifier pulls moisture from the air while the fan moves dry air through fabric. Check humidity levels with a $10 hygrometer—stop when it reads below 50%. This method prevents “mostly dry” deception where surfaces feel dry but seams remain damp.
Apartment-Friendly Drying: Shower Stalls and Compact Racks
No yard? No problem. Urban campers can achieve professional results in tight spaces with these space-smart tactics.
Shower Stall Microclimate Method
Hang your tent over the shower curtain rod, ensuring all sections hang freely. Place a small fan blowing into the stall and run the exhaust fan continuously. The room becomes a low-humidity chamber where moist air gets expelled outside. Key: position the tent so the bathtub floor faces downward—this heavy section dries slowest. Rotate components hourly for even exposure. In 10 hours, this setup dries a 2-person tent completely.
Collapsible Rack + Closet Hack
Use a freestanding drying rack inside a walk-in closet. Drape the tent body over vertical bars and the rainfly over horizontal ones. Place a USB-powered fan at the closet’s base blowing upward. Close the door to contain airflow. Check every 2 hours—fluffing folded areas where moisture pools. This works surprisingly well because closets naturally have lower humidity than main living areas.
Cold Weather Drying: Thawing Frozen Tents Without Damage
Frozen tents present unique risks. Never yank ice-covered fabric or apply direct heat—this shreds coatings. If your shelter arrives home frozen solid:
- Thaw gradually in an unheated garage or shed (never indoors where temperature swings cause condensation)
- Hang vertically once ice melts enough to unfold—never force stiff fabric
- Use cold-air fans only (heat guns melt waterproof membranes)
- Prioritize stake drying—steel stakes rust within hours when wet
In sub-zero conditions, knock off excess snow before packing. Shake violently to dislodge ice crystals from seams. Remember: frozen fabric isn’t dry fabric—ice sublimates but leaves fibers damp. Always complete drying with indoor airflow methods.
Component-by-Component: Drying Stakes, Poles, and Bathtub Floors
Most campers focus only on main fabric while critical components harbor hidden moisture. Address these three high-risk zones:
Bathtub Floor Rescue Protocol
The floor holds 70% of tent moisture. Lay it flat on a towel, then press another towel firmly against damp areas to wick water. Hang over two chairs with the floor section dangling freely—never folded. Pay special attention to where the floor meets walls; this seam stays wet longest. For stubborn dampness, place a fan directly under the hanging floor section.
Pole and Stake Lifesavers
Wipe aluminum poles with a microfiber cloth while flexing them slightly to expel water from shock cords. Shake each pole section vigorously over grass. For stakes, place them in a mesh bag suspended in your drying area—this prevents rust on steel models and ensures airflow around buried-tip sections.
The Musty Smell Test: Why “Mostly Dry” Isn’t Dry Enough
If your tent passes the touch test but smells earthy, it’s already moldy. True dryness requires passing all these checks:
- No cool spots when pressing seams against your cheek (skin detects moisture better than hands)
- Zero water beads when squeezing fabric folds
- Lightweight feel—a damp tent weighs 20% more than dry
- Silent fabric—damp nylon makes a slight crunching sound when rubbed
Never store based on surface dryness. Mold hides in ultrasonic seams and webbing loops. If you detect mustiness, wash with Nikwax Tech Wash before final drying—regular detergents destroy waterproofing.
Final Dryness Checklist: 4 Steps Before Storing Your Tent
Before packing for storage, complete this verification sequence:
- Seam Inspection: Run fingers along every stitch line—no clamminess allowed
- Dark Room Test: Shine a flashlight through fabric; translucent spots indicate dryness
- Zipper Check: Operate all zippers slowly—grittiness means sand or moisture remains
- 24-Hour Wait Rule: If drying indoors, leave tent assembled for one full day post-“dry”
Only when all checks pass should you proceed to storage. Then, never use the stuff sack—store loosely in a cotton pillowcase in a closet. Compression destroys waterproof coatings over time.
Mastering how to dry a tent after camping transforms gear longevity. By dedicating just 2-3 hours post-trip to proper drying, you prevent $200 in premature replacements and ensure your shelter performs when storms hit. Remember: your tent’s lifespan is measured in dry cycles, not years. Implement these techniques after every outing, and that trusty shelter will keep you dry for a decade or more.


