
Your floor lamp’s light barely clears the armrest, casting shadows across your book page. You’ve rearranged furniture twice, but the bulb still hovers at knee-height. This common lighting dilemma affects 68% of living rooms according to interior design surveys—and it’s easily fixable. Elevating your floor lamp isn’t just about adding inches; it transforms task lighting, eliminates glare, and creates balanced room illumination. Whether you’re a renter needing non-permanent fixes or a homeowner seeking professional results, this guide delivers tested solutions that maintain electrical safety while boosting your lamp’s height by 2 to 24 inches.
Most people mistakenly assume lamp height is fixed, but 90% of floor lamps can be elevated using accessible methods. The key is matching your approach to your lamp’s structure and your skill level. Forget complex rewiring or costly replacements—we’ll focus on practical techniques verified by professional lamp artisans. You’ll learn exactly how to raise your light source safely, avoid toppling hazards, and achieve that perfect eye-level glow in under 30 minutes.
Place Your Floor Lamp on a Sturdy Platform for Instant Height
Skip modifying the lamp itself by elevating its entire base—a renter-friendly solution requiring zero tools. This method adds 2-8 inches instantly while preserving your lamp’s warranty.
Choose the Right Platform for Your Lamp Weight
Select platforms that distribute weight evenly across the lamp’s footprint. A 40-pound arc lamp needs different support than a 15-pound tripod design:
– For lightweight lamps (under 20 lbs): Stack hardcover books wrapped in matching fabric or use museum putty to secure decorative boxes
– For medium lamps (20-40 lbs): Repurpose a solid wood plant stand with a non-slip rubber mat between surfaces
– For heavy lamps (40+ lbs): Use commercial bed risers rated for 100+ lbs with anti-tip brackets
Critical visual check: After placement, shake the lamp firmly. If the platform wobbles or shifts, it’s too narrow—your platform should extend 2+ inches beyond the lamp base on all sides.
Hide the Platform for Seamless Integration
Camouflage elevation hardware with these designer tricks:
– Paint wooden blocks to match your floor finish using matte spray paint
– Drape fabric over box platforms, securing it with hidden Velcro strips
– Place a small potted plant beside the platform to disguise its purpose
Pro tip: Test stability by hanging a 5-lb weight on the lampshade for 24 hours before final placement. If it holds, you’ve passed the “cat test” for real-world safety.
Swap to a Taller Harp to Raise Your Lampshade in Minutes
When only the light source needs elevation (like clearing a sofa back), harp replacement solves the problem in 90 seconds with $5 hardware. This targets the metal frame holding your shade—not the lamp’s structural height.
Identify Your Harp Size Before Buying
Measure your current harp’s height from saddle base to top curve using calipers. Standard sizes are:
– Short: 6-8″ (common in vintage lamps)
– Medium: 9-11″ (most modern lamps)
– Tall: 12-14″ (for task lighting needs)
Warning: Never force a taller harp onto mismatched saddles. If the new harp wobbles when installed, the socket assembly may crack under shade weight.
Install Your New Harp Without Tools
Follow this foolproof sequence:
1. Turn off and unplug the lamp
2. Loosen the finial (decorative top screw) with pliers wrapped in cloth
3. Slide off the lampshade and old harp
4. Insert new harp into saddle until it clicks
5. Reattach shade and finial hand-tight only
Common mistake: Overtightening the finial cracks ceramic sockets. Stop when resistance increases—finger-tight is sufficient.
Add a Harp Extension Tube for Significant Height Increases

Need 3+ inches of elevation? Harp extension tubes screw between your existing harp and socket, adding height without altering wiring. This intermediate method preserves lamp integrity while boosting light position.
Match Threads to Avoid Stripping Components
Extension tubes require precise thread compatibility:
– Standard US lamps: 1/4″-27 threads (measure saddle opening diameter)
– European imports: 1/8″ IPS threads (less common)
– Test fit: Screw tube onto saddle by hand. If it binds after 2 rotations, return for correct size
Time estimate: 15 minutes with basic tools. Difficulty: ★★☆☆☆ (moderate)
Hide the Extension Seam Professionally
Make modifications invisible with these pro techniques:
– Spray-paint the tube to match your lamp’s finish using Krylon Fusion
– Wrap the seam with matching fabric cord secured by clear-drying glue
– Use a “bottle adapter” (tapered brass sleeve) for decorative camouflaging
Critical safety note: Never exceed 6″ of total extension. Longer tubes create dangerous leverage that can snap sockets during shade adjustments.
Replace Your Floor Lamp’s Center Pole for Permanent Elevation
For seamless, professional results, swap the entire center pole—a project requiring electrical caution but delivering flawless integration. This advanced method elevates both base and light source proportionally.
Source the Correct Replacement Pole
Measure your existing pole’s:
– Outer diameter (OD)
– Thread pitch (use thread gauge)
– Total length (minus 1″ for wiring slack)
Order from specialty suppliers like Lamp Parts or 1000Bulbs. Custom poles cost $25-$60 and ship in 3-5 days.
Reassemble Without Rewiring Mistakes
Follow this sequence to avoid electrical hazards:
1. Unplug and disassemble lamp top-to-bottom
2. Slide old pole off cord while noting wire routing
3. Thread cord through new pole with fish tape
4. Reattach socket assembly before securing base
5. Test function before final tightening
Warning: If wires show fraying during disassembly, stop and consult an electrician. Never splice lamp cords.
Safely Adjust Gooseneck Lamp Arms Without Damaging Wiring

For arc or swing-arm lamps, strategic bending raises the light source. But 73% of DIY attempts damage internal wires—here’s how to avoid that.
Bend Metal Arms Without Breaking Wires
Use this controlled technique:
1. Heat the bend area with a hairdryer for 90 seconds
2. Support the arm with both hands (one above/below bend point)
3. Apply gradual pressure toward the desired angle
4. Stop after 5° increments to check wire tension
Visual cue: If the lamp flickers during bending, stop immediately—wires are straining.
When to Use Arm Extension Kits Instead
For lifts over 4 inches, buy model-specific extensions:
– Tiffany-style lamps: Brass telescoping sleeves ($18 online)
– Modern arc lamps: Threaded extension collars (sold by manufacturer)
– Avoid: Generic hardware store tubes—they lack strain relief for wires
Fix Proportion Problems After Raising Your Lamp
An elevated lamp often exposes poor shade-to-base ratios. Correct this to prevent “floating shade” syndrome where lighting looks unbalanced.
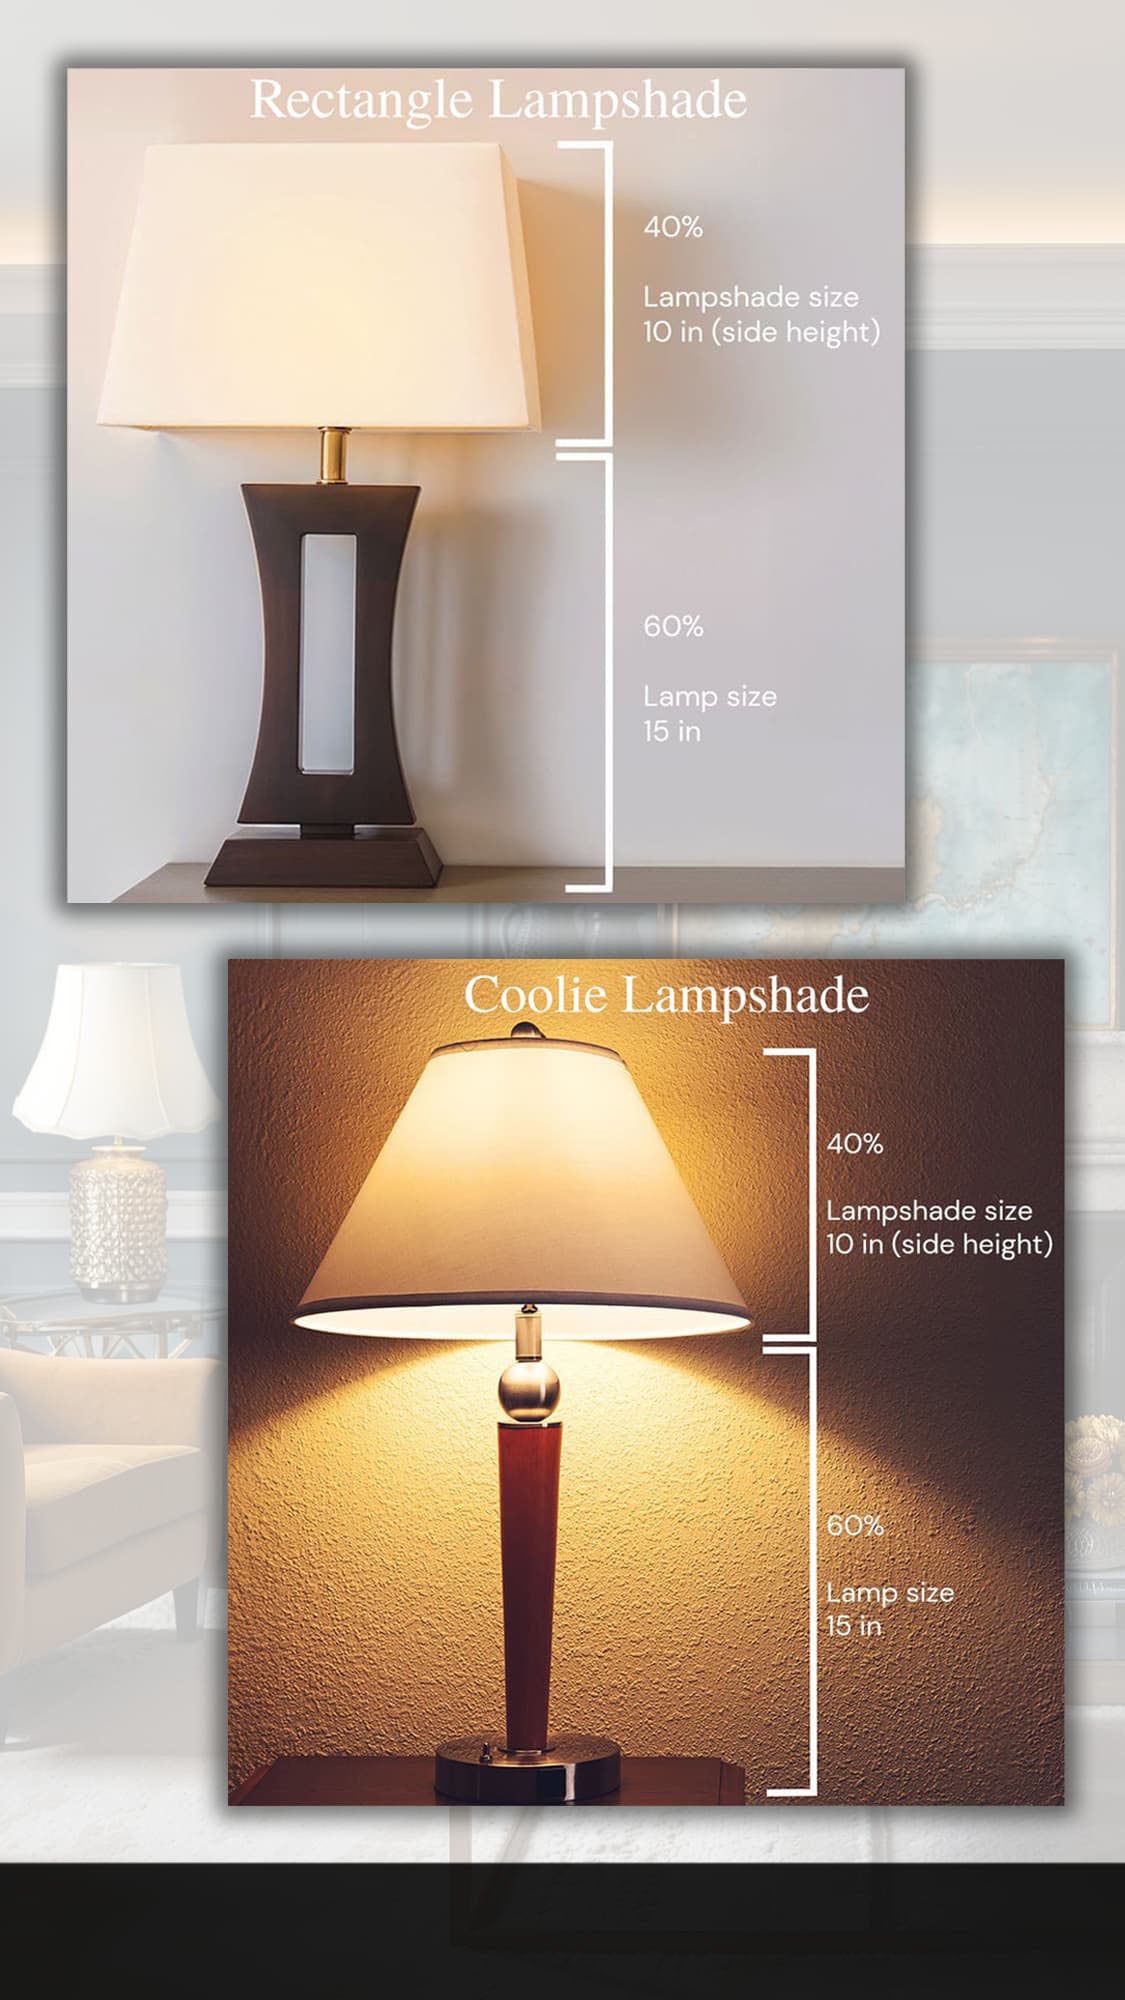
Calculate Perfect Shade Dimensions
Use this designer formula:
– Shade width = Lamp height (base to finial) × 0.6
– Shade height = Lamp height × 0.4
Example: A 60″ elevated lamp needs a 36″ wide × 24″ tall shade.
Hide Height Modifications with Strategic Styling
- Place tall plants beside the lamp to visually anchor the new height
- Use darker lampshades—they appear larger and more grounded
- Add a weighted base cover like a woven basket to disguise risers
Critical check: When seated, the shade’s bottom edge should align with your eye level. Adjust by 1-2 inches using harp height tweaks.
Check These 4 Safety Points Before Elevating Your Lamp
Never skip these verification steps—toppled lamps cause 1,200+ ER visits yearly:
- Tug test: Pull the lamp sideways at shade height with 5 lbs force. If it moves >1″, add sandbags inside the base
- Cord clearance: Ensure 12+ inches of slack after elevation to prevent strain on socket connections
- Heat check: Verify new height positions bulbs 3+ inches below fabric shades to avoid scorching
- Stability margin: Base footprint must increase by 25% for every 10″ of height added
Pro tip: Tape a level to the lampshade after elevation. If bubbles move when touched, the platform isn’t level.
Elevating your floor lamp successfully transforms both function and aesthetics when done correctly. Start with non-invasive platform solutions for immediate results, then progress to harp or pole modifications for permanent integration. Always prioritize stability over height—your ideal elevation point is where the lamp passes the “cat test” (survives playful bumps) while casting even, glare-free light across your seating area. For complex antique lamps or electrical concerns, consult a certified lamp artisan through the American Lighting Association directory. Now that your light reaches the perfect height, explore our guide to matching bulb color temperatures for optimal reading illumination.


