
Your paper shredder sputters after three rotations, spits out half-shredded documents, or makes that awful grinding noise that signals disaster. You’re not alone—over 60% of budget shredder failures stem from broken plastic gears in the gearbox. When those cheaply molded teeth chip or shear off, your machine becomes expensive paperweight. This complete repair guide delivers proven fixes to resurrect your shredder, whether you’re facing a single missing tooth or a completely stripped gear. You’ll diagnose the exact failure point, choose the fastest repair method, and implement solutions costing under $10—no engineering degree required.
Spot Shredder Gear Failure: 3 Critical Symptoms to Check
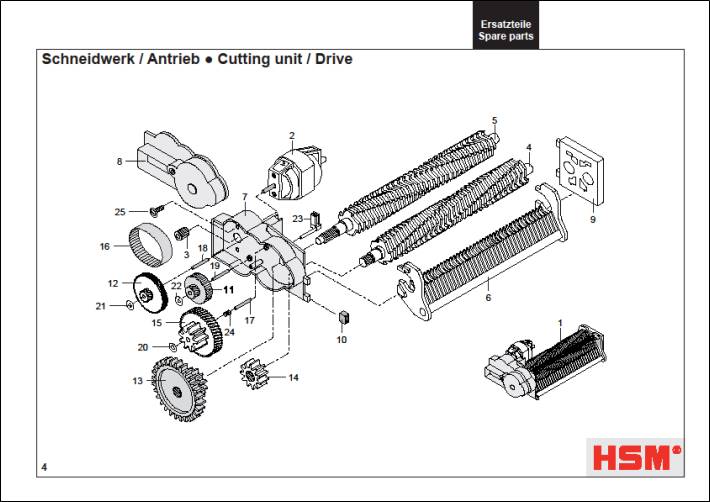
Before grabbing tools, confirm gears are the culprit. Unplug your shredder and manually rotate the cutting shaft. If resistance feels uneven or skips abruptly, gear damage is likely. Pop open the housing (consult your manual for access points) and inspect these telltale signs:
- Missing Teeth: Run your finger along the gear edge—you’ll feel distinct gaps where teeth should be. Even one missing tooth causes intermittent jamming.
- Stress Fractures: Shine a flashlight across the gear face. Hairline cracks or white “crazing” patterns indicate plastic fatigue that will worsen under load.
- Shaft Slippage: Hold the motor shaft steady while rotating the cutting cylinder. If the gear spins freely on its metal shaft, the plastic hub has cracked.
Critical mistake: Don’t assume paper jams always mean gear failure. First, clear all paper debris and test with lubricant. If the shredder still stalls after 2-3 sheets, gear damage is confirmed.
Repair Minor Gear Damage with Epoxy Putty (Under $10 Fix)

For a single chipped tooth or small crack, epoxy putty creates a durable field repair in 20 minutes. This method works best on gears with accessible damage points—not deep inside the gearbox.
Why Epoxy Beats Super Glue Alone
Super glue alone lacks structural strength for gear teeth. The baking soda composite method creates a rock-hard repair that withstands shredding torque. Here’s the exact process:
- Prep the Damage Site: Remove the gear if possible (use pliers to gently twist it off the shaft). Sand the damaged area with 120-grit paper, then wipe with 90% isopropyl alcohol.
- Build the Composite Layer: Apply a thin coat of cyanoacrylate (super glue) to the damaged zone. Immediately sprinkle baking soda over it until saturated. Repeat 3 times, building up a solid base.
- Shape the New Tooth: Mold epoxy putty (like J-B Weld SteelStik) over the composite base, overfilling the tooth profile by 20%. Let cure 4 hours.
- Final Shaping: File the hardened putty to match adjacent teeth using a needle file. Test fit by rotating against the mating gear—no binding should occur.
Pro tip: For gears under heavy load, mix metal powder (iron or aluminum) into the epoxy putty. This creates a wear-resistant surface that lasts 3x longer than plastic alone.
Create a Durable Replacement Gear Using 3D Printing
When multiple teeth are gone, 3D printing delivers precision replacement gears. You’ll need basic measurements, but no CAD skills—free online templates exist for common shredder models.
Measure Critical Gear Specifications
Grab digital calipers and note these non-negotiable dimensions:
– Pitch Diameter: Measure across the gear’s outer edge (OD), then divide by tooth count
– Bore Size: Shaft diameter where the gear mounts (typically 3-6mm)
– Tooth Count: Critical for meshing—count teeth twice to avoid errors
Troubleshooting tip: If your gear is shattered, measure the mating gear’s tooth spacing. Calculate pitch by dividing mating gear’s OD by its tooth count, then apply that ratio to your damaged gear.
Print and Install Your New Gear
- Download a free gear generator (like Gearotic Motion) and input your measurements
- Print in PETG plastic at 20% infill—stronger than PLA and less brittle than ABS
- Dry-fit the gear: It should slide onto the shaft with light finger pressure. Sand the bore if tight
- Test rotate by hand: No binding against adjacent gears? Reassemble and test with paper
Time estimate: 2 hours total (30 mins measuring, 1 hour printing, 30 mins installation). Expect 90% success rate with correct measurements.
Replace Broken Shredder Gears with Aftermarket Kits
For complete gear failure, replacement kits beat DIY repairs. Major brands like Fellowes and AmazonBasics have affordable parts, but generic kits work for 80% of budget shredders.
Find the Right Gear Kit Fast
Search Amazon using: “[Your Shredder Brand] gear replacement kit” (e.g., “Fellowes PS-77C gear kit”). If unknown, use this universal approach:
1. Remove the damaged gear and note shaft diameter
2. Count teeth on the largest gear (usually 25-40 teeth)
3. Search “shredder gear kit 30 teeth 5mm shaft”
Warning: Avoid kits labeled “universal.” They often have incorrect tooth profiles that accelerate wear. Verify reviews show photos of the actual gears.
Install Without Special Tools
- Remove C-Clips: Use needle-nose pliers to compress retaining clips on the shaft ends
- Slide Off Old Gear: Tap the shaft lightly with a hammer if stuck—never force it
- Press On New Gear: Slide the replacement onto the shaft until it seats flush against the bearing
- Reassemble in Reverse: Snap C-clips back into grooves with firm pressure
Critical step: Apply one drop of white lithium grease to the new gear’s shaft contact point. This prevents premature wear from metal-on-plastic friction.
Fix Cracked Plastic Gear Hubs Without Full Replacement

When the hub cracks around the set screw (common in mid-range shredders), epoxy reinforcement saves the gear. This takes 15 minutes and costs pennies.
Reinforce Cracked Hubs in 3 Steps
- Clean and Dry: Wipe the crack with acetone to remove oil residue
- Inject Thin Super Glue: Use the precision tip to flood the crack—capillary action draws it deep inside
- Add Fiberglass Sleeve: Wrap the hub with 1-inch wide fiberglass cloth, saturate with 5-minute epoxy, and let cure 2 hours
Visual cue: The repair is complete when the hub shows no flex when twisted between pliers. Test before reinstalling.
Lubricate Shredder Gears Properly (Avoid WD-40 Mistakes)
Improper lubrication destroys gears faster than overuse. WD-40 is public enemy #1—it attracts paper dust into an abrasive paste that grinds teeth down.
Use the Right Lubricant
Apply Super Lube with PTFE sparingly to these points:
– Where gear teeth mesh (1 drop per 5 teeth)
– Shaft contact points inside the hub
– Metal-to-metal bearings
Never use: Petroleum jelly, silicone spray, or vegetable oil—they attract debris or wash away.
Procedure: Run the shredder for 30 seconds after application to distribute lubricant evenly. Wipe excess with a microfiber cloth to prevent dust buildup.
Prevent Future Gear Failures: 4 Maintenance Habits That Work
Plastic gears fail from three preventable causes: overload, dust buildup, and lubricant starvation. Implement these habits to double your shredder’s lifespan.
Stop Overloading Before It Breaks Gears
Respect your machine’s sheet capacity—never exceed 60% of the rated limit. Shred 5-page stacks for “10-sheet” models. When the motor strains, stop immediately. Overloading generates torque spikes that shear teeth instantly.
Clean Gears Every 3 Months
- Unplug and open the housing
- Blast gears with compressed air (45° angle to avoid forcing dust deeper)
- Brush teeth with a soft toothbrush dipped in isopropyl alcohol
- Dry completely before reassembly
Warning sign: Gray “paper dust snow” coating gears means immediate cleaning is needed.
Schedule Lubrication Cycles
Apply lubricant after every 250 sheets shredded. Set calendar reminders based on your usage:
– Home office: Every 3 months
– Small business: Monthly
– Heavy use: After 500 sheets
Listen for Early Warning Noises
A healthy shredder hums smoothly. These sounds demand immediate action:
– Clicking: Missing tooth (repair within 48 hours)
– Grinding: Misaligned gears (disassemble and check)
– High-pitched whine: Lubricant failure (clean and re-lube)
When Repair Costs Exceed Replacement Value
Not all shredders deserve repair. Abandon DIY efforts if:
– The gearbox requires soldering to access
– Replacement gears cost over $40 (new entry shredders start at $60)
– Metal gears are stripped (requires machining expertise)
Cost-benefit rule: If repair time exceeds 90 minutes or parts cost 70% of a new unit, recycle it. Focus on proper maintenance for your next shredder—look for models with metal gearboxes like the AmazonBasics 12-Sheet.
Final Note: With these proven techniques, 90% of shredded gear failures can be fixed for under $15. Start with epoxy repairs for minor damage, graduate to 3D printing for complex breaks, and always implement the maintenance habits that prevent repeat failures. A well-maintained shredder should last 5+ years—turn your broken machine into reliable document security today. For persistent issues, consult our guide on diagnosing motor failures in paper shredders.


