
Your tent collapsed in a sudden downpour, or maybe you’re tired of wrestling with poles after a long hike. Whatever the reason, ditching the tent doesn’t mean sacrificing safety or comfort. Camping without a tent is a liberating way to reduce pack weight by 30% while deepening your connection with nature. In this guide, you’ll discover proven alternatives—from vehicle setups to minimalist star-sleeping—that keep you dry, warm, and legally compliant. Whether you’re a beginner testing backyard car camping or a backpacker seeking ultralight freedom, these methods deliver real-world results.
Sleeping in Your Vehicle: Avoiding Condensation & Heat Traps
Your car, van, or SUV transforms into a secure, weatherproof shelter with minimal setup. This method dominates car camping without a tent because it shields you from insects, wind, and curious wildlife. But metal bodies amplify temperature extremes—expect 20°F colder than ambient air on winter nights and oven-like heat in summer.
Critical Setup Steps for Comfort:
– Park Legally: Target established campgrounds, BLM lands (where dispersed camping is permitted), or designated rest areas. Never trespass on private property—use apps like iOverlander to verify spots.
– Create Ventilation Gaps: Crack two opposing windows 1–2 inches diagonally (e.g., front driver + rear passenger) to prevent condensation buildup while maintaining privacy with sunshades.
– Insulate Against Ground Cold: Place a closed-cell foam pad (like Therm-a-Rest Z Lite) under your sleeping pad. The metal floor conducts cold rapidly—a single 3/4″ pad often isn’t enough below 45°F.
Pro Tip: In freezing weather, drape a wool blanket over the windshield overnight. It traps radiant heat while blocking frost formation inside the glass.
Why Most Car Campers Wake Up Soaking Wet
Condensation strikes when warm breath moisture hits cold metal surfaces. Fix this by:
1. Wiping interior windows dry before bed with a microfiber towel
2. Positioning your sleeping bag away from direct contact with windows
3. Using moisture-wicking base layers (never cotton) to reduce sweat
Tarp Shelters: 3 Rain-Blocking Configurations You Can Pitch in 10 Minutes

Forget bulky tents—a 10×12 ft silnylon tarp weighs under 1 lb and creates versatile shelters. The key is achieving a 45-degree rain-shedding angle while minimizing wind resistance.
A-Frame Shelter for Heavy Rain:
1. Tie a ridgeline rope between two trees 8–10 ft high
2. Drape the tarp over the line, pulling corners taut at 45° angles
3. Anchor corners with rocks (not stakes—faster and no ground damage)
Use Case: Downpours—water sheets off the steep slope
Lean-To for Windy Sites:
1. Tie one tarp edge 3–4 ft high to a tree
2. Stake the opposite edge 6 ft out at ground level
3. Add a groundsheet extending 12″ beyond the tarp
Use Case: Coastal or mountain ridges—blocks wind while allowing airflow
Bivy Sack Alternative for Solo Hikers:
Slip a waterproof bivy sack (like the Sea to Summit Ultra-Sil) over your sleeping bag. It’s 8 oz lighter than a tent and critical when:
– Temperatures dip below 50°F (prevents dew saturation)
– Mosquito season hits (most include bug netting)
– You’re on multi-day trails (fits in a 1L stuff sack)
Hammock Camping: Why Your Underquilt Beats a Sleeping Pad
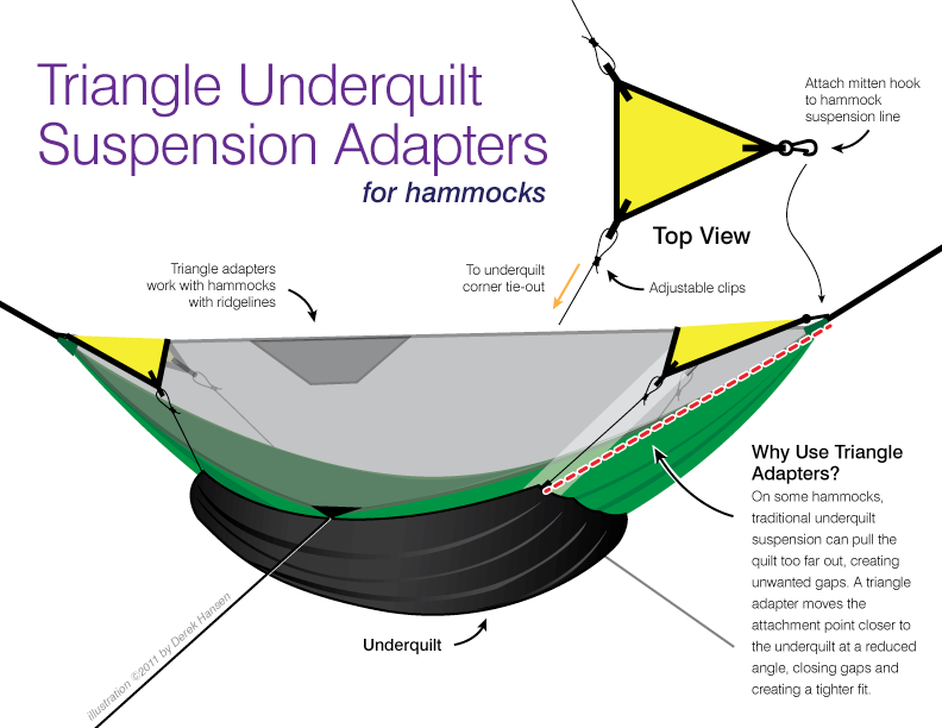
Hammocks outperform ground sleeping in wet, rocky, or buggy terrain—but 90% of beginners get cold due to one mistake: skipping the underquilt. Cold air circulates underneath you, sucking heat 5x faster than ground contact.
Non-Negotiable Gear Checklist:
| Item | Why It’s Essential | Budget Pick |
|——————–|————————————————|————————–|
| Tree-friendly straps | Prevents bark damage; 1″ width distributes weight | ENO Atlas Straps ($40) |
| Underquilt | Insulates from below (-20°F possible) | Warbonnet Super Ultralight ($199) |
| Asymmetrical hammock | Diagonal lay creates flat sleeping surface | Hennessy Hammock Scout ($170) |
Setup Hack: Pitch your rain tarp first before hanging the hammock. A 9×12 ft tarp at 8–10 ft height covers both you and gear. In rain, angle the tarp’s ridgeline 6″ lower on the windward side to shed water away from your hammock.
Finding Free Trail Shelters on Public Lands
State parks and national forests often feature free three-sided lean-tos near trailheads. These aren’t “first-come” myths—many operate on reservation systems.
How to Secure a Shelter:
1. Check recreation.gov for “shelter” filters in your target park
2. Arrive by 2 PM for weekend spots (most fill by dusk Thursday)
3. Pack earplugs—these social spaces attract snorers!
Critical Note: Lean-tos lack insulation. Place your sleeping pad against the back wall to block wind, and avoid placing your head near the open front.
Ground Sleeping Under Stars: The 4-Point Gear Checklist
This minimalist method works only when:
✅ Forecast shows 0% rain for 48+ hours
✅ Temperatures stay above 55°F
✅ You’re away from animal trails (check for tracks/scat)
Gear That Prevents a Midnight Retreat:
1. Sleeping pad with R-value ≥4.0 (e.g., NEMO Tensor—R 4.2)
2. Bivy sack with breathable membrane (prevents condensation inside)
3. Waterproof groundsheet (12″ larger than your pad on all sides)
4. Emergency tarp (stashed in your pack for sudden storms)
Warning: Never skip the groundsheet—a single pine needle puncture ruins insulation.
Rooftop Tents vs. Pop-Up Campers: Cost/Benefit Breakdown

| Option | Setup Time | Weight | Cost | Best For |
|---|---|---|---|---|
| Roof-top tent | 2 minutes | 150–200 lbs | $2,000–$5,000 | Adventure vehicles (Jeep, 4Runner) |
| Pop-up camper | 15 minutes | 1,000+ lbs | $5,000–$15,000 | Towed setups (SUVs/trucks) |
Key Reality: RTTs increase wind resistance by 25%, reducing highway MPG. Pop-up campers require level ground—use a bubble level on your hitch during setup.
Site Selection Secrets for Shelter-Free Safety
Your location determines survival. Avoid these fatal mistakes:
The Cold Air Trap:
Never camp in dry riverbeds or valleys. Cold air sinks—these “frost pockets” can be 15°F colder than ridges. Aim for north-facing slopes above 1,000 ft elevation for stable temps.
Wind Channeling:
Identify natural windbreaks:
– Stand with your back to prevailing winds—your site should feel calmer
– Use boulders or dense pines (not dead trees—they fall in storms)
– Pitch tarps parallel to wind direction to prevent billowing
Drainage Test:
Pour a gallon of water uphill of your site. If it pools near your sleeping area, relocate. Ideal spots have <5° slope for runoff.
Emergency Weather Protocols When Exposed
When storms hit without a tent:
Flash Flood Response:
1. Immediately move to higher ground (100+ ft elevation gain)
2. Avoid canyon walls—debris flows travel fastest there
3. Strip wet layers; put on dry insulation before shivering starts
Lightning Strike Prevention:
– Crouch on your sleeping pad (insulates from ground current)
– Stay 50+ ft from isolated trees (lightning jumps to tallest object)
– Remove metal-frame packs—place them 100 ft away
Critical Rule: If thunder follows lightning within 30 seconds, seek solid shelter now. Tents offer zero protection.
Camping without a tent isn’t about sacrificing comfort—it’s about smarter shelter choices. Your vehicle becomes a fortress with proper ventilation, while a $20 tarp outperforms tents in wind-driven rain. Remember: insulation from the ground (via high-R-value pads) matters more than overhead cover, and always have a bivy sack as your emergency shell. Start with car camping in familiar territory, master tarp setups in your backyard, and within months you’ll shed 15+ lbs of tent gear while sleeping drier and warmer. The next time you pack, leave the poles behind—but never skip the underquilt.


