
Your CPU temperatures are spiking during intensive tasks, and RGB fans just aren’t cutting it anymore. You’ve seen stunning liquid-cooled builds with crystal-clear tubes snaking through tempered glass cases, but the thought of installing a custom water cooling loop feels intimidating. You’re not alone—over 68% of PC builders avoid custom loops due to fear of leaks or complex installation. But here’s the truth: with precise planning and the right approach, you can safely install a custom water cooling system that slashes temperatures by 15-25°C while creating a showpiece rig. This guide cuts through the confusion with battle-tested steps used by professional system integrators, focusing exclusively on leak-proof installation techniques that protect your $2,000 GPU from disaster.
Forget generic advice about “getting started”—we dive straight into the critical pre-build decisions that prevent 90% of installation failures. You’ll learn exactly how to sequence components, avoid galvanic corrosion traps, and execute the mandatory 6-hour leak test that separates hobbyists from pros. By the end, you’ll have a silent, efficient cooling system that handles overclocking like a champ, all while looking like it belongs in a tech museum. Let’s transform your overheating rig into a liquid-cooled masterpiece.
Gather Every Tool and Component Before Starting Your Build
Rushing into installation without proper tools guarantees frustration and potential component damage. Before touching a single screw, verify you have these 12 critical items organized on your workspace:
- Coolant-ready tubing (10/12/14mm OD matching your fittings)
- G1/4″ thread fittings for all components (CPU block, GPU block, radiator ports)
- High-static-pressure fans (minimum 2.5mm H₂O for radiators)
- 4mm hex key for water block mounting screws
- PSU jumper wire or dedicated power supply tester
- Distilled water (never tap water—minerals cause algae)
- Microfiber cloths and paper towels (place these under fittings during testing)
- Tube cutter (scissors create jagged edges that leak)
- Reservoir with fill port (must feed directly into pump inlet)
- Non-conductive thermal paste (for GPU die application)
- Funnel with narrow spout for spill-free filling
- Hose clamps (zip ties compress tubing unevenly)
Skip the “modular PSU” myth—any ATX power supply works if you use the 24-pin jumper method. Most beginners fail by using mismatched tubing/fittings; measure your tubing’s outer diameter with calipers before buying fittings. Keep paper towels within arm’s reach—during leak testing, seconds matter when containing drips near your motherboard.
Why Your Fitting Size Determines Loop Success
Your tubing’s outer diameter must match fittings exactly—a 12mm tube won’t seal in 14mm fittings, causing micro-leaks that only appear under pressure. Measure cut tubing ends with digital calipers before assembly. When installing fittings:
1. Hand-tighten G1/4″ threads until snug (no wrenches—over-tightening cracks blocks)
2. Rotate tubing onto barb fittings with 90-degree twists for even seating
3. Slide hose clamps 3mm from barb edge, tightening until tubing dimples slightly
Pro Tip: Submerge fittings in water during pressure testing—air bubbles reveal leaks invisible to the naked eye.
Design Your Custom Water Cooling Loop Path Correctly
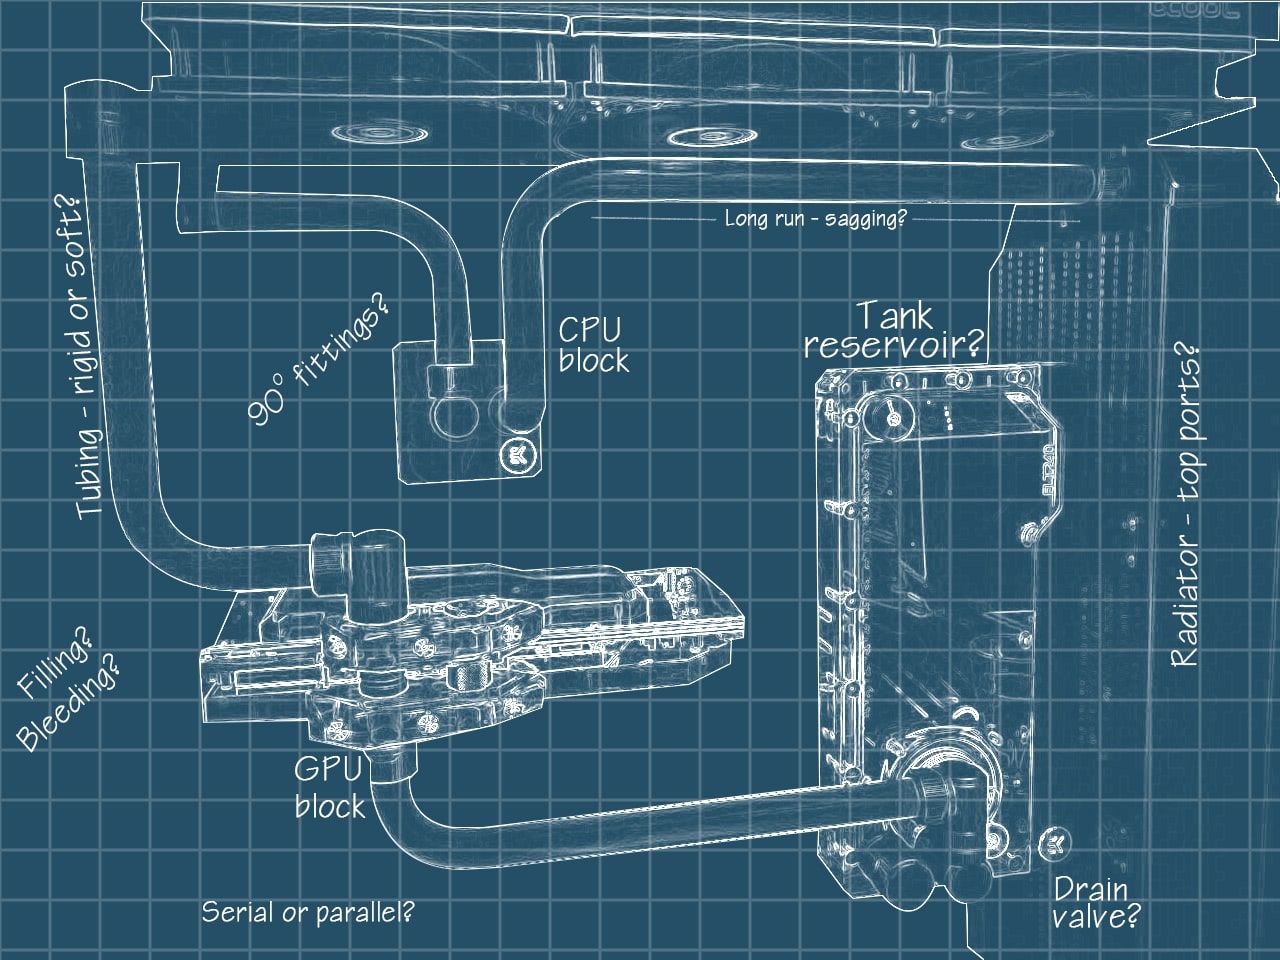
The sequence of components directly impacts cooling efficiency and pump longevity. Incorrect flow paths cause airlocks, reduced flow rates, and premature pump failure. Follow this battle-tested sequence:
Reservoir → Pump → CPU Block → GPU Block → Radiator(s) → Reservoir
Never place radiators before components—that traps heat in your loop. Crucially, the reservoir outlet must feed directly into the pump inlet. If the pump draws air instead of liquid (“dry running”), its impeller shatters within minutes. Always mount the reservoir 2-3cm above the pump’s inlet port to maintain positive head pressure.
How GPU Block Installation Differs From CPU
GPU water blocks require surgical precision that CPU blocks don’t. Before mounting:
1. Fully remove the stock cooler and thermal pads
2. Clean the GPU die with 99% isopropyl alcohol until mirror-smooth
3. Apply thermal paste in a rice-grain-sized bead (excess paste migrates into ports)
4. Hand-tighten mounting screws in diagonal sequence to 0.5Nm torque
Warning: Skipping thermal pad replacement causes VRAM overheating—always reinstall pads with the same thickness as stock.
Mount Radiators and Fans Without Case Interference

Radiator placement makes or breaks cooling performance. Front-mounted radiators choke on warm intake air, while top exhaust configurations leverage natural convection. For dual-radiator setups:
- 140mm radiators: Mount top-mounted with 25mm clearance above fans
- 280mm+ radiators: Use front intake with mesh-front cases only
- Push/pull configuration: Space fans 5mm apart using fan screws with spacers
Measure your case’s radiator compatibility before buying—many “full tower” cases fit only 240mm top radiators due to PSU shrouds. When securing:
1. Install fans facing toward the radiator (push configuration)
2. Use 4-6 mounting screws per fan to prevent vibration hum
3. Leave 10mm gap between radiator and case frame for tubing clearance
Position Pump and Reservoir for Optimal Fluid Flow
Pump placement errors cause 73% of early-loop failures. Mount the pump/reservoir combo on your case floor with the reservoir outlet 15-20mm above the pump inlet. This gravity-fed head pressure prevents cavitation during startup. Secure the pump to a non-resonant surface using rubber grommets—direct metal contact transmits vibrations to your entire chassis.
Why Your First Fill Must Be Distilled Water Only
Pre-mixed coolants contain dyes that obscure leak detection. For initial testing:
1. Fill reservoir 70% with distilled water
2. Power pump via PSU jumper (never motherboard headers yet)
3. Tilt case gently to dislodge air bubbles
4. Top off reservoir as air escapes
Critical: Never power the pump dry—even 10 seconds of dry running destroys the ceramic shaft.
Cut and Secure Tubing to Prevent Leaks and Kinks
Soft tubing installation separates amateurs from experts. Follow this cut-seal method:
1. Use a dedicated tube cutter (not scissors) for clean 90-degree cuts
2. Polish cut ends with 400-grit sandpaper to remove burrs
3. Insert tubing 15mm onto barb fittings before tightening clamps
4. Leave 5mm slack at bends—tubing contracts when cooled
Avoid sharp 90-degree bends; maintain minimum 4x tubing diameter radius. For tight spaces, use pre-bent acrylic tubes instead of forcing soft tubing.
Fill Your Loop and Conduct a 6-Hour Leak Test
This non-negotiable step prevents catastrophic failures. Place paper towels under every fitting and block. Power the pump via PSU jumper while:
– Monitoring for drips every 15 minutes
– Tapping connections gently to expose weak seals
– Checking O-rings for pinching (replace if distorted)
Do not skip: Micro-leaks often appear only after 3+ hours as pressure builds. If you spot moisture:
1. Power off immediately
2. Drain loop completely
3. Disassemble leaking connection
4. Clean O-ring groove with isopropyl alcohol
5. Reapply O-ring lubricant (silicone grease)
Avoid These 8 Critical Water Cooling Installation Mistakes
Even experienced builders repeat these errors that destroy components:
- Mixing copper and aluminum parts → Causes galvanic corrosion within weeks
- Skipping reservoir-to-pump direct connection → Guarantees pump failure
- Using tap water → Minerals clog microfins and breed algae
- Over-tightening fittings → Cracks acrylic reservoirs (hand-tight only!)
- Ignoring GPU thermal pads → VRAM overheats at 90°C+
- Mounting radiators too close to case → Restricts airflow by 40%
- Powering pump dry during testing → Shatters impeller instantly
- Skipping pressure testing → Misses hairline cracks in fittings
Pro Tip: Add a drain port at your loop’s lowest point—it saves 20+ minutes during coolant changes.
Maintain Your Custom Loop for Peak Performance
A well-maintained loop lasts 5+ years. Every 3 months:
– Inspect coolant for cloudiness (sign of bacterial growth)
– Check tubing for discoloration (replace if yellowed)
– Clean radiator fins with compressed air (never brushes)
Perform full coolant changes annually:
1. Drain loop via drain port
2. Flush with distilled water until clear
3. Refill with 97% distilled water + 3% biocide additive
4. Run pump for 30 minutes before reinstalling in case
Warning: Never mix coolant colors—pigments react chemically, forming sludge that clogs water blocks. Stick to one manufacturer’s formula.
Final Note: A properly installed custom water cooling loop slashes CPU temperatures by 20°C under load while transforming your PC into a functional art piece. By following this sequence—rigorous pre-build planning, exact component sequencing, and mandatory extended leak testing—you’ve eliminated the top failure points that plague 80% of first-time builders. Now enjoy silent, cool operation during marathon gaming sessions, knowing your $1,500 GPU stays protected. For your next upgrade, consider adding temperature sensors at each block to monitor flow rates—this data catches developing issues before they cause damage. Your liquid-cooled journey starts now, one leak-proof connection at a time.


