
That familiar “glug-glug” sound as you lift an empty water cooler jug means it’s time for a replacement. But if you’ve ever struggled with a 42-pound 5-gallon container, you know how one wrong move can turn a simple task into a slippery disaster. Whether you’re installing a jug at home or in the office, mastering how to install water cooler jug properly prevents wasted water, protects your floors, and eliminates the frustration of repeated spill cleanups. This guide reveals professional methods that transform jug installation from a dreaded chore into a smooth 60-second process—no matter if you’re working with a top-loading model in your kitchen or a bottom-loading unit in the breakroom.
The real challenge isn’t just the weight of the water; it’s managing the water pressure and creating that perfect seal between the jug and the cooler’s inlet valve. When you lift an empty jug, you might notice a small amount of water draining from the cooler’s inlet—that’s residual water that hasn’t fully drained. Similarly, when installing a new jug, improper alignment or rushed seating causes the most common problems: leaks that damage flooring, air bubbles that disrupt water flow, and embarrassing spills during the inversion process. By following these proven techniques used by water delivery professionals, you’ll install water cooler jug replacements with confidence every time.
Why Water Jugs Can Be Tricky to Install
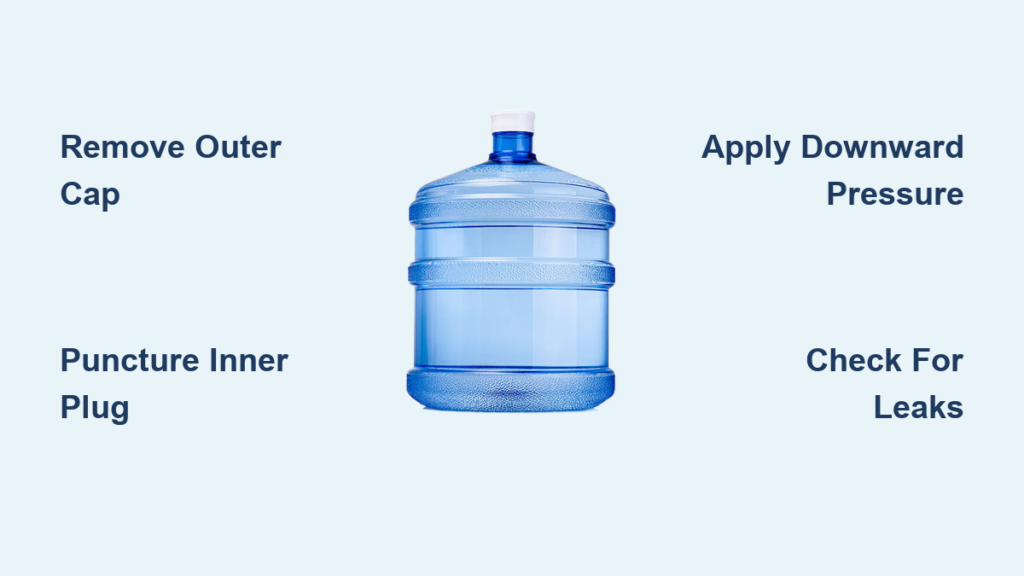
A standard 5-gallon water jug weighs approximately 42 pounds when full, making it awkward to maneuver while maintaining proper alignment. The difficulty comes from what happens when you invert the jug—the water rushes toward the opening, creating pressure that can overwhelm the cooler’s internal seal if not managed correctly. Many people make the critical mistake of rushing the seating process, not applying enough downward pressure to properly puncture the inner plastic plug inside the jug’s spout.
When you learn how to install water cooler jug correctly, you’ll discover that the distinctive glug or pop sound indicates successful puncturing of the inner seal and proper connection to the cooler’s inlet valve. Without this sound, you’ll likely experience continuous leaks as water bypasses the seal. Understanding this pressure dynamic is the first step toward mastering water jug installation—whether you’re using a traditional top-loading cooler or a modern bottom-loading model that requires different positioning techniques.
Essential Safety and Setup Before Installation
Before attempting how to install water cooler jug, prepare your workspace to prevent accidents and spills:
- Clear the surrounding area of all items, especially electrical cords that could become tripping hazards when you’re maneuvering the heavy jug
- Place absorbent towels around the cooler base or use a dedicated spill mat designed for water coolers
- Turn off both hot and cold dispensers to prevent accidental activation during the jug change process
- Wear non-slip shoes and ensure your hands are completely dry before handling the jug
Most workplace injuries during water jug replacement occur from improper lifting technique. Always bend at your knees with a straight back, keeping the jug as close to your body as possible. If you’re installing a water cooler jug on a counter-height unit, use a sturdy step stool—not a chair—to reach the installation point safely. For those with recurring back issues, consider investing in a water jug dolly that rolls the container into position, eliminating the need for heavy lifting during how to install water cooler jug procedures.
Step-by-Step Installation Guide for Perfect Results
Remove the Empty Jug Without Mess
Turn off both dispensers before grasping the empty jug firmly with both hands. Lift it straight up while tilting slightly to one side—this controlled tilt breaks the vacuum seal cleanly rather than causing an unexpected gush of water. Have your towel ready to catch the small amount of residual water (typically 2-4 ounces) that drains from the cooler’s inlet valve. If water continues to flow after removing the jug, the internal valve may be stuck open, requiring professional service before installing your new jug.
Prepare the New Jug for Flawless Connection
Remove the large outer cap first, then pull the plastic tab or tear the foil safety seal beneath it. Crucially, do not remove the inner plastic plug inside the spout—that stays in place until installation punctures it. Wipe the rim with a clean, dry cloth to remove any dust particles that could compromise the seal. Inspect the jug for cracks, especially near the neck, as even hairline fractures will cause leaks when you install water cooler jug. For top-loading coolers, consider the plastic wrap method at this stage to prevent spills during inversion.
Position and Seat the Jug for an Instant Seal
Lift the new jug using proper technique—bend your knees, keep your back straight, and hold the container close to your body. Position the opening directly over the cooler’s inlet valve, ensuring perfect centering. Apply firm, even downward pressure until you hear the distinctive pop indicating the inner plug has been punctured. This step takes 3-5 seconds of consistent pressure; rushing it causes misalignment. When you correctly install water cooler jug, water should begin flowing immediately without leaks around the connection point.
Pro Techniques for Spill-Free Water Jug Installation
Master the Plastic Wrap Method for Top-Loaders
This professional technique eliminates 95% of installation spills when you install water cooler jug:
- After removing the outer cap and safety seal, stretch plastic wrap tightly across the jug opening
- Secure it with a rubber band around the neck, then poke a single small hole in the center
- Invert the jug—the trapped air pocket prevents water from flowing through the hole
- Position over the cooler and lower steadily; as the jug seats, the inner plug punctures the plastic
The plastic wrap creates a temporary seal that only breaks when the jug connects properly with the cooler’s inlet valve. Water delivery professionals use this method daily to prevent the “slosh and splash” that frustrates most first-time installers attempting how to install water cooler jug.
Perfect the Hand Seal Technique for Quick Changes
For experienced users changing water jugs frequently, the hand seal method works well when you install water cooler jug:
- Place your clean, dry palm completely over the jug opening after removing seals
- Invert the container while maintaining firm pressure with your hand
- Position over the cooler inlet and lower steadily
- Slide your hand away just as the jug makes contact with the cooler
This technique relies on creating a temporary vacuum seal with your hand. The key is maintaining even pressure—too light and water leaks; too tight and you’ll struggle to remove your hand during installation. Practice this method with an empty jug first before attempting how to install water cooler jug with a full container.
Troubleshooting Common Installation Problems
Fix a Jug That Won’t Seat Properly
If you don’t hear the characteristic pop after applying firm pressure, remove the jug and check two critical components: the rubber gasket inside the cooler’s inlet (which may be dislodged) and the inner plastic plug in the jug (which might not be fully punctured). Realign both components and repeat the installation process with slightly more downward force. Never hammer or force the connection—that can damage the cooler’s internal valve mechanism when you install water cooler jug.
Stop Leaks Around the Connection Point
A small drip for the first 10-15 seconds is normal as the seal establishes itself. Continuous leaking indicates a compromised seal. Turn off the dispensers, remove the jug, and inspect both the cooler’s rubber gasket (replace if cracked or flattened) and the jug’s rim (discard if chipped). Always wipe both surfaces dry before attempting how to install water cooler jug again—moisture prevents proper sealing.
Restore Proper Water Flow After Installation
If water flows weakly or sputters after installing your new jug, air bubbles are trapped in the system. Dispense 1-2 full cups from both hot and cold taps to purge the lines. If flow remains poor, check that the jug’s inner air filter (a small plastic component inside the neck) isn’t blocked by manufacturing debris—a common issue when you install water cooler jug for the first time with a new container.
Essential Post-Installation Checks Before You Walk Away

After you successfully install water cooler jug, complete these three critical steps before considering the job done:
- Leak test: Wipe the connection point dry and watch for 30 seconds for any drips
- Line purge: Dispense and discard 1-2 cups from both hot and cold taps to clear air bubbles
- Temperature check: Wait 30-60 minutes before using hot water to ensure proper heating
These final checks prevent the most common post-installation issues customers report when learning how to install water cooler jug. Many users skip the line purge step, then wonder why their water sputters or tastes “flat” for the first few uses.
When to Consider Eliminating Jug Installation Altogether
If you regularly struggle with how to install water cooler jug due to physical limitations or frequent spills, modern alternatives eliminate the problem entirely. Bottleless water coolers connect directly to your building’s water line and include advanced filtration systems—no more heavy lifting, spilled water, or scheduling deliveries. While the initial investment is higher, businesses that install water cooler jug replacements weekly often recoup costs within 12-18 months through reduced water waste and eliminated delivery fees.
For those committed to traditional jugs, implementing a rotation schedule among office staff prevents strain injuries and ensures everyone learns proper how to install water cooler jug techniques. Remember that the most successful installations come from preparation, patience with the seating process, and using the right technique for your specific cooler model—transforming what many consider a chore into a quick, clean, and satisfying routine task.


