

That unmistakable swirl of creamy soft-serve packed with candy chunks defines the Dairy Queen Blizzard experience—but you don’t need to visit the drive-thru to enjoy one. With your Ninja Creami appliance, you can recreate that signature thick, spoon-standing texture right in your kitchen for a fraction of the cost. This guide reveals the exact techniques used by home chefs to transform simple ingredients into restaurant-quality Blizzards that rival the original. Forget generic blender methods—the Ninja Creami’s specialized freezing and processing technology delivers the authentic experience you’re craving.
Ninja Creami Setup for Perfect Blizzard Texture
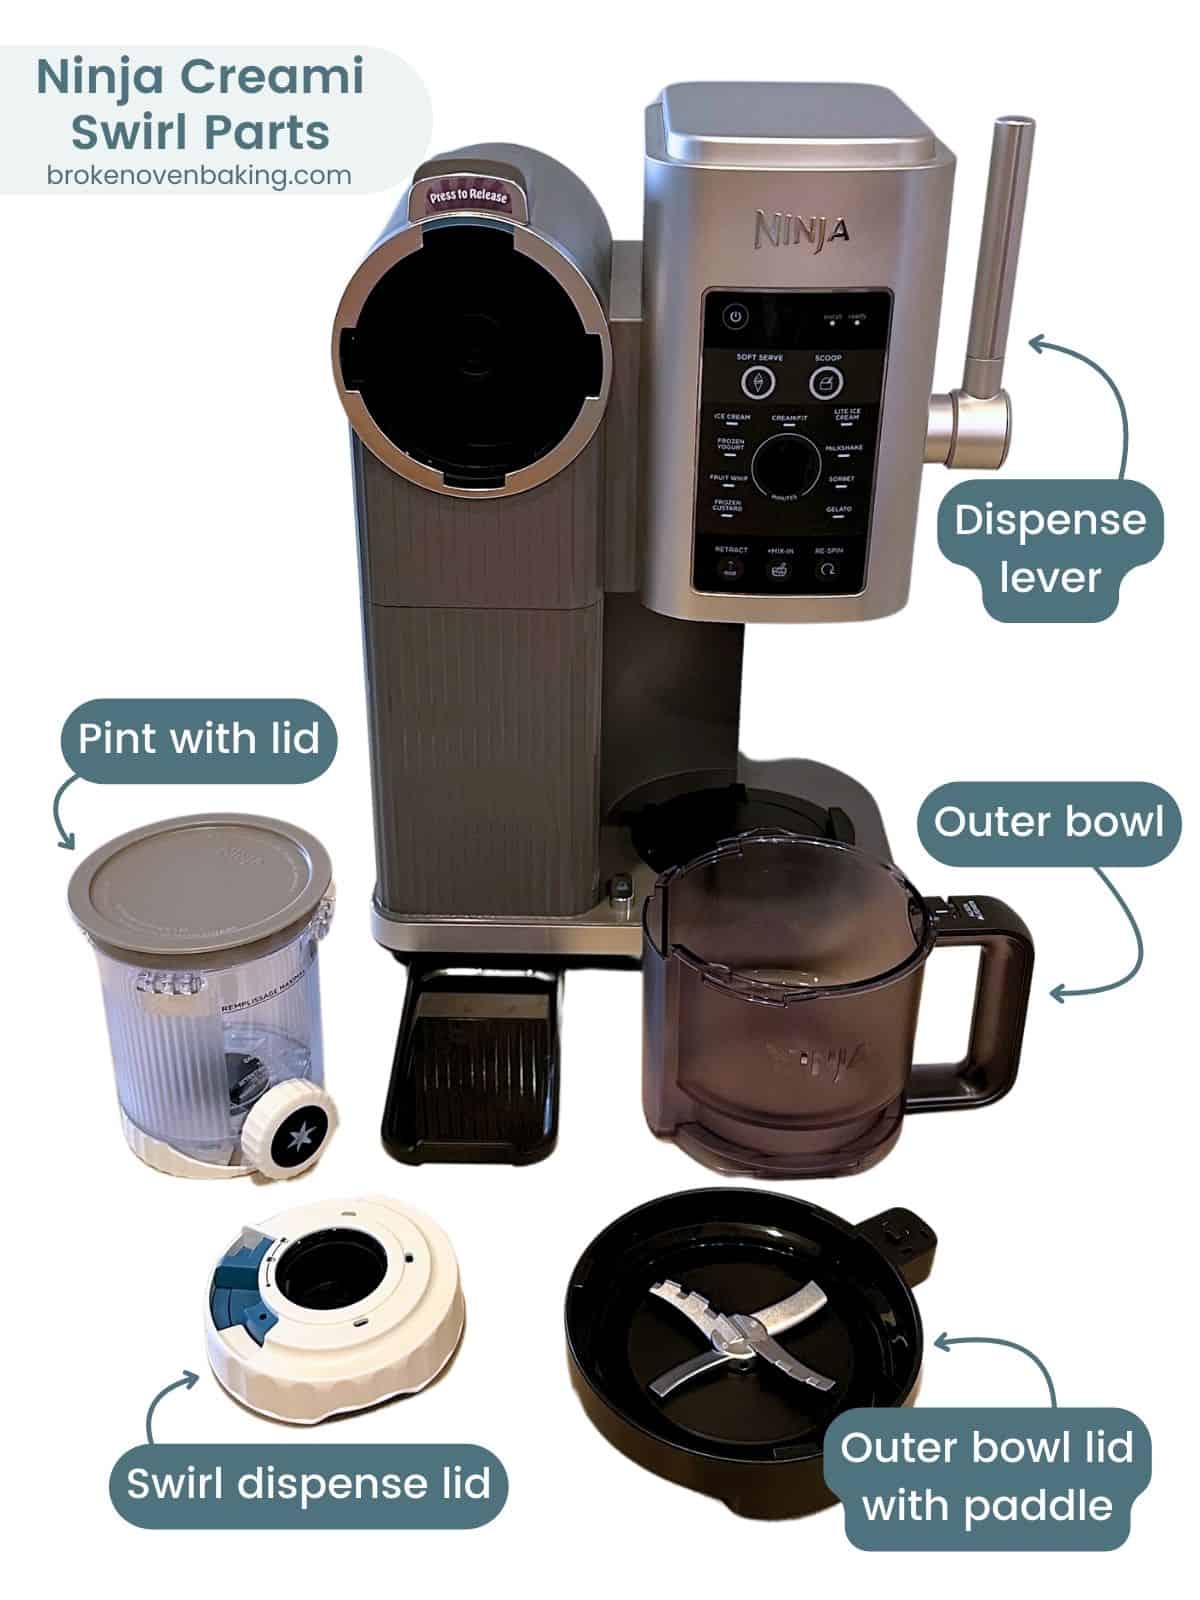
Critical Equipment Requirements You Can’t Skip
The Ninja Creami isn’t just another blender—it’s a specialized frozen dessert system requiring specific components. You absolutely need the Ninja Creami machine with processing lid, freezer-safe pint containers designed specifically for processing, and proper mixing tools. Your standard kitchen whisk won’t cut it—use an immersion blender or milk frother to ensure your base mixture is completely homogeneous. Any undissolved ingredients will create icy pockets that ruin the creamy texture we’re after.
Pro tip: Chill your pint containers in the freezer for 15 minutes before adding your mixture. This promotes even freezing from the start and prevents the dreaded center dome that throws off processing.
Exact Base Formula for Blizzard Success
Every authentic Blizzard starts with this precise ratio: 1 cup milk (low-fat works fine but whole milk creates richer texture), ¾ cup whipped topping like Cool Whip, and 1 tablespoon vanilla ice cream mix (Junket brand delivers the closest commercial texture). If you don’t have ice cream mix, substitute 1 teaspoon vanilla extract plus 2 tablespoons sugar. For ultra-creamy results that mimic Dairy Queen’s signature mouthfeel, add 1-2 tablespoons half-and-half—this small addition makes a dramatic difference in final texture.
Critical mistake to avoid: Don’t eyeball measurements. Use proper measuring cups and spoons—this recipe depends on exact ratios. Too much liquid creates icy results, while too little yields dry, crumbly texture even after processing.
Peanut Butter Cup Blizzard: Step-by-Step Processing
Mix and Freeze Like a Pro
Combine your milk, whipped topping, and vanilla mix in a bowl, then blend with an immersion blender for 20-30 seconds until completely smooth—no streaks or lumps allowed. Pour this mixture into your Ninja Creami pint container, leaving ½ inch of headspace at the top. Freeze uncovered on a level shelf for exactly 24 hours—this timing is non-negotiable for proper texture. After freezing, test with a butter knife; it should meet solid resistance throughout with no soft spots.
Why this matters: The Ninja Creami’s blades need a completely solid block to properly shave and reconstitute the mixture. Any soft spots create uneven texture that no amount of reprocessing can fix.
Processing Sequence for Restaurant-Quality Results
Lock your frozen pint into the Ninja Creami and select the Ice Cream cycle. During the first 30 seconds, you’ll notice the mixture appears powdery—this is completely normal and expected. Stop the machine, use a spoon to create a 1-inch wide well extending to the bottom, then add 6-8 mini Reese’s cups. Restart the Mix-in cycle for 10-15 seconds until candy is evenly distributed but still chunky. Serve immediately in chilled bowls—delaying even 2 minutes allows the texture to firm up significantly.
Expert note: If your mixture looks too dry after the first spin, add exactly 1 tablespoon cold milk to the well before adding mix-ins. This small amount of liquid activates the blades’ ability to create that signature creamy swirl.
Oreo Blizzard: Special Technique for Cookie Lovers

Base Preparation That Prevents Graininess
For Oreo Blizzards, mix ingredients directly in the pint container: ¾ cup low-fat milk, ¼ cup half-and-half, 1 tablespoon instant vanilla pudding mix, 2 tablespoons sugar, and ½ teaspoon vanilla extract. Use a milk frother to incorporate everything smoothly—pudding mix will thicken slightly, which is exactly what creates that dense, spoon-standing texture. Unlike other variations, this base benefits from the pudding’s stabilizing properties.
Key difference: The Oreo version requires the Lite Ice-Cream setting rather than standard Ice Cream cycle. This gentler processing preserves more cookie structure while still achieving creamy base texture.
Two-Stage Processing for Optimal Cookie Distribution
After the first spin on Lite Ice-Cream setting (expect crumbly results), create a small well and add 1 tablespoon milk before re-spinning on the same setting. This second pass transforms the mixture from crumbly to creamy. Only then should you add 4-5 crushed Oreos—twist apart regular Oreos to include the creme filling for authentic flavor. Run the Mix-in cycle for just 7 seconds; over-processing turns cookies to mush.
Pro tip: Press half the cookie pieces into the sides of the pint before the final mix-in cycle. This creates visible cookie streaks that mimic Dairy Queen’s signature presentation.
Troubleshooting Your Ninja Creami Blizzard

Fixing Common Texture Problems
Problem: Your mixture won’t process properly and just sits there
Solution: Your base isn’t completely frozen solid. Return to freezer for 2-4 additional hours. The Ninja Creami’s safety sensors prevent operation if the base isn’t frozen enough.
Problem: After processing, your Blizzard separates or becomes watery
Solution: You’ve added too much liquid during re-spin. Stick to the exact 1 tablespoon maximum—any more prevents proper emulsification.
Preventing the Center Dome Disaster
Freezing with the lid on causes the center to dome upward, creating uneven thickness that processes poorly. Always freeze pint containers uncovered. If you notice a dome forming anyway (check at 12-hour mark), use a metal spoon to level the surface before the 24-hour mark. This small step ensures even blade contact during processing.
Warning: Never attempt to process a partially frozen base—this strains the motor and creates inconsistent texture that can’t be salvaged.
Cost-Saving Strategies for Homemade Blizzards
Ingredient Budget Breakdown
Your homemade Blizzard costs $2.50-3.50 per pint compared to $4-5 for a medium Dairy Queen version. Here’s the math: milk ($0.25), whipped topping ($0.75), flavor mix ($0.50), and mix-ins ($1.00-2.00). That’s under $1 per serving versus $1.25-1.50 at Dairy Queen. Buy mix-ins in bulk online for even greater savings—mini Reese’s cups cost 40% less per ounce when purchased in family-size bags.
Time-saving hack: Prepare 4-6 pints simultaneously with different flavor bases. Label each container clearly with masking tape noting the flavor and mix-ins. Properly frozen, these will keep for 2-3 weeks before processing.
Health-Conscious Customizations That Still Taste Amazing
Lower-Calorie Options That Work
Substitute almond milk for dairy milk and use fat-free whipped topping without sacrificing texture—the Ninja Creami’s processing power maintains creaminess even with lighter ingredients. For sugar control, replace granulated sugar with monk fruit sweetener at a 1:1 ratio. Use sugar-free pudding mix and sugar-free candies for diabetic-friendly treats that still deliver satisfying sweetness.
Protein boost method: Add 1 scoop vanilla protein powder to your base but reduce milk to ¾ cup to maintain proper consistency. This adds 20-25g protein per pint while keeping texture smooth.
Serving Like a Professional
Temperature Management Secrets
Your Blizzard’s texture begins changing the moment it leaves the Ninja Creami. Serve immediately in chilled bowls (freeze them for 15 minutes beforehand) or use metal pint cozies to maintain temperature longer. Never let it sit more than 2 minutes before serving—this is when the magic texture peak occurs.
Presentation tip: Reserve a few whole mini Reese’s cups or Oreo pieces to place on top after serving. This creates that Instagram-worthy layered look Dairy Queen is famous for while signaling to your brain that fresh mix-ins await with every spoonful.
Final Processing Timeline and Results
Active prep: 7 minutes
Freeze time: 24 hours minimum (non-negotiable)
Processing time: 3-5 minutes total
Total investment: 1 day 12 minutes for 4 perfect servings
The Ninja Creami method delivers identical texture to commercial Blizzards because it replicates Dairy Queen’s fundamental process: freezing a precise base mixture solid, then mechanically agitating it to incorporate air and create that signature soft-serve consistency. Master these techniques once, and you’ll never wait in a drive-thru line again—you’ll have a freezer stocked with ready-to-process Blizzards that cost less and taste better than the original. Whether you’re craving peanut butter cups or Oreos, your Ninja Creami transforms simple ingredients into that spoon-standing treat you love, with complete control over every component.


