
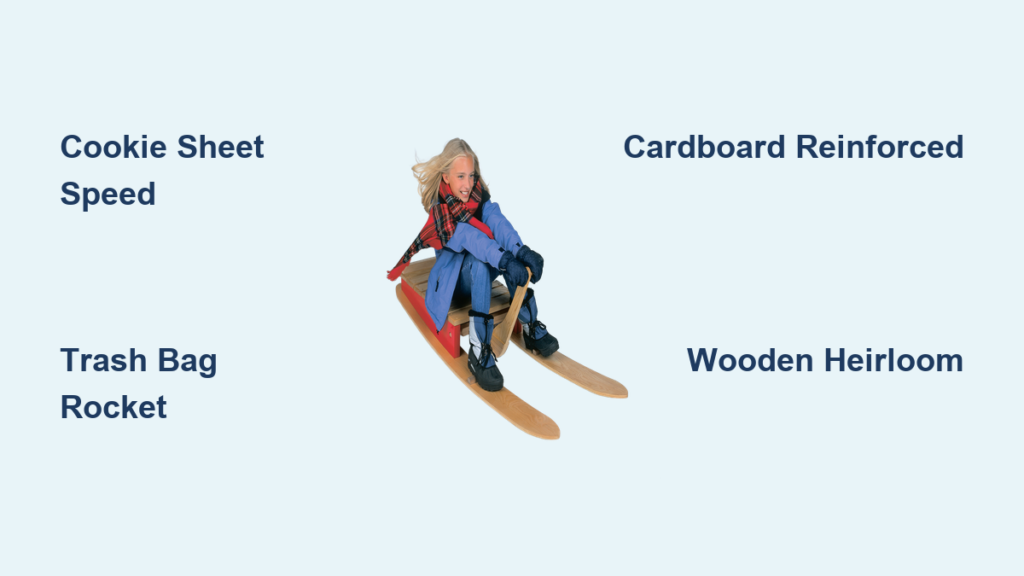
That sinking feeling when snow blankets your yard but your sled’s missing in action? Don’t let empty store shelves ruin your snow day. You can build a functional sled right now using kitchen trash, garage scraps, or basic lumber—no carpentry skills required. Whether you need a lightning-fast solution for an impromptu hill session or a weekend woodworking project, this guide delivers proven methods tested on real snow. You’ll discover how to transform a cookie sheet into a speed demon sled in 30 seconds or craft a heirloom-quality wooden runner in under four hours. Most importantly, you’ll learn exactly which DIY sled matches your hill’s danger level—and how to avoid painful wipeouts.
Instant Sleds from Kitchen Trash (0 Minutes Build Time)
When snow starts falling and you need a sled now, skip the store run. These household items slide faster than you’d believe with zero assembly.
Why Your Cookie Sheet Is the Fastest Emergency Sled
Grab that standard aluminum baking sheet from your cabinet—it’s the ultimate speed sled for short, steep hills. The non-stick metal glides on packed snow like ice, hitting speeds other DIY options can’t match. Kneel on it, tuck the front edge under your shins, and grip the sides for minimal control. Critical warning: This sled has zero steering or brakes. Only use it on obstacle-free slopes under 50 feet long. For a 10-second speed boost, spray the bottom with cooking oil (works for 2-3 runs max). Never attempt on hills with trees, fences, or road runoff.
Heavy-Duty Garbage Bag Sled: The 10-Second Slush Rocket
Thin grocery bags tear instantly—use only thick, black contractor-grade trash bags (4-mil thickness minimum). Sit inside the open bag, gather the edges around your waist, and tuck your feet in. The plastic creates a slick interface on wet, slushy snow, shooting you down steep inclines faster than rigid sleds. Best for hills where snow feels heavy and wet. Pro tip: Add a cardboard seat insert to prevent bag punctures from knees. This is a one-run wonder—expect tears after your first descent.
Cardboard Box Sled: Reinforced for Survival
A standard appliance box (refrigerator or washer size) becomes a serviceable sled in under 5 minutes. Flatten it, sit cross-legged, and grip the front edge to steer. Here’s the game-changer: Wrap the entire cardboard in a heavy-duty trash bag, sealing seams with duct tape. This waterproofs the cardboard, adds slickness, and prevents disintegration on wet snow. Reinforce the leading edge with extra tape to avoid shredding. Avoid powdery snow—it sinks instantly. Works best on packed neighborhood hills under 100 feet.
Inflatable Pool Toy: Powder Snow Secret Weapon
Grab any pool float or air mattress—its large surface area floats you on deep, fluffy snow where narrow sleds sink. Sit upright for better control. Critical flaw: Expect slow leaks from hidden ice or twigs. Patch holes mid-day with duct tape, but don’t rely on it for long runs. Never use on icy slopes—it slides unpredictably. Best for gentle, long descents in fresh powder where speed isn’t the goal.
Build a Steering Sled in Under 1 Hour (Minimal Tools)
When you want control and reusability, these projects deliver proper steering without complex carpentry.
Flying Carpet Sled: Your Steerable Plastic Speedster
This $5 project mimics commercial sleds using hardware store scraps. You’ll need:
– 36″x36″ stiff plastic sheet (cut from a heavy-duty tarp or plastic sign blank)
– 4-foot nylon rope
– Duct tape or grommets
Step-by-Step Assembly:
1. Fold the front 4 inches of plastic over and secure with duct tape (or staple through grommets) to create a rigid leading edge.
2. Punch two holes 8 inches apart 2 inches from the folded edge.
3. Thread rope through both holes, knotting ends securely underneath.
4. Sit on the plastic, grip the rope handle, and lean left/right to steer.
Why it works: The folded edge prevents snow plowing under the sled, while the rope gives braking control. Test on small hills first—this sled handles packed snow beautifully but struggles in powder. Stores flat in your garage for next winter.
Reinforced Cardboard Sled: The Kid-Friendly Upgrade
Transform flimsy cardboard into a durable sled with household supplies:
1. Cut a refrigerator box into a 30″x18″ rectangle.
2. Wrap the entire piece in overlapping layers of duct tape (shiny side out).
3. Tape a pool noodle horizontally across the front edge for a handhold.
4. Apply clear packing tape to the bottom for extra slickness.
This version lasts 3-5 runs on wet snow and actually steers. Kids can decorate it with permanent markers. Avoid thin cardboard—it buckles under rider weight. Only attempt on gentle slopes under 30 feet tall.
Build a Heirloom Wooden Sled (Weekend Project)
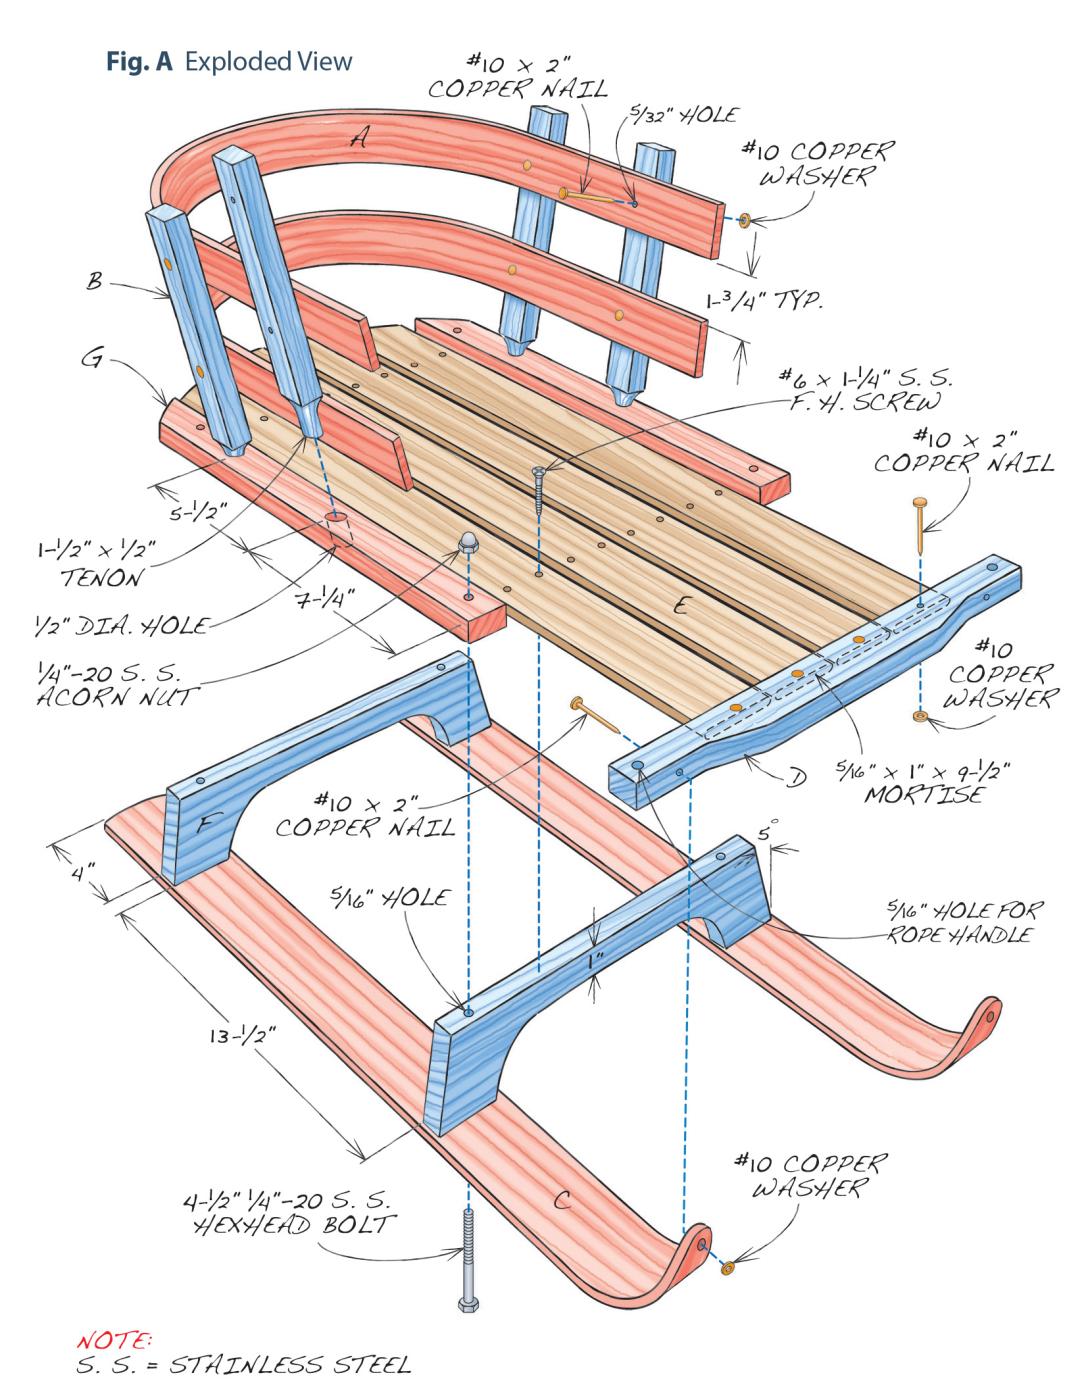
For a sled that becomes a family tradition, this 4-hour project uses basic tools and lasts decades.
Exact Materials & Tool Checklist
Don’t guess—use these specs:
– Lumber: One 8-ft 1×6 cedar (for deck), one 8-ft 1×4 pine (for runners)
– Hardware: 12 exterior #8 wood screws (2.5″), 20 1.25″ deck screws, 10-ft 3/4″ nylon rope
– Tools: Drill, circular saw, tape measure, 120-grit sandpaper, exterior spar urethane
Critical cut list (no math required):
– Runners: Two 40″ pieces from 1×4 (bevel front ends at 45°)
– Cross supports: Three 5.5″ pieces from 1×4
– Deck boards: Three 40″ pieces from 1×6
Step-by-Step Assembly (Avoid These Costly Mistakes)
Mistake #1: Skipping wood glue. Always apply exterior glue to joints before screwing—it prevents creaking.
1. Build the frame: Attach cross supports between runners with glue + 2.5″ screws. Space them 10″ apart (front, middle, back). Check squareness with a carpenter’s square.
2. Install the deck: Lay 1×6 boards across the frame with 1/4″ gaps between them. Screw from the top using 1.25″ screws. Gaps prevent water pooling and wood warping.
3. Add steering control: Drill a 1″ hole through the front deck board. Thread rope through and tie a baseball-sized knot underneath.
4. Finish properly: Sand all edges smooth. Apply 3 coats of spar urethane, waiting 4 hours between coats. Never skip this—raw wood rots in one season.
Why this sled lasts: The gaps between deck boards let snow escape, while the beveled runner tips cut through packed snow. It’s heavy enough for stability but light enough for kids to carry uphill. Store it vertically in a dry garage—never leave it snow-covered overnight.
Critical Safety Fixes Most DIY Guides Ignore
Walk your hill BEFORE riding—here’s why: Hidden rocks under snow cause catastrophic wipeouts at high speed. Check for:
– “Invisible” hazards: Fence posts, tree roots, or buried playground equipment
– Runout zone: Must be 3x longer than the hill’s descent distance
– Traffic zones: Never sled toward roads or parking lots
Helmet non-negotiables: Bike helmets fail in snow impacts. Use:
– Snow sports helmets (rated for 0°F)
– Skateboard helmets with full-ear coverage
– Never use bike helmets—they shatter on hard-packed snow
The temperature trap: Below 20°F, plastic sleds (cookie sheets, trays) become brittle and shatter on impact. Switch to wooden or inflatable options in extreme cold.
Sled speed cheat sheet:
| Sled Type | Max Safe Hill Length | Critical Failure Point |
|——————–|———————-|————————|
| Cookie sheet | 50 feet | Hitting packed snow bump |
| Cardboard+bag | 100 feet | Water saturation |
| Wooden sled | 200+ feet | Loose deck screws |
| Inflatable | 150 feet | Slow air leak |
Which DIY Sled Should You Build Right Now?
For instant gratification: Grab your cookie sheet if your hill is short and clear. It’s the fastest zero-build option—but wear that helmet.
For family fun: Build the Flying Carpet sled. Kids love decorating the plastic, and it steers reliably on neighborhood hills.
For legacy building: Craft the wooden sled. It becomes a cherished heirloom (and looks stunning under Christmas lights).
Final reality check: No DIY sled matches commercial quality. Always:
1. Inspect your sled for cracks or weak points before every run
2. Test new designs at walking speed first
3. Abandon runs if the sled fishtails uncontrollably
This winter, don’t let sold-out stores steal your snow day. With these proven methods, you’ll turn kitchen clutter into sledding joy—safely and immediately. That refrigerator box in your garage? It’s not trash. It’s tomorrow’s adventure.


