
That moment when you watch elite athletes exploding forward against a weighted sled, building raw power that translates to every athletic movement, might have you wondering: “Could I build my own workout sled without breaking the bank?” Commercial sleds cost $300-$1,000, but you can create an equally effective DIY version using materials from your local hardware store. Building your own workout sled gives you complete control over weight capacity, size, and functionality while costing a fraction of store-bought models. This guide reveals exactly how to make a workout sled that delivers professional results, whether you’re training for athletic performance, building functional strength, or simply want a versatile conditioning tool that transforms your backyard into a power development zone.
Most people don’t realize that a properly constructed DIY workout sled can outperform expensive commercial models for specific training goals. The beauty of creating your own lies in customization—you determine the weight range, handle position, and surface compatibility based on your unique training needs. By the end of this guide, you’ll know precisely which materials to purchase, how to assemble them for maximum durability, proper technique for each movement variation, and workout protocols that deliver explosive power gains. Forget complicated engineering—this project requires basic tools and can be completed in a single afternoon, putting professional-grade strength training within immediate reach.
Build Your Budget-Friendly Workout Sled with These Exact Materials
Skip the expensive commercial models and create a sled that performs just as well with materials costing under $100. Your material choices directly impact performance, durability, and versatility, so select wisely based on your primary training goals.
Choose Your Base Platform: Tire vs. Steel Construction
Your foundation determines everything about your DIY workout sled’s functionality. For beginners and budget builders, a repurposed car or tractor tire offers surprising effectiveness. Flip a standard passenger tire on its side for immediate use, or enhance stability by inserting a 3/4-inch plywood circle (cut to match the tire’s inner diameter) inside the tire’s opening. This creates a solid platform that transfers your pushing force efficiently.
For serious athletes seeking professional results, a ¼-inch steel plate (18″x18″ minimum) provides superior weight capacity and durability. Pair this with 1-inch square steel tubing for the frame—this combination handles hundreds of pounds of weight plates without flexing. The steel construction requires welding skills but delivers a lifetime of reliable service on any surface.
Gather These Specific Tools for Seamless Sled Construction
Your tool selection makes or breaks the build process. For tire sleds, you’ll need:
– Circular saw or jigsaw (for cutting plywood)
– Heavy-duty drill with 3/16″ drill bits
– Deck screws (3-inch)
– Measuring tape and carpenter’s square
– Heavy-duty eye bolts (⅜-inch diameter minimum)
Steel sled builders require:
– Angle grinder with cutting wheel
– Welding equipment (MIG recommended)
– Metal files for smoothing edges
– Center punch and hammer
– Calipers for precise measurements
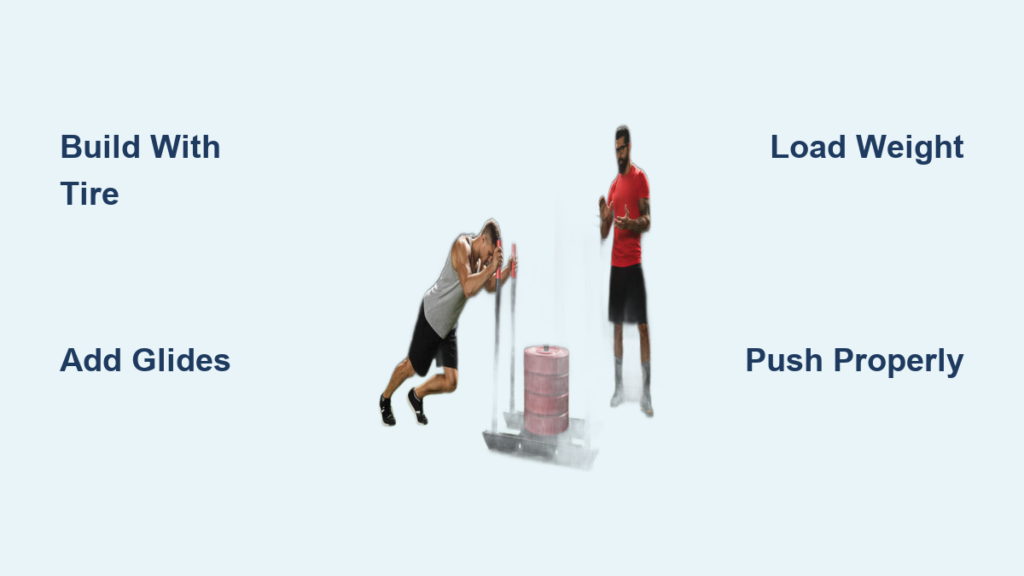
Install Low-Friction Glides That Transform Sled Performance
This critical component separates functional sleds from frustrating ones. Never drag bare wood or steel—attach UHMW (ultra-high molecular weight) plastic or HDPE (high-density polyethylene) strips to the bottom contact points. For tire sleds, cut 2-inch wide strips to attach along the bottom edge of your wooden frame. Steel sled builders should weld or bolt a continuous 2″x4″ HDPE runner across the entire base. This investment reduces friction by 80%, allowing smooth movement even with heavy loads. Visit your local plastics supplier for scrap pieces—many will sell offcuts for minimal cost.
Assemble Your Tire Workout Sled in 4 Actionable Steps

Complete this beginner-friendly project in under two hours with basic tools and materials from your garage or local hardware store.
Secure Your Frame Inside the Tire for Maximum Power Transfer
Don’t just rest wood inside the tire—create a locked structure that channels your force directly to the ground. Build a rectangular frame from 2×4 lumber slightly smaller than the tire’s inner diameter. Position the frame so it contacts the tire at multiple points, then drill pilot holes through the tire sidewall into the wood. Secure with 3-inch deck screws every 6 inches around the perimeter. Test stability by standing on the frame—zero movement means you’ve created an effective power transfer system.
Create the Perfect Attachment Point for Pushing and Pulling
Your sled’s functionality depends on this single component. For pushing, weld or bolt two 1.5-inch steel pipes to the front of your platform at a 45-degree angle, positioned at hip height when you’re in athletic stance. For pulling, install a heavy-duty D-ring or eye bolt at the exact center of the front edge—this prevents dangerous twisting during backward drags. Reinforce all attachment points with gussets or backing plates; failure here could cause serious injury during high-force movements.
Load Smart: Weight Distribution Secrets for Optimal Performance
How you add weight makes all the difference between effective training and frustrating slides. For tire sleds, place weight plates or sandbags directly over the frame structure—not on the flexible tire rubber. Use ratchet straps with cam buckles (never bungee cords) to secure loads vertically. When adding significant weight, distribute it evenly across the platform—uneven loading causes the sled to pull to one side, wasting energy and risking injury. Start with just 25-50 pounds to test your construction before adding serious resistance.
Master Proper Sled Technique to Avoid Common Training Mistakes
Even the best DIY workout sled delivers poor results with improper form. Learn these technique essentials to maximize power development while protecting your spine.
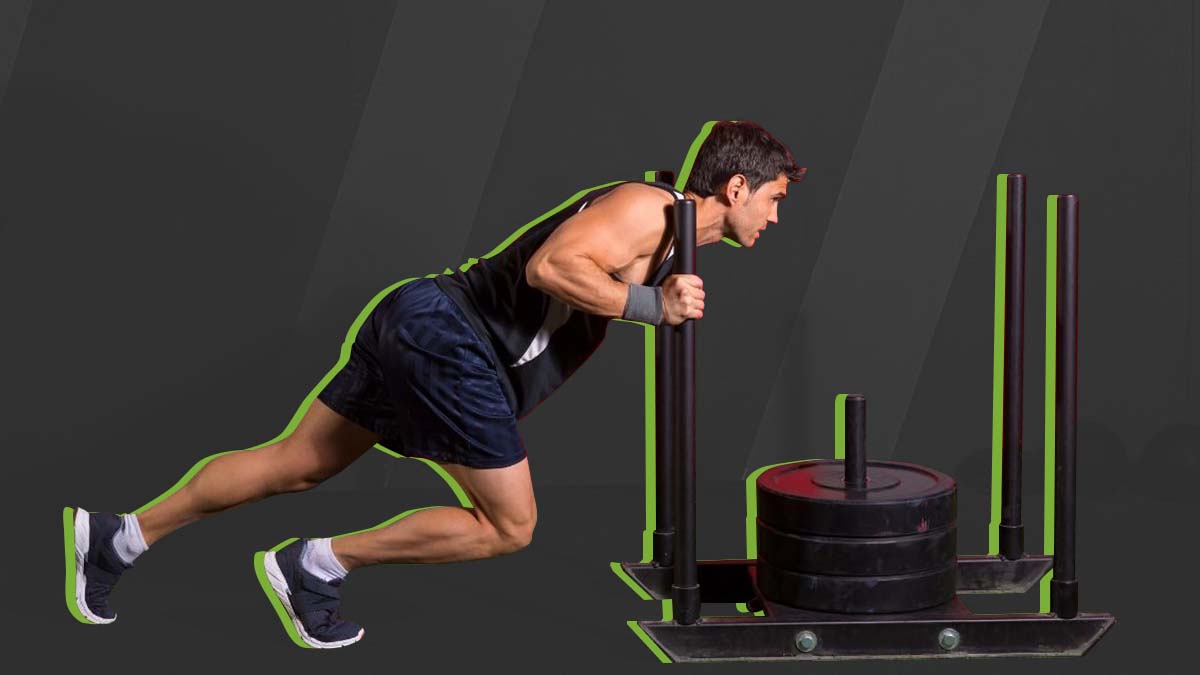
Drive Through Your Legs, Not Your Back: The Pushing Posture Breakdown
Your first mistake with sled pushing? Leaning too far forward or bending at the waist. Stand with feet shoulder-width apart, grip the handles firmly, and lower into a quarter-squat position. Initiate movement by driving through your entire foot—not just your toes—with explosive leg power. Keep your spine neutral (imagine holding a book between your chin and chest) and eyes focused 10-15 feet ahead. If your lower back rounds during the push, the weight is too heavy—scale back immediately to protect your spinal discs.
Walking Backward Drags: The Glute Activation Secret Most Miss
The backward sled pull builds posterior chain strength most lifters desperately need, but only with proper execution. Attach a belt or harness around your hips, not your waist. Take short, powerful steps backward while maintaining a slight forward lean from the ankles—not the waist. Squeeze your glutes at the end of each step to maximize muscle engagement. Most people take steps that are too long, causing their hips to drop and reducing glute activation—keep steps short and powerful for maximum effect.
Design Your Sled Workout for Explosive Power Gains
Your DIY workout sled delivers different results based on how you program it. Match these protocols to your specific fitness goals.
Power Builder Protocol: Heavy Loads for Short Distances
Use 70-85% of your maximum sled weight for distances of 10-20 yards. Rest 2-3 minutes between sets to maintain power output. Complete 4-6 sets with perfect form—your speed should remain consistent across all repetitions. This protocol develops raw strength and acceleration that translates directly to athletic performance. Warning: If your speed decreases by more than 10% on later sets, the weight is too heavy and you’re training endurance instead of power.
Conditioning Circuit: Light Loads for Metabolic Burn
For fat loss and cardiovascular conditioning, use just 25-40% of your max sled weight. Perform 30-second work intervals followed by 60 seconds of rest, repeating for 8-10 rounds. Alternate between forward pushes and backward drags to work opposing muscle groups. This protocol creates a brutal metabolic effect while building work capacity—perfect for fighters, tactical athletes, or anyone wanting to improve conditioning without long cardio sessions.
Avoid These 3 Critical Sled Training Mistakes That Cause Injury
Your DIY workout sled could become a liability without these safety essentials.
Why Grass or Turf Beats Concrete for Sled Training
Dragging your homemade sled on concrete destroys both your equipment and joints. The abrasive surface shreds plastic glides within minutes and transfers excessive vibration to your knees and spine. Train on natural grass, artificial turf, or rubber gym flooring for optimal performance and safety. If you must use concrete, invest in professional-grade UHMW plastic runners at least ½-inch thick—standard hardware store plastic won’t survive more than a few sessions.
How Much Weight Is Too Much: The Form Breakdown Warning Signs
Your sled work becomes counterproductive—and dangerous—the moment form deteriorates. Watch for these red flags: lower back rounding during pushes, uneven step patterns during drags, or excessive forward head position. If you notice any of these, reduce weight by 20-30% immediately. Better to train with lighter weight and perfect technique than risk injury with excessive load. Remember: sled training should challenge your strength, not compromise your movement quality.
Harness vs. Rope: The Pulling Safety Decision
Never wrap a rope around your waist for backward drags—a sudden stop could cause serious spinal injury. Use a dedicated pulling harness that distributes force across your hips, or maintain constant tension with a rope while keeping your core braced. For forward pulls, keep the rope attachment point below hip height to prevent dangerous backward tipping as you walk away from the sled.
Building your own workout sled puts professional power development within reach of any serious trainee. The $50-$100 investment in materials delivers a lifetime of explosive strength gains when constructed properly and used with intelligent programming. Start with a simple tire sled to validate your commitment, then consider upgrading to steel construction as your training progresses. The real test comes when you load it up, feel that initial resistance, and discover how much more powerful you become with consistent sled work. Your backyard, local park, or garage gym just became the most effective strength development zone you own—now go build that sled and push your limits.


