

Picture this: it’s 9 PM, you’re craving ice cream, but your fitness goals are calling. What if you could have both—the creamy, indulgent dessert you want AND the 40+ grams of protein your body needs? If you’re searching for how to make protein ice cream with Ninja Creami that actually tastes like real ice cream, you’ve found the right guide. Unlike chalky store-bought alternatives, the Ninja Creami’s freeze-processing method transforms simple ingredients like Fairlife milk and protein powder into scoopable, gym-friendly pints that satisfy cravings without derailing progress.
This isn’t just “healthy ice cream”—it’s authentic texture with complete macro control. By freezing your base mixture for 24 hours then spinning it through specialized cycles, you’ll create dairy desserts hitting 20-49g protein per pint while staying under 436 calories. Forget icy textures; we’ll show you exactly how to make protein ice cream with Ninja Creami that rivals premium brands.
Ninja Creami Equipment Essentials

Skip generic blenders—this machine is non-negotiable. The Ninja Creami’s unique freeze-processing technology spins frozen bases into creamy perfection through multiple cycles no standard blender can replicate. For flawless protein ice cream, gather these specific items:
Must-Have Gear Checklist:
– Ninja Creami Machine (any model works)
– Official 16 oz Pint Containers (with visible max fill line)
– Handheld Milk Frother (creates smoother bases than blenders)
– Kitchen Scale (for precise macro tracking)
Critical Prep Tip: Always freeze containers lid-off on a level surface. Lids trap moisture that forms damaging “ice humps” during spinning. Place containers away from freezer walls to ensure even freezing—this prevents texture-killing temperature fluctuations.
Protein Ice Cream Base Building Blocks
Liquid Foundations That Guarantee Creaminess
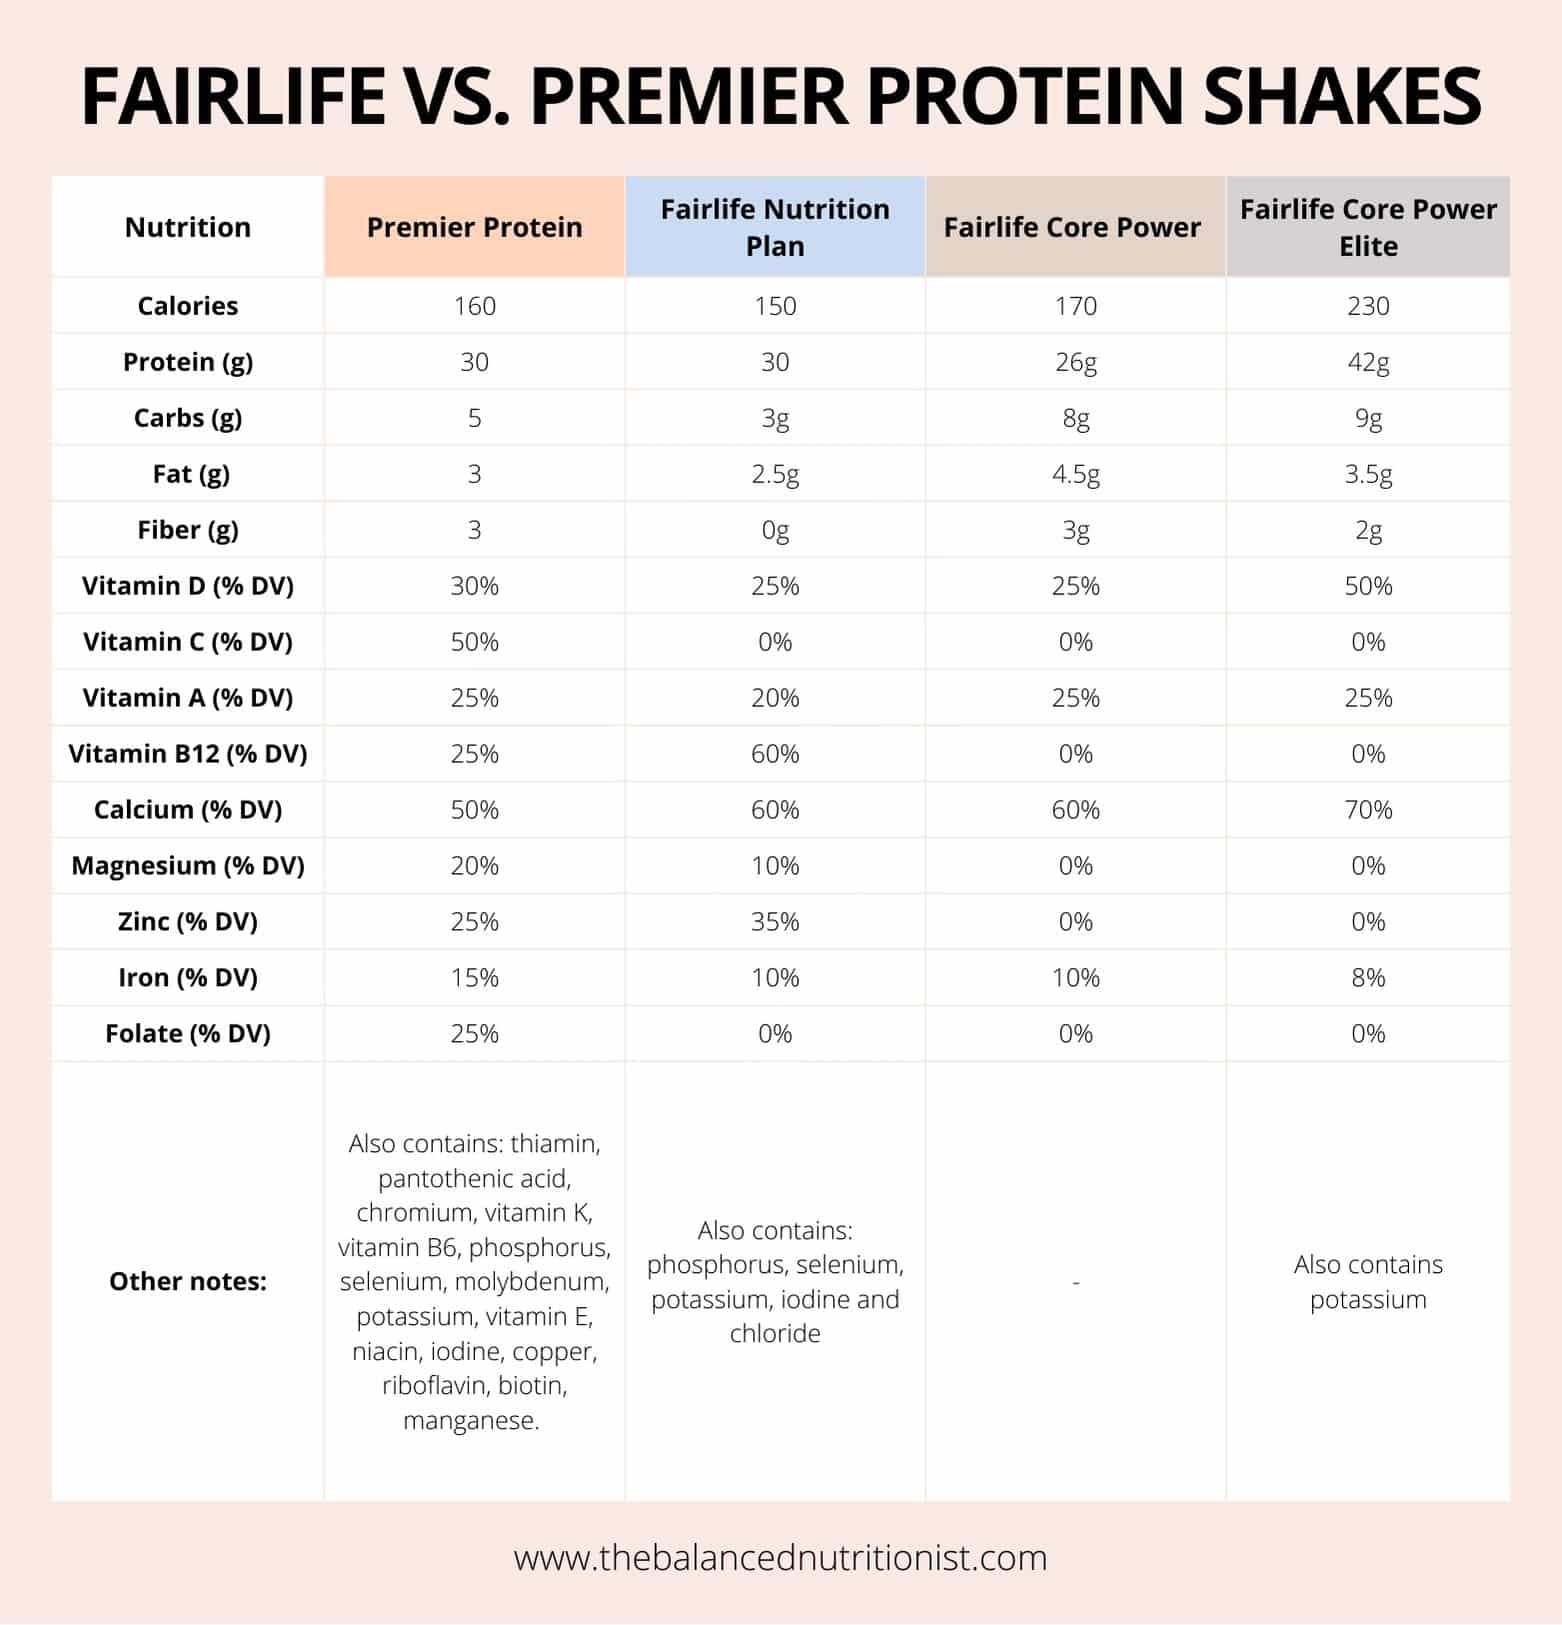
Your liquid base directly impacts protein content and texture. Fairlife milk dominates with 13g protein per cup while staying lactose-free, but these alternatives work:
– 12 oz Ready-to-Drink Shakes (Fairlife Core Power) = instant chocolate base
– 1¼ cups Greek Yogurt + ¼ cup Milk = ultra-thick, high-protein foundation
– 1½ cups Blended Cottage Cheese = highest protein option (49g/pint)
Avoid watery alternatives like almond milk—they cause icy results. For non-dairy success, use full-fat coconut milk to mimic dairy richness.
Protein Powder Selection Secrets
One scoop (25-30g) of whey isolate transforms liquids into dessert, but avoid these pitfalls:
– ✘ Plant proteins create gritty textures (use only whey/casein blends)
– ✓ Clean Simple Eats or Flavcity vanilla blend smoothly without chalkiness
– Texture Game-Changer: Add 1-2 tbsp sugar-free instant pudding mix—it eliminates iciness while adding body without extra calories.
Foolproof Protein Ice Cream Recipes
Vanilla Power Base (35g Protein)
Combine in pint container:
– 1.5 cups Fairlife 2% milk
– 1 scoop vanilla whey protein
– 1 tbsp sugar-free vanilla pudding mix
– 1-2 tbsp monk fruit sweetener
– ½ tsp vanilla extract
Mix with frother until smooth. Rest 5 minutes to release air bubbles before freezing. Yields 436 calories per pint.
2-Ingredient Emergency Fix
When time is tight:
– 1.5 cups Fairlife milk
– 1 scoop protein powder
Mix thoroughly, freeze 24 hours. Makes a half-pint (228 calories, 20g protein). Perfect for beginners testing the process.
Ninja Creami Processing Protocol
Day 1: Freeze Like a Pro
1. Fill correctly: Never exceed the max fill line—ingredients expand dramatically during spinning.
2. Mix thoroughly: Use a frother until zero powder clumps remain (30 seconds).
3. Rest mixture: Let sit 5-10 minutes to dissipate air bubbles that cause graininess.
4. Freeze uncovered: 24 hours minimum on a level freezer shelf. Eight hours yields inferior texture.
Day 2: Spin Sequence for Creaminess
1. Strategic thaw: 10 minutes at room temperature or 30 seconds under hot water.
2. First spin: “Lite Ice Cream” setting—expect crumbly texture (this is normal!).
3. Re-spin magic: Add 1-2 tbsp milk, use “Re-Spin” setting 1-2 times for creamy results.
4. Mix-ins timing: Create a center hole, add 1-2 oz crushed cookies, then use “Mix-In” setting.
Texture Troubleshooting Tactics

Fixing Crumbly Results
Don’t panic if your first spin looks like snow! This happens when the base hasn’t fully incorporated. Simply:
– Add 1 tbsp milk
– Re-spin using “Re-Spin” setting
– Repeat once more if needed (most pints require 2-3 re-spins total)
Pro Tip: Over-thawing causes soupiness—stick to 10 minutes max.
Eliminating Ice Crystals
Causes and solutions:
– ❌ Low fat content → Add 1 tbsp pudding mix next batch
– ❌ Insufficient freeze time → Always freeze 24+ hours
– ❌ Air bubbles in base → Rest mixture 10 minutes before freezing
Warning: Overfilling containers causes overflow that damages blades—fill to max line ONLY.
Flavor Variations That Work
Chocolate Lover’s Toolkit
Guaranteed winners:
– Cookies & Cream: 2 crushed Oreos during mix-in cycle
– Reese’s Blizzard: 2 tbsp chopped PB cups + 1 tbsp peanut butter ribbon
– Protein Boost: Add 10g unflavored collagen for extra body
Avoid cocoa powder clumping—mix with pudding powder before adding liquids.
Fruit-Based Successes
Skip watery fruits—use these instead:
– Dole Whip Style: 10 oz frozen pineapple + ¼ cup milk + vanilla protein
– Strawberry Fields: Strawberry protein powder + ½ cup freeze-dried berries
– Banana Cream: Banana Greek yogurt + vanilla wafers (add during mix-in)
Never use fresh berries—they create icy pockets. Freeze-dried versions maintain texture.
Advanced Texture Mastery

Fat Content Strategy Guide
Match fat levels to your goals:
– 🔥 Cutting Phase: Fat-free Fairlife + pudding mix (lowest calories)
– 💪 Bulking Phase: Half whole milk + half cream (richest texture)
– ⚖️ Maintenance: 2% milk (optimal balance)
Thickening Hacks:
– ¼ tsp xanthan gum = commercial-quality texture
– Sugar-free pudding mix = #1 texture enhancer (use 1-2 tbsp)
– 10g collagen = protein boost + creaminess
Temperature Control Checklist
- ❄️ Freezer too cold? Thaw 5 extra minutes before spinning
- 🌡️ Freezer too warm? Extend freeze time to 30 hours
- 🔁 Re-serving: Always re-spin or thaw 10 minutes—microwaving ruins texture
Mix-In Rules for Perfect Distribution
Timing and Quantity Limits
Add mix-ins ONLY after final re-spin using “Mix-In” setting. Adding too early breaks down ingredients. Critical rules:
– ✋ Max 2 oz total per pint (overloading strains the machine)
– 🔪 Pre-crush cookies/candy into pea-sized pieces
– 🍪 Protein-friendly options: Crushed Quest bars, graham crackers, or freeze-dried fruit
Winning Combo: Oreos + 1 tbsp powdered peanut butter (creates swirls without sinking)
Storage and Batch Prep System
Leftover Preservation Protocol
For optimal next-day texture:
1. Level surface with spoon after spinning
2. Replace lid tightly
3. Refreeze on level shelf
4. Consume within 1-2 weeks (label with date)
Meal Prep Strategy:
– Monday/Tuesday: Chocolate RTD bases (fastest)
– Wednesday/Thursday: Greek yogurt bases (highest volume)
– Weekend: Cottage cheese bases (max protein)
Cost Analysis: Homemade vs. Store-Bought
Real math per pint:
– 💰 Homemade: $2.00-$3.00 (Fairlife milk + protein powder)
– 🏪 Store-Bought: $5.00-$8.00 (similar protein ice creams)
ROI Reality: Your Ninja Creami pays for itself within 20-30 pints. At one pint daily, that’s just one month of guilt-free dessert.
Final Takeaway: Master the 24-hour freeze and embrace re-spins to create protein ice cream with Ninja Creami that hits 40g+ protein while tasting like a cheat meal. Start with the two-ingredient vanilla base, then progress to cottage cheese power pints. Your late-night cravings just became your secret muscle-building weapon—no more sacrificing flavor for fitness. Ready for your first pint? Grab that Ninja Creami and freeze your way to dessert victory tonight.


