
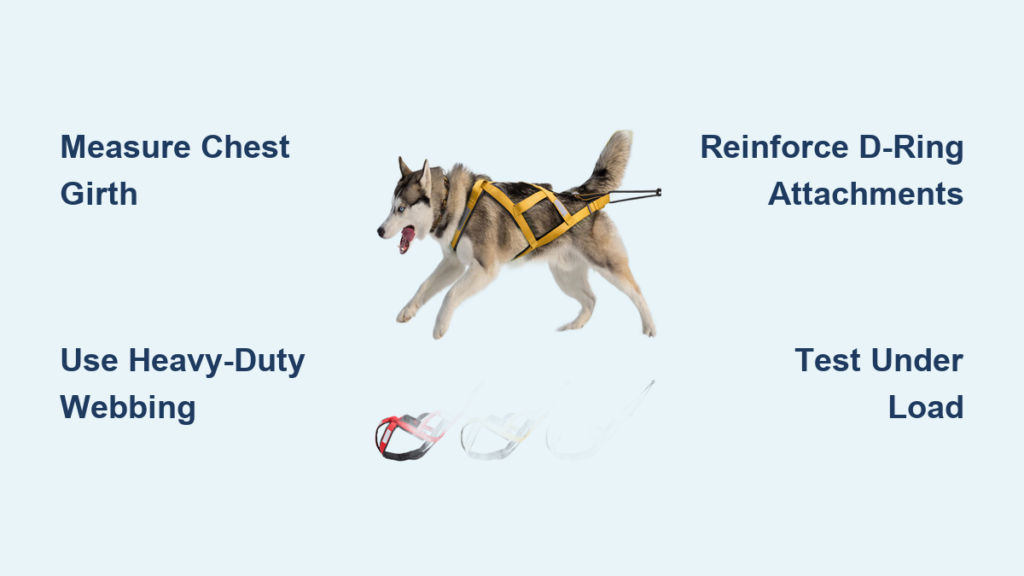
Your lead dog strains against a flimsy store-bought harness as ice crystals form on its frayed straps – a scene too many mushers know well. Commercial harnesses often fail under real trail conditions, causing painful chafing and reduced pulling power that compromises your entire team. Learning how to make a sled dog harness solves this by creating a custom-fit solution that matches your dog’s unique anatomy and your trail demands. This guide delivers the exact process used by professional mushers to craft X-back harnesses that withstand 1,000+ pound pulls while keeping dogs comfortable mile after mile. You’ll discover critical measurements most beginners miss, industrial-strength stitching techniques, and safety checks that prevent mid-run failures.
Why Store-Bought Harnesses Fail During Heavy Pulling
Off-the-shelf harnesses sacrifice performance for mass production, creating three critical failure points during actual mushing. The chest strap often rides too high, restricting shoulder movement and causing hair loss along the ribcage within weeks. Flimsy stitching at D-ring attachment points snaps under load – a catastrophic failure when your dog hits 20mph on packed snow. Most dangerously, generic sizing creates pressure points that cause painful sores on Alaskan Huskies’ slender frames or fails to distribute weight properly on larger Malamutes. When you make a sled dog harness yourself, you control every stress point. Custom padding placement eliminates chafing, while industrial-grade webbing and box-X stitching patterns create failure points rated for 3x your dog’s maximum pull weight. This isn’t just about durability – it’s about preventing injuries that sideline your lead dog for an entire season.
Gathering Industrial-Strength Materials for Trail Survival

Webbing That Won’t Snap Under Load
Skip craft-store nylon and source military-spec 2-inch (5cm) Type 138 webbing rated for 2,000+ pounds. The chest and girth straps require this heavy-duty material, while 1-inch (2.5cm) poly webbing works for neck straps where flexibility matters. Verify the manufacturer’s test certificate – many “heavy-duty” webbing rolls fail at 800 pounds. For padding, use 1/4-inch closed-cell foam (like Evazote) that won’t absorb moisture during river crossings. Never substitute with memory foam – it compacts under pressure within days.
Hardware That Survives Sub-Zero Stress
Your D-rings must be stamped with “1,000+ lb breaking strength” – climbing-rated carabiners are ideal for gangline attachments. Test hardware by applying steady pressure with a come-along winch; if the metal deforms, discard it immediately. For buckles, choose plastic ladder-locks over metal: they won’t freeze shut at -40°F. Pro tip: Dip all hardware in boiled linseed oil before assembly – this creates an invisible waterproof barrier that prevents corrosion from dog sweat and trail slush.
Taking Trail-Ready Measurements in Under 5 Minutes
The Critical Chest Girth Measurement
Stand your dog squarely on level ground. Wrap a flexible tape measure around the widest part of the chest, positioned 4 inches behind the front legs – not at the shoulders. This spot must accommodate full lung expansion during sprints. Have a helper lift the tape slightly; it should allow two fingers to fit comfortably but not slide freely. If measuring a Siberian Husky with thick winter coat, subtract 1/2 inch from your measurement to prevent summer looseness.
Avoiding Neck Strap Chafing
Measure the neck girth at the base where it meets the shoulders, not higher up. The strap must sit below the jawline to avoid throat pressure. Check fit by sliding your flat hand palm-down under the strap; if your knuckles catch, it’s too tight. For breeds like Alaskan Malamutes with heavy neck ruffs, add 1 inch to measurements but use adjustable buckles for seasonal changes.
Cutting and Sealing Webbing for Fray-Free Durability
Precision Cutting Techniques
Lay webbing on a cutting mat and use a rotary cutter with a fresh blade – scissors cause uneven fraying. For the main saddle piece, cut 2-inch webbing to your back length measurement plus 12 inches for overlap. Mark stitching lines with a fabric marker at 1/4-inch intervals. Critical mistake to avoid: Never cut webbing while stretched; this causes shrinkage after assembly. Always cut at natural tension.
Heat-Sealing Like a Professional
Hold cut ends 1-2 inches above a butane lighter flame, rotating constantly until edges melt smooth. Immediately pinch sealed ends with pliers to create a rounded tip that won’t snag. Test seal quality by vigorously rubbing the end between your fingers – if fibers pull loose, reheat. For thick padding layers, use a soldering iron tip to melt foam edges before covering with webbing.
Building the Reinforced Saddle Section for Maximum Comfort
Creating the Load-Bearing Saddle
Fold your 2-inch webbing piece in half lengthwise, sandwiching the closed-cell foam padding inside. Baste temporarily with heavy thread before final stitching. The saddle must sit flat along the spine without curving – if it bows, your measurements are inaccurate. Visual cue: When held horizontally, the saddle should support 5 pounds of weight without sagging.
Industrial-Strength Stitching Patterns
Sew all edges with V-69 bonded nylon thread using a box-X pattern: Stitch 1 inch forward, reverse stitch, then create a perpendicular box. Repeat 3 times at stress points. Set your industrial machine to 6 stitches per inch with size 20 needles. Hand-stitchers must use a sailmaker’s palm and waxed thread, making at least 10 stitches per inch. After sewing, test seams by pulling with 100 pounds of force – any thread slippage means immediate rework.
Securing D-Rings for 1,000lb+ Pulling Power
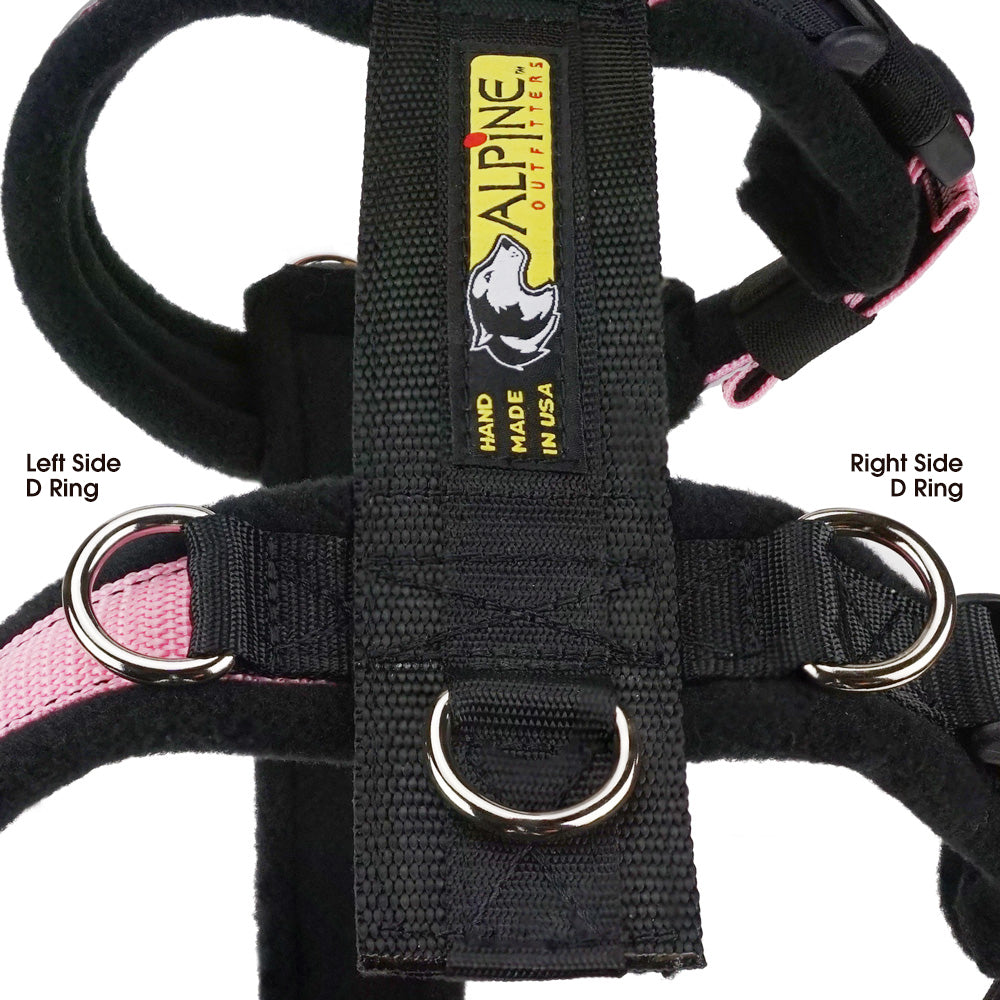
Reinforced Gangline Attachment
Position the main D-ring 2 inches behind the neck strap attachment point. Layer three strips of 2-inch webbing vertically where the D-ring base meets the saddle, creating a “sandwich” that fully encases the metal. Sew through all layers using a diamond-shaped box-X pattern with 8 rows of stitching. Pro safety check: Apply pressure until the webbing visibly stretches – if the D-ring shifts more than 1/8 inch, reinforce with additional webbing layers.
Preventing Hardware Freeze-Ups
Before final assembly, coat all metal contact points with silicone grease. Thread the D-ring through the reinforced webbing channel while warm so it rotates freely when frozen. Test rotation after 24 hours in a freezer – if stiff, disassemble and reapply grease. This prevents dangerous binding when your dog makes sudden turns on icy trails.
Testing Your Harness Before the First Run
Static Load Testing Protocol
Anchor the gangline D-ring to a tree or post. Attach a 500-pound weight (or winch) and apply force gradually to 2x your dog’s expected pull weight. Inspect all stress points for:
– Webbing distortion (indicates weak stitching)
– Hardware movement exceeding 1/8 inch
– Padding compression beyond 50% thickness
If any component fails, disassemble immediately and reinforce with additional box-X stitching.
Real-World Fit Assessment
Have your dog wear the harness indoors for 30 minutes before trail testing. Watch for:
– Shoulder restriction during walking (indicates high chest strap)
– Saddle shifting side-to-side (loose girth strap)
– Red marks under neck strap (tightness issue)
Adjust buckles incrementally – a properly fitted harness allows two fingers under all straps but won’t slide off when lifted at the D-ring.
Maintaining Your Handmade Harness for Season-Long Durability
Daily Inspection Checklist
Before every run, spend 90 seconds checking:
– Stitch integrity: Run fingers along seams feeling for loose threads
– Webbing condition: Look for white stress marks indicating fiber fatigue
– Hardware function: Verify D-rings rotate freely when cold
– Padding placement: Ensure no shifting during previous run
Discard harnesses showing even minor fraying – field repairs fail under load.
Cleaning Without Compromising Strength
Never machine wash. Instead, scrub with a stiff brush using cold water and mild soap (like Dr. Bronner’s). Rinse thoroughly while stretching webbing to remove trapped silt. Air-dry flat away from direct heat – hanging causes distortion. For stubborn ice buildup, wipe with a cloth dampened with 50% vinegar solution to melt crystals without damaging fibers.
When to Immediately Retire Your DIY Sled Harness
Retire harnesses showing any of these critical failure signs:
– Webbing discoloration: Yellowing indicates UV degradation
– Stitch unraveling: More than two consecutive broken stitches
– Hardware deformation: D-rings that no longer lie flat
– Foam compaction: Padding thinner than 1/8 inch at pressure points
Never repair these issues in the field – a compromised harness risks spinal injury during high-speed runs. Keep retired harnesses as pattern templates but never reuse damaged components.
Final Note: Building a reliable sled dog harness requires precision, but pays off in trail confidence. Your custom creation should last 3-5 seasons with proper care – far exceeding store-bought alternatives. Always prioritize fit over speed: a well-made harness disappears on your dog, allowing natural movement from the first step to the final dash across the finish line. For your next project, consider adding reflective tape along stress seams for night visibility – a simple upgrade that addresses the #1 safety concern in winter mushing. Remember: when you make a sled dog harness correctly, you’re not just crafting gear – you’re building trust with your lead dog, mile after mile.


