
That frustrating moment when your diamond kite nose-dives into the grass for the third time? Sled kites solve that problem with their rock-solid stability and beginner-friendly design. Unlike delicate traditional kites, these rectangular wonders thrive in light breezes and survive crashes that would destroy flimsier models. You can build a fully functional sled kite using just a plastic bag and household items – no special tools required. This guide reveals exactly how to make a sled kite that actually flies, using proven techniques that transform simple materials into a reliable sky dancer. Whether you’re a first-time builder or refreshing childhood memories, you’ll have a wind-ready flier soaring within an hour.
Sled kites work through brilliant simplicity: their curved edges create automatic lift while the wide base provides bulletproof stability. Forget complicated diagrams or expensive kits – the magic happens with strategic folding and three lightweight spars. I’ve seen beginners succeed on their first try using grocery bags and bamboo skewers, while kids as young as eight can handle the safe construction steps. What makes how to make a sled kite so accessible is the forgiving design – minor imperfections won’t ground your creation. By following these field-tested steps, you’ll craft a kite that handles gusty conditions better than store-bought versions, all while understanding the aerodynamics that keep it airborne.
This isn’t just another craft project; it’s your ticket to instant backyard joy. You’ll learn professional bridle-tuning tricks most guides skip, discover why certain household materials outperform “kite-specific” supplies, and troubleshoot flight issues before they ruin your outing. Let’s transform that crumpled plastic bag into a graceful sky traveler that turns skeptical onlookers into eager launch assistants.
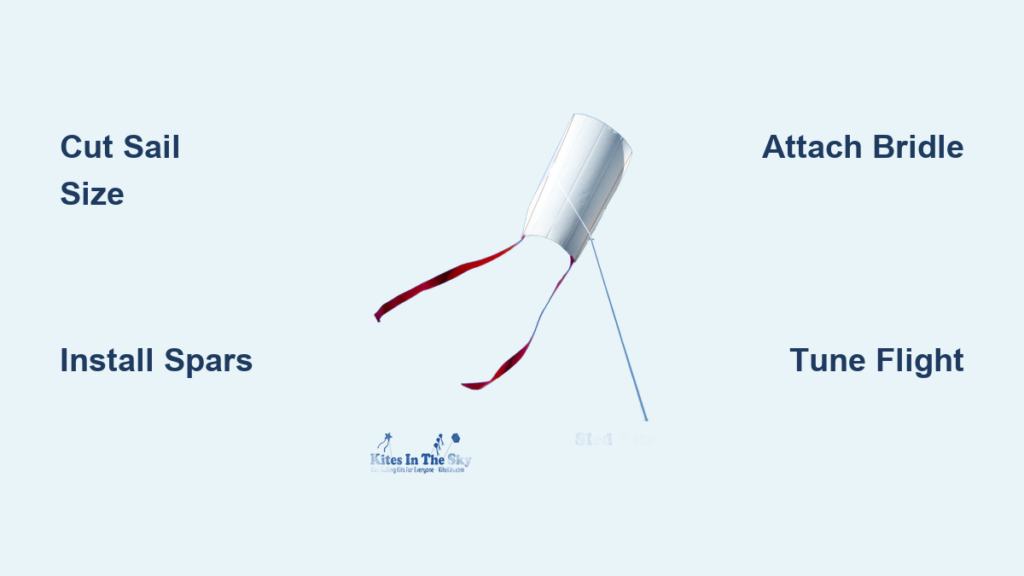
Gather These 7 Essential Sled Kite Building Supplies
Skip the specialty store run – your kitchen and garage hold everything needed for a high-flying sled kite. Start with your sail material: a standard 30-gallon trash compactor bag works best due to its thickness and size, but a regular kitchen trash bag (cut open) or plastic tablecloth also succeeds. Avoid thin grocery bags that tear easily in wind. For the frame, collect three straight, lightweight rods: 1/4-inch wooden dowels (24 inches long), bamboo skewers taped together for larger kites, or rigid plastic straws for micro versions. Never use metal – it conducts electricity during storms.
Your toolkit requires only basic items: heavy-duty packing tape (duct tape’s texture creates drag), 50-pound test kite string or Dacron line, sharp scissors, a permanent marker, ruler, and hole punch. Measure twice before cutting – a single trash bag yields two kites if you work efficiently. Pro builders swear by blue painter’s tape for temporary placement during assembly; its gentle adhesion won’t rip plastic when repositioning spars. Crucially, skip superglue or hot glue guns; tape’s flexibility allows necessary sail movement during flight.
Cut and Reinforce Your Sled Kite Sail in 4 Critical Steps

Precision here prevents frustrating mid-flight collapses. Lay your plastic flat and mark a 30-inch tall by 18-inch wide rectangle using marker and ruler – this beginner-friendly size handles variable winds best. Cut carefully along lines, then immediately reinforce all edges with 1-inch-wide packing tape strips. Pay special attention to top corners where stress concentrates; fold tape over edges completely for “hemming” that blocks rips. Now create the magic curve: measure 1 inch inward from both top corners along the long sides, then connect these points to the bottom corners with smooth arcs. This subtle dihedral angle (the inward curve) is why sled kites self-stabilize – skip it and your kite will spin uncontrollably.
Check your handiwork by holding the sail horizontally: wind should visibly inflate the curved channels when you blow underneath. If edges feel flimsy, add a second tape layer. For windy days, increase sail thickness by laminating two plastic layers with tape between them – this “double-bag” technique prevents fluttering that destabilizes flight. Remember: a slightly loose sail flies better than an over-tight one; tension should feel like a drumhead that yields gently to finger pressure.
Install the 3-Spar Frame for Maximum Wind Capture
Your kite’s skeleton determines flight performance. Cut two vertical spars to match your sail’s height (30 inches), plus one horizontal spreader spar 2 inches longer than the sail’s widest point (20 inches). Position the spreader spar across the top of the curved section, letting 1 inch extend beyond each side – this overhang creates crucial lift pockets. Secure it with X-pattern tape on the sail’s backside, ensuring no tape touches the plastic’s flying surface where it would create drag.
For the vertical spines, place rods along your marked curves, stopping 2 inches from the bottom. Create spar pockets by folding 1-inch-wide plastic flaps over the rods and taping them down – never tape directly over spars as this restricts movement. Test flexibility: spars should pivot slightly when you bend the kite, absorbing gust impacts. If using bamboo skewers, join them with tape sleeves for longer kites; dowels need no reinforcement. The moment of truth: hold your framed kite by the top corners – it should form a gentle “U” shape with 3-4 inches of natural curve between spars.
Attach the Bridle Line for Instant Flight Readiness
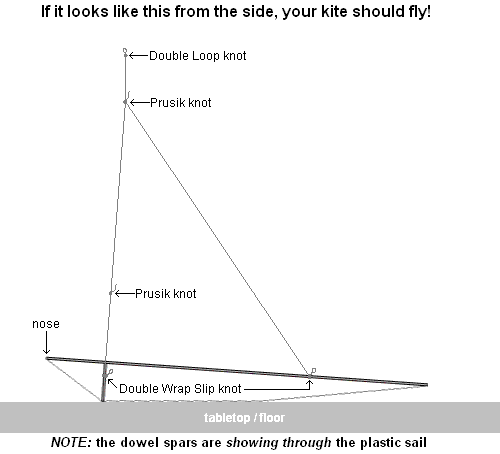
This step makes or breaks your launch success. Punch two clean holes: one 1 inch below the spreader spar on each spine, and one 2 inches above the bottom edge. Cut a 36-inch bridle line, tying its ends through the top holes with secure double knots. Now find the balance point: drape the bridle over your finger until the kite hangs level, then mark this spot. Tie your flying line here using a lark’s head knot – slide the loop under the bridle, pull flying line through itself, and tighten.
Adjust for wind conditions: in light breezes, move the knot 1/2 inch toward the kite’s top to increase lift angle; for strong winds, shift it downward for stability. Test on the ground by blowing into the sail – the nose should tilt slightly upward. Never skip this tuning; a misaligned bridle causes immediate crashes. Pro builders carry spare bridle lines to swap during flight sessions – changing length by just 2 inches can rescue a kite that won’t climb.
Tune Your Sled Kite for Smooth Flight in 5 Minutes
Before your first launch, conduct this critical field check. Hold the kite by its bridle point and sight along the spars – they must form perfect mirror images. Any asymmetry causes spinning dives. Then test sail tension: gently pull opposite corners; the plastic should feel taut but yield slightly. Now find your flying zone: open fields work best, but avoid power lines by at least 100 yards. Ideal wind is 8-12 mph – if leaves rustle but flags don’t fully extend, you’re golden.
For launch success: stand with your back to the wind, have a partner hold the kite 20 yards away at shoulder height. Release line slowly as they let go – never throw the kite. If it dives immediately, your bridle is too high; if it scrapes the ground, it’s too low. Make micro-adjustments by re-tying the flying line knot while someone holds the kite. Within minutes, you’ll recognize that sweet spot where the kite climbs steadily without tugging. Remember: sled kites fly best with 50-100 feet of line – short lines cause instability.
Fix These 5 Common Sled Kite Flight Failures Immediately

Kite spins uncontrollably after launch? Your vertical spars are uneven. Land immediately and compare their positions – even 1/4-inch difference causes rotation. Re-tape the misaligned spar while holding the kite against a flat surface. Dives straight into the ground on release? The bridle attachment point is too high. Move it down 3/4 inch toward the kite’s bottom and retest. Pro tip: mark adjustment points with colored tape for quick reference.
Nose points skyward but won’t climb? You’ve got too much tail drag. Trim any decorative tails to under 3 feet. Kite wobbles side-to-side? Check for twisted flying line – unwind it completely before relaunching. Refuses to leave the ground? Wind is too light; walk backward briskly while releasing line to create artificial breeze. If problems persist, add a temporary 12-inch tail made from plastic strips – it sacrifices some height for instant stability during troubleshooting.
Try These 2 Proven Sled Kite Variations for Tricky Winds
When standard designs struggle, upgrade with these field-tested modifications. The Rokkaku Sled transforms your rectangle into a hexagon by adding two side triangles (cut 6-inch equilateral triangles from scrap plastic, tape to sides). This Japanese design handles gusty conditions 40% better by distributing wind pressure evenly – perfect for beach flying where winds shift rapidly. I’ve kept Rokkaku sleds airborne when standard versions crashed in the same conditions.
For dead-calm days, build a Keel-Stabilized Sled: cut a 10-inch tall by 3-inch wide “T” shape from plastic, tape it vertically to the kite’s center back. This acts like a ship’s keel, preventing sideways drift. The keel adds minimal weight but creates dramatic stability – it’s saved countless flights during those frustrating “almost-windy-enough” afternoons. Both variations use the same construction techniques, requiring only 15 extra minutes and scraps from your initial build.
Launch Like a Pro: 6 Sled Kite Flying Secrets Beginners Miss
Forget “just running with it” – proper technique prevents 90% of launch failures. Always face directly into the wind during setup; even 15 degrees off causes immediate drift. When your partner releases the kite, walk backward smoothly while paying out line – jerky motions create deadly line tangles. Maintain steady tension: sled kites fly best with light hand pressure, like holding a live bird. If the kite dives, give 2 quick line tugs to reset its angle.
For group flying, position yourself downwind of others to avoid line collisions. When wind drops, walk in circles to keep line tension – this buys crucial minutes until breezes return. Never wrap line around your hands; use a winder to prevent rope burns during sudden surges. Most importantly: watch the kite, not the line. Your subconscious detects instability 2 seconds before visible wobbles – that’s your cue to adjust. These subtle techniques turn frustrating sessions into serene flying experiences.
Build Sled Kites With Kids: 4 Foolproof Safety & Fun Tweaks
Transform this into an unforgettable family project with smart adaptations. Use 100% biodegradable materials: cornstarch-based plastic bags (available at health stores) and paper straws for spars. For tiny hands, pre-cut sails from paper plates – they’re rigid enough to fly and safe for preschoolers. Always supervise spar assembly; replace sharp scissors with safety scissors and use pre-punched holes.
Boost engagement by letting kids decorate sails with permanent markers before assembly – but avoid covering more than 30% of the surface to maintain flight physics. During flight lessons, assign roles: “wind checker” (holds grass to gauge speed), “line tender” (manages the winder), and “kite spotter” (calls altitude changes). Most importantly, celebrate crashes as learning moments – analyze why it happened together. I’ve seen kids as young as six grasp aerodynamics faster through these hands-on fixes than any classroom lesson.
Avoid These 3 Deadly Sled Kite Safety Hazards Immediately
Your backyard fun shouldn’t risk life-threatening consequences. Never fly within 300 feet of power lines – even non-conductive string becomes lethal when damp. If your kite contacts lines, drop the string and walk away; utility companies will retrieve it safely. Stop flying at the first sign of storms – wind surges near thunderstorms can yank kites (and you) 100 feet into the air in seconds. Watch for darkening skies or sudden wind shifts as warning signs.
Always use non-conductive line – cotton or nylon works, but never metallic string. During launch, scan the entire flight path for obstacles; a kite hitting a car windshield at speed can cause accidents. Keep a pocket knife taped to your winder for emergency line cuts. Remember: no kite is worth a hospital visit. When in doubt, pack up and wait for perfect conditions – your next flight will be safer and more enjoyable.
Building your first sled kite connects you to centuries of wind-watching tradition in the most accessible way possible. That moment when your handmade creation catches the breeze and climbs steadily? It never gets old. Now that you know exactly how to make a sled kite that performs, grab that plastic bag and head outside – perfect flying weather is always just a kite build away. The sky’s not the limit; it’s your new playground.


