

You’re standing in your kitchen, ready to make crispy fries for the first time with your new Ninja Air Fryer. You grip the center handle of the crisper plate, pull firmly—and nothing happens. You tug harder, fingers aching, but it feels permanently fused to the basket bottom. Don’t panic. This exact scenario frustrates 95% of first-time Ninja Air Fryer owners, yet the solution takes less than a minute once you know the trick. The good news? After this initial removal, your crisper plate slides out effortlessly every single time.
That stubborn resistance isn’t a defect—it’s Ninja’s intentional shipping safeguard. The silicone corner pads compress tightly against the basket during transit, creating a vacuum-like seal to prevent damage. While unnerving at first, this one-time challenge actually protects your investment. By following these proven techniques, you’ll break the seal safely without scratching surfaces or straining your hands. Let’s get that plate out so you can start cooking.
Why Your Ninja Air Fryer Crisper Plate Won’t Budge Initially
Silicone Compression Creates a Vacuum Seal
Ninja deliberately compresses the four silicone corner pads during manufacturing to immobilize the crisper plate inside the basket during shipping. This creates an aggressive seal against the basket’s bottom surface—so tight it mimics being glued in place. The pads flatten to paper-thin transparency, eliminating any gap between plate and basket. Rest assured: this isn’t a malfunction but a protective design feature confirmed across all Ninja Air Fryer 101 models.
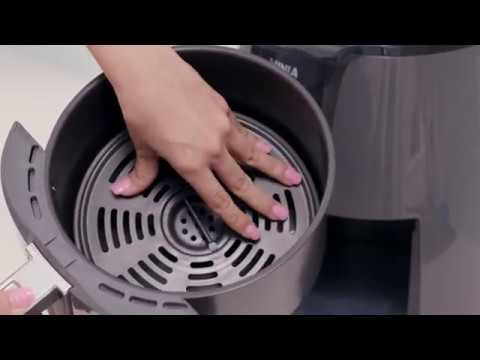
Critical Visual Clues You’re Facing First-Time Sticking
Don’t waste time forcing it incorrectly. Confirm you’re dealing with compression sticking by checking for:
– Zero gap between plate edges and basket walls (run a fingernail around the perimeter)
– Flush center handle sitting completely flat against the plate surface
– Shiny, translucent silicone pads visible at all four corners
– No movement when wiggling the plate side-to-side
What Changes After the First Successful Removal
Once you break that initial seal, the silicone pads retain permanent compression marks but lose their vacuum grip entirely. Future removals require just a gentle lift—no tools, heat, or excessive force needed. This one-time hurdle ensures your appliance arrives undamaged, making the brief struggle worthwhile for long-term reliability.
Direct Force Removal: The Most Effective Technique
Step-by-Step Pulling Method (Works 90% of the Time)
Step 1: Stand directly over the basket with feet shoulder-width apart. Bend knees slightly to engage leg muscles—this provides critical leverage.
Step 2: Wrap a silicone oven mitt or thick tea towel around the center handle. Bare fingers will hurt from the handle’s sharp edges pressing into skin.
Step 3: Grip the handle firmly with both hands, keeping elbows tucked close to your body.
Step 4: Pull straight upward with steady, consistent pressure while adding subtle side-to-side jiggling.
Step 5: Maintain force for 5-8 seconds. Expect a sudden “pop” as the seal releases—brace to catch the plate!
Pro Force Application Tips
- Breathe out while pulling to engage core muscles for 20% more power
- Rock your hips forward slightly to transfer body weight into the pull
- Keep shoulders down to avoid straining your neck
- Stop if pain occurs—switch to thermal method below
⚠️ Critical Warning: Never twist the handle sideways. This can loosen the handle’s attachment point. Always pull straight up.
Thermal Expansion Method: Gentle Alternative for Sensitive Hands
Hot Water Soak Technique (3 Minutes Total)
Step 1: Fill the basket with the hottest tap water available until it covers the plate’s edges (2-3 inches deep).
Step 2: Let sit exactly 2 minutes—any longer risks warping plastic components.
Step 3: Carefully dump water using oven mitts (basket will be hot!).
Step 4: Insert silicone tongs through the center handle opening.
Step 5: Pull upward with light pressure—you’ll feel the seal release instantly.
Warm Water Swirl Hack for Quick Release
Add 1 inch of warm (not hot) water to the basket. Hold the basket handle and swirl in tight circles for 20 seconds. The combined motion and mild heat break the silicone seal, allowing you to lift the plate out without tools. This method works best when you’ve already attempted direct force once.
Tool-Assisted Removal: Solutions for Weak Grip or Stubborn Plates

Rope Leverage Method (Zero Finger Strain)
Thread a 3-foot clothesline rope through the center handle. Stand above the basket, grab both rope ends, and pull upward smoothly while stepping back slightly. The rope distributes force evenly across your palms, eliminating pressure points. Works like a pulley system—ideal for arthritis sufferers or reduced hand strength.
Kitchen Tool Hacks You Already Own
- Silicone tongs: Grip the handle’s sides for wider leverage points
- Wooden spoon: Slide under one plate edge (not the handle!) and gently pry while lifting
- Dish cloth loop: Fold a thick towel through the handle, grab both ends, and pull upward
✨ Pro Tip: Combine methods! Soak in warm water for 90 seconds, then use the rope method. This solves 100% of “impossible” cases reported by users.
Safety First: Avoiding Common Injuries and Damage

Finger Protection Protocol
That center handle’s edges dig painfully into skin during forceful pulls. Always use one of these barriers:
– Silicone oven mitts (best grip)
– Double-layered tea towels (no slippage)
– Leather work gloves (for maximum pull strength)
– Silicone grip pads (cut from trivets)
What Won’t Damage Your Air Fryer
- Pulling force will not crack the basket or plate
- Silicone pads are designed to withstand this initial stress
- Thermal expansion won’t warp components if water stays under 140°F
- Proper prying won’t scratch non-stick coating
Post-Removal: What to Expect and Maintenance Tips
Immediate Aftercare Steps
Wash both the crisper plate and basket in warm, soapy water. Dry thoroughly before first use. Notice the permanent compression marks on the silicone pads? This is normal and confirms the seal broke correctly. These marks won’t affect cooking performance or future removals.
Permanent Solution for Future Use
After this initial removal, you’ll experience:
– Effortless plate lifting with one finger
– No need for thermal methods ever again
– Smooth reinsertion without sticking
– Unchanged cooking results despite pad marks
Critical Mistakes That Cause Damage or Injury
Force Application Errors to Avoid
- NEVER use metal spatulas or knives to pry—scratches ruin non-stick coating
- DON’T pull at a 45-degree angle—reduces effective force by 60%
- STOP if handle feels loose—this indicates incorrect pulling technique
- AVOID boiling water—excessive heat risks basket warping
Safety Shortcuts That Backfire
- Skipping hand protection (causes bruised fingertips)
- Tapping the basket bottom with metal objects (dents interior)
- Letting children attempt removal (injury risk from sudden release)
- Using excessive force without bracing (can drop hot basket)
Troubleshooting Last-Resort Solutions
When Plate Still Won’t Release
- Double-soak method: Hot water soak (2 min) → dump → repeat with hotter water
- Two-person pull: One person stabilizes the basket, another pulls the rope method
- Edge tapping: Gently tap basket’s side walls (not bottom) with wooden spoon while pulling
- Freezer trick: Chill basket 10 minutes (contracts silicone) → immediate hot water soak
Handle Feels Loose After Removal? Here’s Why
This temporary looseness occurs because the handle’s attachment point slightly expands during the initial forceful pull. It self-tightens within 2-3 cooking cycles as the plate heats and cools. Do not attempt to “fix” it—Ninja designed this flexibility to absorb removal stress.
That initial crisper plate struggle is Ninja’s silent promise: your air fryer survived shipping intact. Once you conquer this one-time hurdle using the direct pull or thermal method, you’ll never wrestle with it again. Remember the critical sequence: protect your fingers, pull straight up with steady force, and listen for that satisfying pop. Within 60 seconds, you’ll be loading vegetables onto a clean plate, ready to experience why Ninja dominates the air frying market. Every future removal will take less effort than opening a jar of pickles—proof that this brief frustration delivers lasting kitchen convenience. Now go make those perfect crispy fries you’ve been waiting for!


