
You’re hurtling headfirst down an icy track at speeds exceeding 80 miles per hour, your skeleton sled vibrating beneath you. One wrong move could send you careening into the wall—but the difference between disaster and victory lies in mastering how to steer a skeleton sled. Unlike toboggans or bobsleds, skeleton offers no steering mechanisms beyond your body. Every millimeter of movement translates to control or chaos on the ice. This guide cuts through the confusion with actionable techniques used by elite sliders, transforming you from a passenger into the driver of your sled. You’ll learn why counter-intuitive pressure inputs create precise turns, how to avoid speed-killing mistakes, and the exact body mechanics that separate podium finishers from wipeouts.
For new sliders, the terror of losing control often leads to frantic, oversized movements that actually worsen stability. But skeleton demands finesse over force—a reality that shocks most beginners. The truth? Your shoulders and hips are your steering wheel, and understanding this physics-defying relationship is the gateway to consistent runs. By the end of this guide, you’ll execute smooth directional changes while maintaining maximum speed through corners, turning intimidating track sections into your competitive advantage.
Counter-Steering: Why Pressure on the Right Runner Turns Left

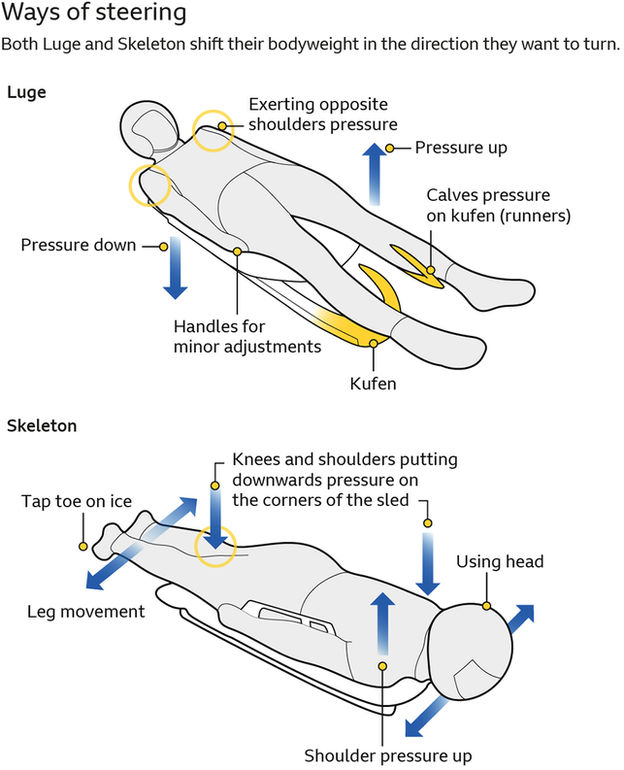
Steering a skeleton sled defies instinctive reactions. When you need to turn left, you must first apply pressure to the right runner—a principle called counter-steering. This isn’t a quirk; it’s physics in action. Pressing your right shoulder down increases friction on that runner, causing the sled to pivot around that point and initiate a left turn. The initial pressure “sets” the turn, after which the sled naturally drifts in your desired direction.
How to Execute Perfect Counter-Steering Inputs
- Left turns: Drive your right shoulder downward into the sled’s right handle while subtly shifting your right hip inward. Maintain this pressure for 0.5–1 second.
- Right turns: Mirror the motion by pressing your left shoulder into the left handle with controlled hip engagement.
- Critical timing: Release pressure before the turn completes to avoid over-rotation. Hold too long, and you’ll scrub speed; release too soon, and the sled won’t commit to the line.
New sliders often mistake counter-steering for contradiction. Remember: the initial pressure point is opposite your intended direction, but the resulting motion carries you where you need to go. Practice this on gentle training tracks until the movement feels reflexive—your survival at high speeds depends on this muscle memory.
How Runner Pressure Controls Your Skeleton Sled’s Direction
Runner pressure isn’t just about turning—it’s the sole variable determining your sled’s trajectory. Increased downward force on one runner creates micro-friction against the ice, acting like a pivot point. The harder you press, the sharper the turn. But precision matters: Olympic-caliber sliders use pressure adjustments measured in grams, not pounds.
Steering Pressure Mistakes That Cost Races
- Over-pressing: Applying excessive shoulder force causes violent “chattering,” where the sled oscillates between walls. This shaves 0.3+ seconds per corner—race-losing time.
- Inconsistent release: Failing to smoothly ease off pressure mid-turn makes the sled “hunt” for stability, creating speed-sapping zigzags.
- Delayed inputs: Waiting until you’re deep in a corner to steer forces last-second corrections. Elite sliders initiate pressure before entering turns.
Visualize your runners as ice skates: gentle, sustained pressure curves your path, while jerky movements break traction. On steep banked turns, combine shoulder pressure with a 5–10 degree head tilt toward your exit point. This subtle weight shift amplifies runner grip without destabilizing your core.
Shoulder Shrugs and Hip Pressure: Your Main Steering Tools
Your shoulders and hips form a dynamic control system. Forget dramatic body throws—effective skeleton sled steering happens through millimeter-scale adjustments. Shoulder shrugs deliver 90% of your directional input, while hip/knee pressure fine-tunes high-G corners.
Step-by-Step Steering Technique
- Initiate with shoulders: For a left turn, shrug your right shoulder down 2–3 inches into the sled’s right runner. Keep elbows slightly bent to absorb vibrations.
- Engage hips: As G-forces build (above 3G), press your right hip laterally toward the turn’s inside wall. This “anchors” the sled against centrifugal force.
- Add knee pressure: In 5+ G corners, drive your right knee against the sled’s right rail for aggressive pivot control.
- Release sequentially: Ease hip pressure first, then shoulder input, to smoothly exit the turn.
Pro Tip: Film practice runs to analyze your shoulder movement. If your head bobs more than 1 inch vertically during shrugs, you’re wasting energy and losing stability. Elite sliders maintain near-perfect head stillness—your helmet should barely ripple the ice mist.
Perfect Your Start to Avoid Early Steering Disasters
A flawed start sabotages steering before the first turn. Your initial 30-meter sprint builds kinetic energy that must transfer seamlessly to controlled steering. The “load”—mounting the moving sled—requires absolute precision.
Start Sequence for Flawless Steering Setup
- Explosive push: Drive off start handles with 90% max effort for 5 strides.
- Sprint phase: Accelerate to top speed (25–30 mph) over 25 meters.
- The critical load: Slide onto the sled perfectly straight in one fluid motion. Any lateral tilt here forces immediate corrective steering, costing 0.2+ seconds instantly.
Warning: Rushing the load causes “sled wobble”—where you frantically counter-steer just to stay centered. This burns mental focus needed for upcoming corners. Practice mounting stationary sleds 50+ times daily until alignment becomes automatic.
Finding the Fastest Line Through IBSF Track Corners
Racing lines aren’t about shortest distance—they’re about maximizing exit speed. The ideal path uses the track’s width to carry momentum through turns.
Cornering Strategy Breakdown
- Setup: Enter from the high wall (outside) to create a wide arc.
- Apex: Apply peak shoulder pressure at the turn’s midpoint while looking through to your exit.
- Exit: Gradually release pressure as you approach the low wall, using the track’s banking to naturally guide your path.
Key Insight: On double-apex corners (common in Whistler and St. Moritz tracks), delay your primary steering input until the second curve. Early pressure here forces an “S-turn” that destroys speed.
Stop Oversteering: Fix Common Skeleton Sled Control Errors
Oversteering—the “sawing” motion where sliders frantically shift shoulders—is the #1 speed killer. It creates oscillating turns that increase your path length by 15–20%.
How to Eliminate Oversteering Forever
- The 0.3-second rule: Limit each steering input to ≤0.3 seconds. Set a timer during training to build discipline.
- Look where you want to go: Fix your gaze 15+ meters ahead at your exit point, not the wall you fear hitting. Your body follows your eyes.
- Breathe through tension: Inhale during setup, exhale sharply during pressure application. Oxygen flow reduces panic-induced jerks.
Critical Fix: If you feel the sled “chattering,” freeze all movement for 1 full second. The oscillation often self-corrects, avoiding compound errors.
Build Core Strength to Maintain Steering Control at 80+ MPH
Your core is the transmission between brain commands and sled response. Weak abs or obliques turn precise shoulder inputs into chaotic upper-body sway.
Non-Negotiable Core Drills
- Plank rotations: Hold plank position while tapping opposite shoulder—3 sets of 20/side. Builds anti-rotation stability.
- Medicine ball throws: Slam 8–10lb ball against wall while maintaining skeleton tuck position—4 sets of 12.
- Neck harness training: 5-minute daily resistance work to prevent “whiplash steering” (head snapping that disrupts line).
Expert Note: Skeleton athletes train core 6x weekly. Even 10 minutes daily of plank variations prevents the “death wobble” in high-G corners where G-forces exceed 5G.
Why Precise Steering Wins Skeleton Races
Mastering how to steer a skeleton sled transforms physics into partnership. Races aren’t won in the straights—they’re decided in corners where 0.1 seconds separate medals. Your shoulder pressure becomes a language: light taps for gentle curves, firm presses for hairpins, and absolute stillness on straightaways. Remember that counter-steering paradox—pressing right to go left—isn’t a trick but the key to harnessing ice friction. Every Olympic slider will tell you: the sled doesn’t fight you when you work with its design, not against it.
Maintain this routine to lock in your skills:
1. Drill counter-steering inputs on dryland trainers 3x weekly
2. Film and analyze one run daily for shoulder/head stability
3. Practice “steering silence”—holding perfect stillness through three consecutive corners
When you stop thinking about how to steer and start feeling the ice through your runners, you’ve crossed into elite territory. That’s when the sled becomes an extension of your body, carrying you toward the finish line with controlled power. Ready to own the ice? Your next run starts now.


