
Your table saw struggles to deliver perfectly square crosscuts on wide boards, and that miter gauge just won’t stay put. You’ve measured twice but still end up with wobbly joints that refuse to fit. This frustrating reality is why woodworkers universally turn to the crosscut sled—it transforms your table saw into a precision instrument that guarantees square cuts while keeping your hands safely away from the blade. Learning how to use a crosscut sled properly eliminates dangerous kickback risks and delivers repeatable accuracy you simply can’t achieve with standard equipment. In this guide, you’ll master every critical step—from initial setup to advanced techniques—that turns this essential jig into your most trusted workshop ally.
Why Your Table Saw Needs a Crosscut Sled Immediately
Without a crosscut sled, you’re gambling with accuracy and safety every time you break down sheet goods or cut long boards. The miter gauge’s flimsy fence allows workpieces to rock during cuts, creating gaps in your joints that no amount of clamping can fix. More dangerously, narrow or long stock can twist mid-cut, binding against the blade and triggering violent kickback that sends wood flying toward your face. A properly built crosscut sled solves both problems: its rigid base supports the entire workpiece while fixed fences maintain perfect 90-degree alignment. You’ll consistently produce cabinet-quality joints and eliminate the anxiety that comes with wrestling unstable stock near spinning teeth.
Identifying Critical Crosscut Sled Components Before Operation
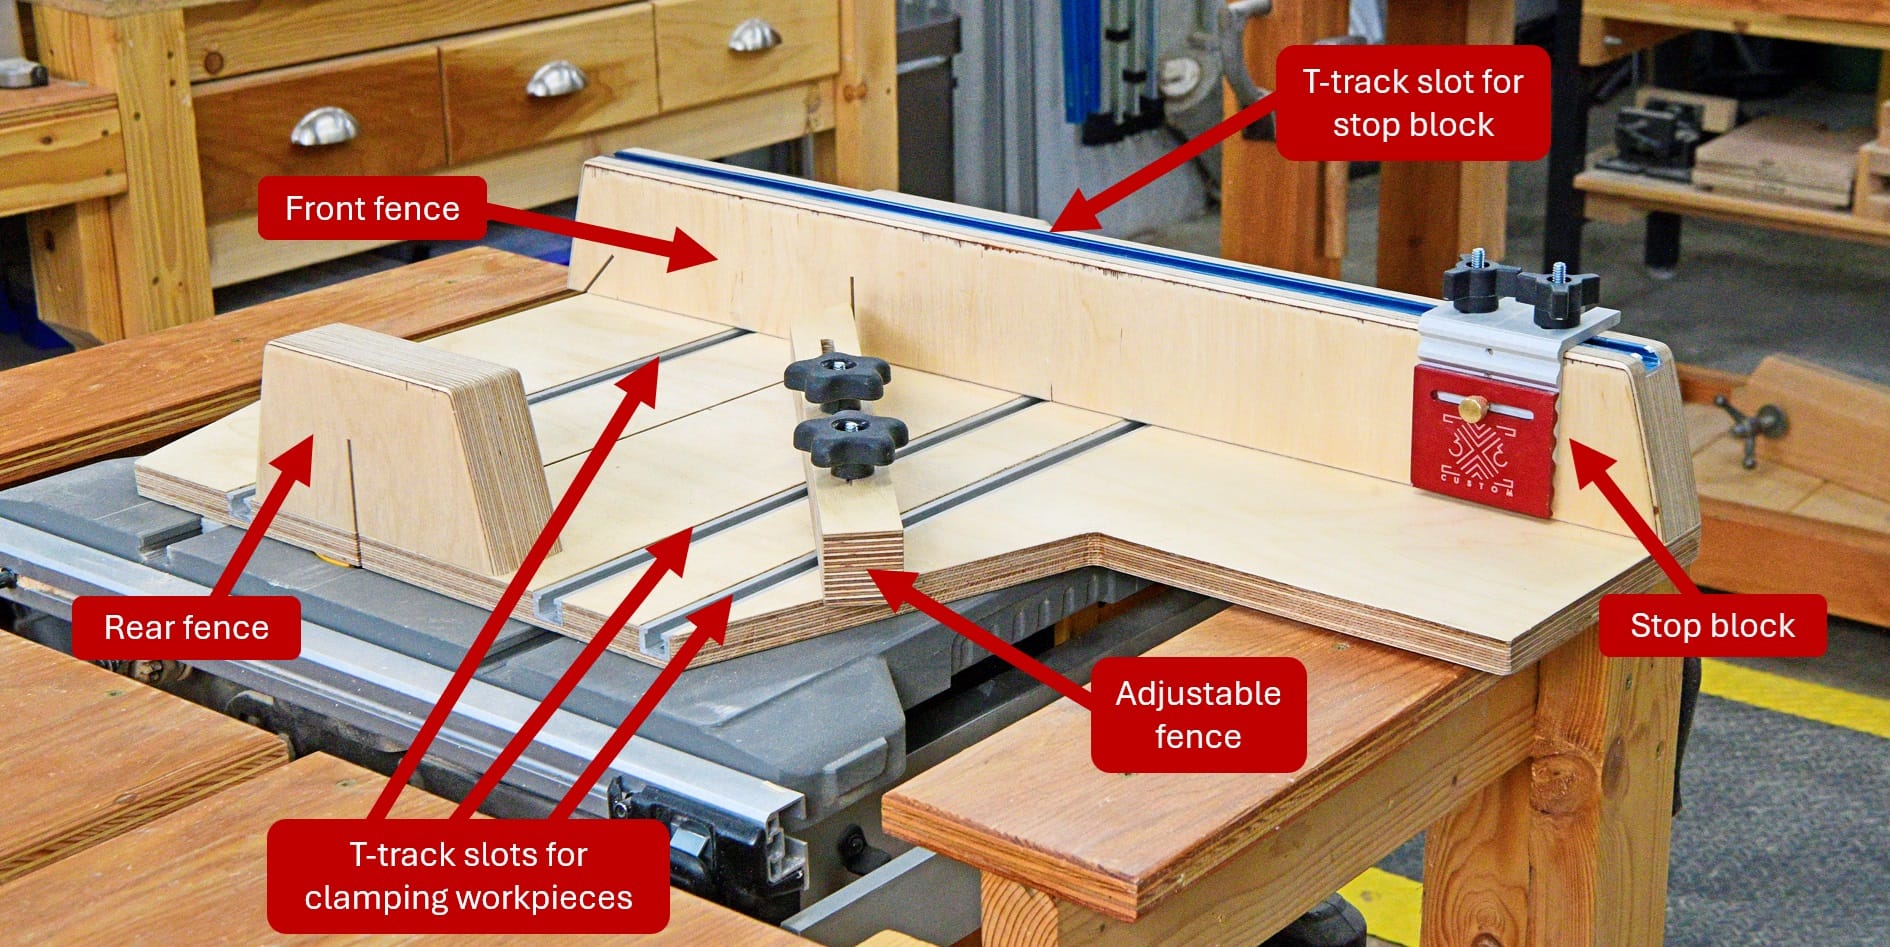
Your sled’s performance depends entirely on four non-negotiable components working in unison. The 3/4″ plywood base plate must be dead flat and rigid—any flex ruins accuracy when cutting hardwoods. Hardwood runners (typically oak or maple) slide in your saw’s miter slots; they need zero side-to-side play but must glide smoothly when waxed. The rear fence provides your workpiece’s primary reference surface and must be perfectly perpendicular to the blade path. Finally, the blade kerf slot creates a zero-clearance opening that prevents tear-out by supporting wood fibers right up to the cut line. Before your first use, verify all components are securely fastened—loose fences or wobbly runners defeat the sled’s entire purpose.
Pre-Cut Safety Checks Every Woodworker Must Perform
Skipping these checks risks catastrophic kickback or inaccurate cuts that ruin expensive materials. Always treat your crosscut sled like a precision instrument requiring calibration before each use session.
Verifying Blade Height and Installing Essential Guarding
Set your blade height to exactly 1/4 inch above your workpiece thickness plus the sled base. A blade protruding too high creates dangerous exposed teeth, while one too low causes burning and binding. Crucially, reinstall your riving knife or attach a shop-made transparent blade guard to the sled’s front fence. Never operate without overhead protection—the sled removes your saw’s standard guard, leaving the blade fully exposed during forward travel. If your sled lacks a guard, stop immediately and fabricate one from polycarbonate; this single step prevents 90% of sled-related injuries.
Securing Runners and Ensuring Smooth Sled Movement
Test runner fit by sliding the empty sled back and forth through the blade path. Zero side-to-side play is mandatory—any wiggle creates cut inaccuracies—but the sled should move with light finger pressure. If runners bind, clean miter slots with a shop vac and brass brush, then apply paste wax to both runners and table surface. Confirm your rear fence remains square to the blade path by making a test cut on scrap wood; misalignment as small as 0.002″ accumulates in multi-part projects. Finally, clear all debris behind the saw so offcuts fall freely without obstructing the sled’s path.
Loading Workpieces for Flawless Crosscuts Every Time
Positioning errors cause most “mystery” inaccuracies even with a perfectly tuned sled. Place your workpiece firmly against the rear fence and side fence simultaneously—never let it rock on a single point. For pieces wider than 12 inches, apply light downward pressure near the blade entry point to prevent lift-off during cutting. When cutting small parts under 6 inches, always use push sticks to keep hands 6+ inches from the blade; clamp a secondary fence to the sled base if needed for extra support. Your fingers should never cross the imaginary line extending from the blade’s front edge toward the rear fence.
Executing the Perfect Cutting Motion Without Kickback
This sequence eliminates the most common cause of injury: rushing the cut. Start the saw and let it reach full speed before engaging the sled. Stand to the left side of the blade path (for right-handed saws), never directly behind it. Grip the front fence handle with both hands and push forward with a smooth, continuous motion—never stop mid-cut as this causes burning and increases kickback risk. Maintain steady pressure through the entire cut until the workpiece clears the blade completely. For long boards, enlist a helper to support the offcut as it exits, but never touch the sled during travel.
Avoiding the Deadly Mistake of Pulling Back Too Soon
This is the #1 cause of crosscut sled accidents. After the cut finishes, the spinning blade’s heel can catch the workpiece if you retract the sled prematurely. Never pull the sled backward while the blade spins—this forces wood against the blade’s reverse rotation, triggering violent kickback. Instead:
– Turn off the saw and wait 10 seconds for complete blade stoppage before pulling the sled back
– Only if your sled design allows, lower the blade below the base before retracting
After stopping, retrieve offcuts from the side using a push stick—never reach over the blade slot. This single discipline prevents 95% of serious sled injuries.
Setting Up Stop Blocks for Identical Repeat Cuts
Achieve perfect part duplication by mounting your stop block only on the sled’s front fence, never the table saw’s rip fence. The rip fence creates a dangerous pinch point when used as a crosscut stop. For best results:
1. Make an initial test cut on scrap wood
2. Clamp a sacrificial block to the front fence at your desired length
3. Verify cut accuracy with a precision square before cutting project material
Use T-track hardware for micro-adjustments on critical projects. Always position the stop block after the blade entry point to prevent workpiece binding during retraction.
Diagnosing and Fixing Non-Square Crosscuts in Minutes

When joints won’t close, your sled has lost squareness. Don’t guess—use the five-cut method:
1. Cut a 6″x6″ square from stable plywood
2. Rotate the piece 90° and make four successive cuts, marking each new edge
3. Measure the final cut’s width difference at both ends
4. Calculate error: (width difference ÷ 4) × 1,000 = thousandths of error
Adjust the rear fence by this amount using shims, then retest. This scientific approach fixes errors as small as 0.001″ that ruin fine furniture.
Eliminating Tear-Out and Burning on Crosscut Sled Cuts
Rough cuts indicate preventable issues. Replace dull blades immediately—a sharp 60-tooth crosscut blade reduces burning and kickback risk. If tear-out occurs only on the sled’s exit side, refresh the zero-clearance slot by:
– Adding a 1/8″ MDF layer to the base
– Making a new pass through the blade
– Sanding the fresh kerf edges smooth
Wax the entire sled base monthly to prevent pitch buildup that causes sticking. For resinous woods, apply masking tape along the cut line before sawing.
Smoothing Sled Movement When Runners Bind Mid-Cut
Binding mid-cut risks workpiece binding against the blade. First, clean miter slots with a vacuum and brass wire brush—sawdust buildup is the #1 cause. If runners still stick:
– Sand runner edges with 220-grit paper while in the slot
– Apply paste wax liberally to runners and table surface
– Check for base plate warping by sliding a straightedge across it
Never force a sticking sled—this misaligns cuts and strains your saw motor. For chronic issues, remeasure miter slot width with calipers and plane runners to fit.
Advanced Crosscut Sled Techniques for Complex Projects
Unlock your sled’s full potential with these professional methods. For perfect tapers, clamp a sacrificial fence at your desired angle to the base, then secure workpieces against it. When cutting tenons, install a dado stack and use shims under the workpiece to create precise cheek depths. For tiny parts under 3″, add a zero-clearance insert around the blade slot using 1/4″ Baltic birch—this prevents tear-out and supports fragile pieces. Always test advanced setups on scrap first.
Maintaining Your Crosscut Sled for Long-Term Precision
Your sled’s accuracy degrades without routine care. After every session:
– Wipe the base plate with a tack cloth
– Re-wax runners and table surface
– Check fence fasteners for looseness
– Inspect the kerf slot for widening (replace base when >1/16″ wider than blade)
Every 50 hours of use, re-verify squareness with the five-cut method. Store the sled vertically to prevent warping—never stack heavy items on it.
A properly maintained crosscut sled pays dividends in flawless joints and peace of mind. By mastering these protocols—especially the critical post-cut safety step—you transform your table saw into the most accurate tool in your shop. Start with simple crosscuts to build confidence, then progress to complex joinery knowing every cut will be square and safe. Remember: the 20 minutes spent tuning your sled saves hours of rework and prevents life-altering accidents. Now go make that perfect cut—you’ve earned it.


