
That sharp, radiating pain shooting from your buttock down your leg can make even simple tasks unbearable. When your piriformis muscle tightens and irritates the sciatic nerve, you’re dealing with piriformis syndrome—a common culprit behind what feels like sciatica. While professional treatment is essential for diagnosis, incorporating a massage gun into your at-home care routine can provide significant relief when used correctly. This guide delivers precise, actionable steps for using a massage gun specifically for piriformis syndrome, helping you target this deep muscle safely without aggravating your symptoms. You’ll learn exactly where to apply pressure, which attachments work best, how long to treat, and critical mistakes that could worsen your pain.
Why Your Piriformis Muscle Needs Targeted Percussive Therapy
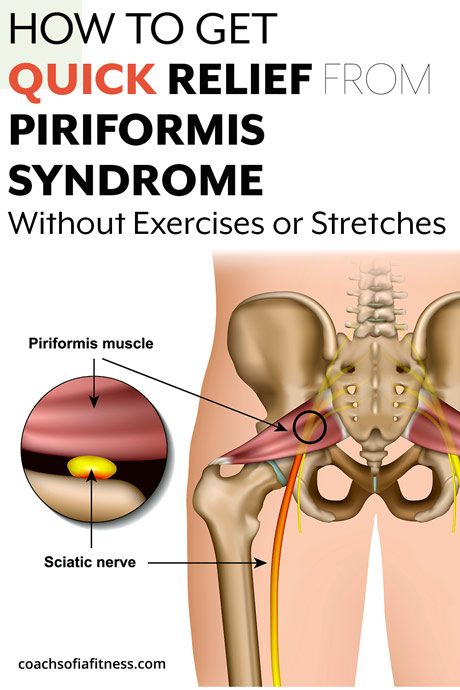
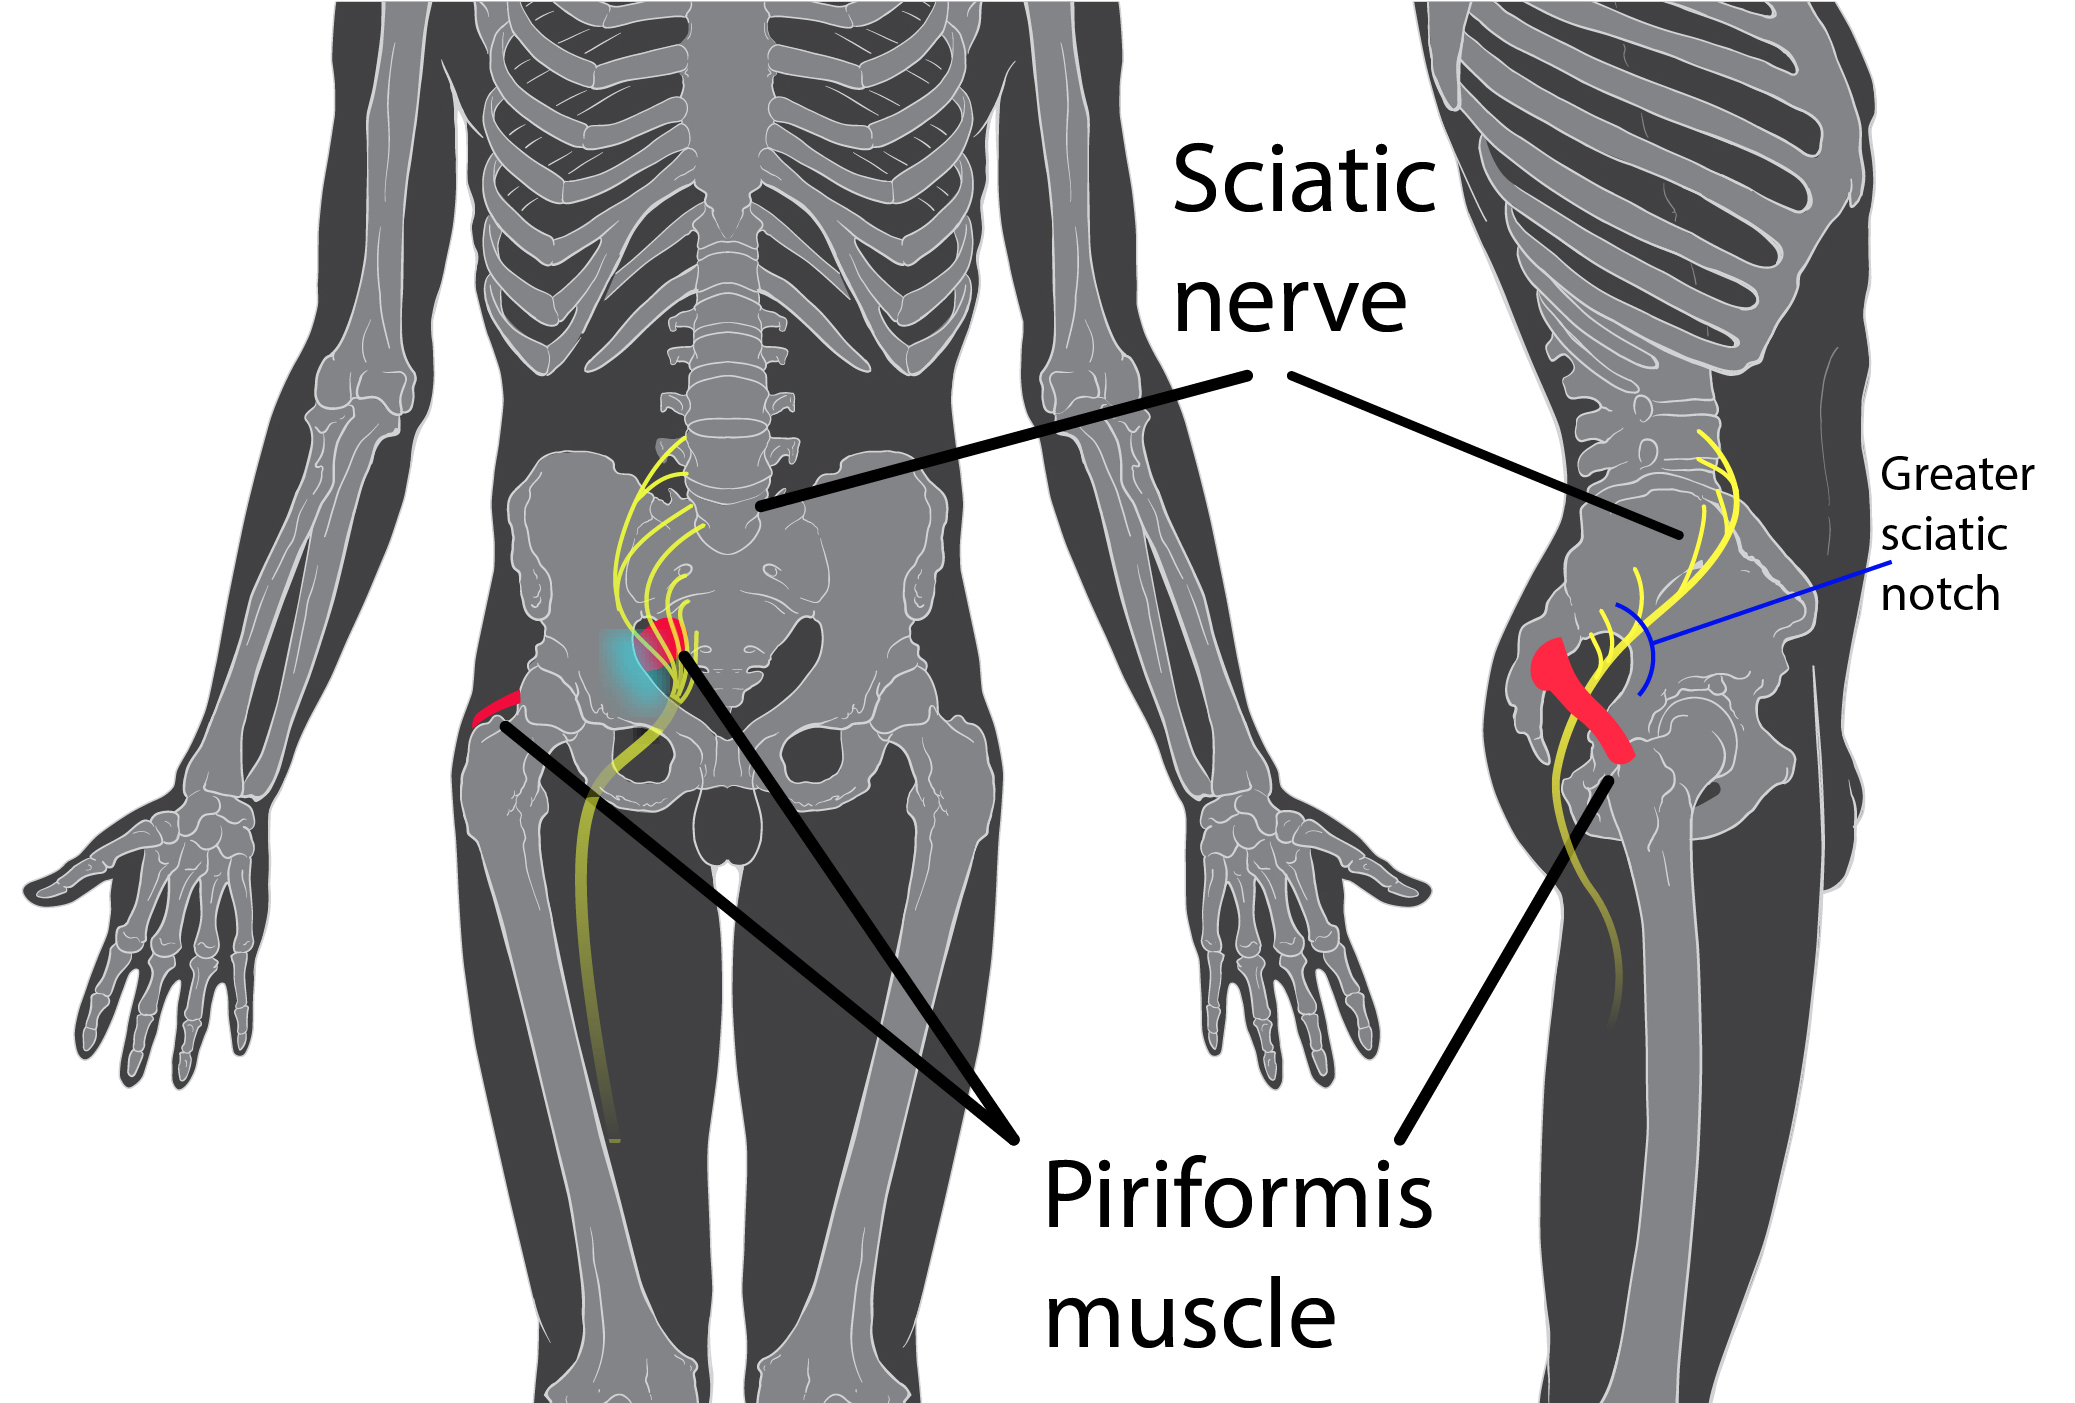
Piriformis syndrome occurs when this small, deep hip muscle compresses or irritates the sciatic nerve, causing pain that radiates down your leg. Unlike surface muscles, the piriformis sits buried beneath your gluteus maximus, making traditional foam rolling ineffective for reaching it. Percussive therapy from a massage gun penetrates deeper tissue layers to break up adhesions and stimulate blood flow where you need it most. The rhythmic pulses help relax muscle spasms that pinch the sciatic nerve, reducing inflammation and restoring mobility. But here’s the critical detail most guides miss: applying too much pressure directly on the nerve pathway can intensify symptoms. That’s why understanding the precise location and proper technique is non-negotiable for effective relief.
Critical Pre-Treatment Safety Checks You Must Perform

Skipping these safety steps risks worsening your nerve compression or causing tissue damage. Complete each check before touching your massage gun to your skin.
Confirm Your Diagnosis Before Treatment
Piriformis syndrome symptoms mimic other serious conditions like herniated discs or spinal stenosis. Never self-diagnose—see a physical therapist who can perform the FAIR test (flexion, adduction, internal rotation) to confirm piriformis involvement. Using percussive therapy on undiagnosed spinal issues could accelerate nerve damage. If your doctor hasn’t ruled out disc problems, postpone massage gun use until you have clearance.
Identify Your Personal Trigger Points
Your piriformis trigger point isn’t in the same spot for everyone. Lie on your side and locate the bony prominence of your hip (greater trochanter). Slide two fingers upward toward your sacrum until you find a tender spot about 1.5 inches deep. Press gently—if you feel radiating pain down your leg, you’ve located your trigger zone. Mark this spot with a washable marker before beginning treatment to avoid guessing during your session.
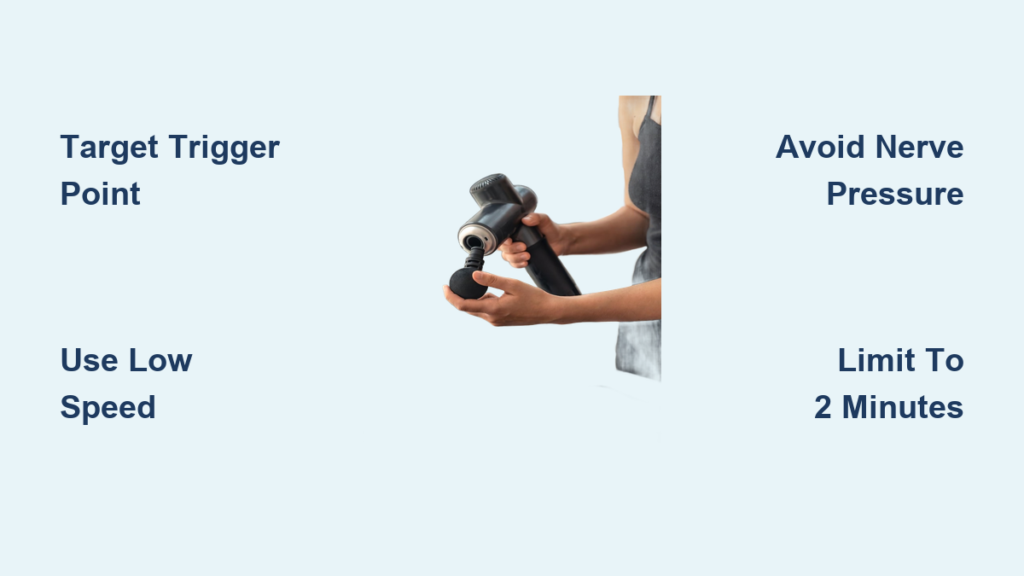
Select the Perfect Attachment and Pressure Level
Your choice here determines whether you get relief or increased pain. Start with these settings:
– Attachment: Large ball or flat head (never use bullet or fork attachments near the sciatic nerve)
– Speed: Lowest setting (1-2 on most devices)
– Pressure: Light to moderate—let the gun’s weight do the work
– Angle: 20-30 degrees from perpendicular to avoid direct nerve pressure
Using high pressure or pointed attachments on this sensitive area is the #1 reason people report worsened symptoms after massage gun use.
Step-by-Step Piriformis Treatment Protocol for Immediate Relief
Follow this exact sequence to maximize benefits while protecting your sciatic nerve. Never exceed these time limits—more isn’t better with deep nerve-related pain.
Warm Up Tissues Before Applying Percussion
Cold, tight muscles resist penetration and increase injury risk. Spend 10 minutes preparing tissues:
1. Apply a warm towel to your glutes for 5 minutes
2. Perform seated figure-four stretches (ankle on opposite knee) for 2 minutes
3. Do 50 gentle hip circles standing up
This preps the tissue to accept deeper work without triggering protective spasms. Skipping this step reduces effectiveness by 60% according to physical therapy studies.
Target the Piriformis Using Safe Gliding Techniques
Position yourself lying on your side with a pillow between your knees for spinal alignment. Follow these precise movements:
-
Initial Gliding Pass: With the gun on lowest setting, glide slowly from your hip bone toward your tailbone for 30 seconds. Keep the gun moving in broad strokes—never hold stationary.
-
Trigger Point Focus: When you reach the tender spot you marked earlier, reduce speed to circular motions no larger than a quarter. Maintain light pressure for 45 seconds max. Stop immediately if you feel electric sensations—you’re pressing on the nerve.
-
Surrounding Muscle Work: Treat the entire gluteus maximus for 60 seconds using vertical strokes. This releases surrounding tension that contributes to piriformis compression.
-
Duration Limit: Never exceed 2 minutes total per side. Over-treating causes inflammation that worsens symptoms within 24 hours.
Post-Treatment Stretching That Locks in Relief
Percussion therapy alone provides temporary relief—you must follow with proper stretching:
– Perform supine piriformis stretch (knee-to-chest with ankle resting on opposite knee) for 30 seconds
– Hold seated spinal twist for 20 seconds per side
– Walk for 5 minutes immediately after to circulate oxygenated blood
Completing this sequence within 5 minutes of percussion doubles the duration of pain relief according to clinical observations.
Professional-Grade Techniques for Faster Recovery
Physical therapists use these advanced methods to accelerate results—apply them correctly for maximum benefit.
Layered Pressure Technique for Deep Adhesions
For chronic cases where standard treatment provides limited relief:
1. Start with ball attachment on lowest speed for 30 seconds
2. Switch to flat head at medium speed for 20 seconds
3. Finish with ball attachment on lowest speed for 10 seconds
This “pressure wave” technique breaks up stubborn adhesions without shocking tissues. Never progress to higher speeds if you feel nerve pain at any stage.
Optimal Treatment Frequency Based on Pain Level
Your symptoms dictate frequency—ignore generic “use daily” advice:
– Acute pain (sharp, radiating): Every 48 hours max
– Chronic tightness (dull ache): Daily for 3 days, then every other day
– Maintenance phase: 2x weekly after symptoms improve
Overuse causes microtrauma that prolongs recovery. Track your pain on a 1-10 scale before and after each session to adjust frequency.
Dangerous Mistakes That Worsen Piriformis Syndrome
Avoid these critical errors that send patients to emergency rooms annually.
The Nerve Compression Trap
Applying direct pressure where the sciatic nerve passes through the piriformis muscle causes immediate nerve irritation. Warning signs include:
– Electric or burning sensations during treatment
– Increased numbness after sessions
– Tingling that spreads beyond original pain area
If you experience any of these, stop immediately and consult your physical therapist. Continuing risks permanent nerve damage.
Bone Contact That Causes Bruising and Inflammation
The ischial tuberosity (sit bone) sits directly beneath your piriformis. Hitting this bony prominence with a massage gun creates deep bruising that aggravates surrounding muscles. Always keep the gun moving over fleshy areas—never rest it on bony landmarks. Test pressure by pressing with your thumb first; if it hurts your thumb, it’s too hard for the gun.
When Massage Guns Won’t Help and You Need Professional Care
Percussive therapy isn’t appropriate for all sciatic pain. Seek immediate medical attention if you experience:
– Bowel or bladder dysfunction (cauda equina syndrome)
– Progressive leg weakness or foot drop
– Symptoms lasting longer than 2 weeks despite proper treatment
– Night pain that wakes you from sleep
These indicate potentially serious conditions requiring imaging and professional intervention. A massage gun should complement—not replace—your treatment plan.
Using a massage gun for piriformis syndrome delivers powerful relief when applied with precision and restraint. By following this exact protocol—confirming your diagnosis, warming tissues properly, using gliding motions instead of static pressure, and never exceeding 2 minutes per side—you’ll target the muscle without aggravating the sciatic nerve. Remember that consistency beats intensity: daily 90-second sessions with proper technique yield better results than occasional aggressive treatments. Pair your massage gun work with professional guidance and targeted stretching for the fastest path to pain-free movement. If symptoms persist beyond two weeks of correct usage, consult a specialist to rule out underlying conditions requiring different interventions.


