
Your Ninja Multi-Cooker just arrived, and that tangle of lids, racks, and buttons feels more intimidating than your first IKEA furniture project. You’re not alone—70% of new owners skip the water test and wonder why their first meal triggers a “BURN” warning. But here’s the truth: this single appliance replaces your pressure cooker, air fryer, and slow cooker once you master its core functions. Within 20 minutes, you’ll confidently pressure-cook fall-off-the-bone ribs, air-crisp golden fries, and even bake a cake without switching gadgets.
This guide cuts through the manual’s jargon with exact steps for every function, safety checks that prevent kitchen disasters, and the “cook-and-crisp” method restaurants use for perfect texture. No more guessing whether to set the valve to SEAL or VENT—we’ll show you exactly when and why. By the end, you’ll wield this kitchen powerhouse like a pro.
Pre-Use Safety Setup You Can’t Skip

Unbox and Inspect Components Before First Use
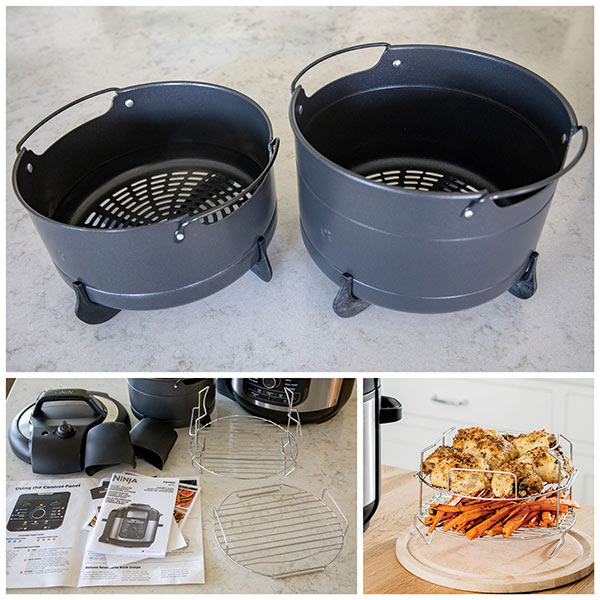
Pull out every piece and inspect for damage before plugging in. Your box must contain: the base unit, 6.5-quart ceramic inner pot, pressure lid (with silicone ring seated in its groove), crisping lid, reversible rack, and condensation collector. Run your finger along the inner pot’s coating—check for chips that could expose metal. Test the pressure release valve: it should click firmly between SEAL (for pressure cooking) and VENT (for quick release). If it sticks, return the unit—forcing it risks dangerous pressure leaks.
Run a 5-Minute Water Test to Avoid Catastrophes
Skipping this invites burnt food and error codes. Add 3 cups of water to the inner pot (never use oil or food). Lock the pressure lid by aligning the arrows until it clicks. Set the valve to SEAL, select PRESSURE mode, and cook for 5 minutes. When the timer ends, wait 10 minutes for natural pressure release. If steam leaks around the lid or the float valve doesn’t rise, unplug immediately—the silicone ring isn’t seated right. Reposition it until the lid locks flush. This test verifies your unit’s safety seals before you cook actual food.
Pressure Cooking Made Foolproof
Avoid the “BURN” Error in 3 Critical Steps
That dreaded red warning almost always means food stuck to the pot’s base. Always deglaze after searing: add ½ cup broth or water, scrape the bottom with a wooden spoon, and stir until browned bits dissolve. Never layer thick sauces like tomato paste directly on the bottom—place them over meats or grains. And never exceed the ½-full line for beans or rice; they expand violently under pressure. If “BURN” flashes, quick-release pressure, add liquid, and restart—do not ignore it.
Perfect Pressure Release for Tender Results
Natural release (waiting 10-20 minutes post-cook) keeps meats juicy by slowly dropping pressure. Use this for roasts, whole chickens, or soups. For veggies or eggs that turn mushy with overcooking, quick-release immediately: stand back, turn the valve to VENT with a long-handled spoon (steam shoots 2 feet!), and point it away from faces. Never force the lid open while the silver float valve is raised—that’s your pressure indicator. Wait until it drops completely.
Air Crisp Like a Restaurant Chef
Fix Soggy Food in 4 Moves
Overcrowding is the #1 cause of limp fries or rubbery chicken wings. Always use the reversible rack in HIGH position—this lifts food away from grease puddles. Arrange items in a single layer with space between pieces (cook in batches if needed). Pat proteins bone-dry with paper towels before seasoning—water steams instead of crisping. And preheat 5 minutes before adding food; a cold start guarantees sticking. Shake the rack halfway through cooking for even browning—no flipping required.
Smoke-Free Air Crisping Every Time
Smoke usually means grease splatter on the heating element. After cooking, unplug the unit and let the crisping lid cool 30 minutes. Wipe the black metal guard inside the lid with a damp cloth dipped in vinegar—never submerge it. For stubborn grease, use the included cleaning brush. Never spray oil directly on food inside the pot; mist ingredients before adding them. Keep your kitchen ventilated by opening a window—this prevents smoke alarms from triggering during fatty foods like bacon.
Master Multi-Function Cooking in Minutes
Transform Frozen Chicken into Crispy Cutlets
Skip thawing with this pro sequence: Place frozen chicken breasts in the pot with 1 cup broth. Pressure cook on HIGH for 12 minutes, then quick-release. Pat chicken extremely dry—moisture is the enemy of crispness. Season, then air crisp at 400°F for 6 minutes. Flip and cook 4 more minutes. Check internal temperature hits 165°F with a meat thermometer. This method works for frozen burgers, shrimp, or fish fillets—just adjust times (shrimp needs 8 minutes pressure cook + 3 minutes air crisp).
The “Cook and Crisp” Method for Restaurant Texture
Pressure cooking tenderizes tough cuts; air crisping adds crunch. For carnitas: pressure cook pork shoulder with ½ cup orange juice for 45 minutes. Natural-release pressure, then shred. Air crisp at 390°F for 10 minutes on the high rack. The result? Fall-apart interior with crackling skin. Works equally well for chicken thighs (12 minutes pressure + 5 minutes air crisp) or tofu (10 minutes pressure + 8 minutes air crisp). Pro tip: Sprinkle panko or cornstarch before air crisping for extra crunch.
Daily Cleaning That Prevents Damage
The 3-Minute Post-Cook Routine
Unplug and cool completely—never clean a hot unit. Empty the condensation collector (that small cup on the back) to stop mold growth. Wash the inner pot with soft sponge only; steel wool scratches the ceramic coating. For stuck-on bits, fill the pot with warm water and 2 tbsp vinegar, then simmer 5 minutes on SAUTÉ LOW before scrubbing. Wipe the base unit’s rim with a damp cloth—food gunk here prevents proper lid sealing.
Monthly Maintenance That Extends Lifespan
Remove the silicone sealing ring and check for cracks or permanent dents (replace yearly). Soak it in vinegar water to kill odors. Use a toothpick to clear debris from the pressure release valve’s tiny holes—clogs cause ERR2 errors. Test the float valve: it should drop when cool and rise when pressurized. If it sticks, replace the ring immediately. Critical: Never store the unit with the sealing ring compressed—leave lids slightly ajar to prevent warping.
Your Ninja Multi-Cooker pays for itself the moment you skip preheating your oven for crispy wings or rescue last night’s leftovers into gourmet meals. Start with the 5-minute water test, master pressure release timing, and use the cook-and-crisp method for textures you never thought possible from one pot. Remember: never force the lid, always deglaze after searing, and keep that sealing ring clean. Within a week, you’ll wonder how you ever cooked without it—this isn’t just another appliance; it’s your kitchen’s new command center.


