

That wobble when you reach too far. The sickening slide when feet hit a slippery surface. Step ladder accidents send over 500,000 people to emergency rooms annually in North America alone. Most happen because users skip simple safety steps they assume are unnecessary. Whether you’re changing a lightbulb or painting a ceiling, knowing exactly how to use a step ladder correctly transforms a routine task into a safe operation. This guide delivers the precise techniques professionals use to prevent falls, based strictly on Canadian Standards Association (CSA) regulations and real-world accident data. You’ll learn the exact weight limits most homeowners ignore, the 30-second inspection that catches dangerous defects, and why standing on the top step causes 1 in 3 ladder injuries.
Why Your Ladder’s Weight Rating Could Save Your Life (CSA Grades Explained)
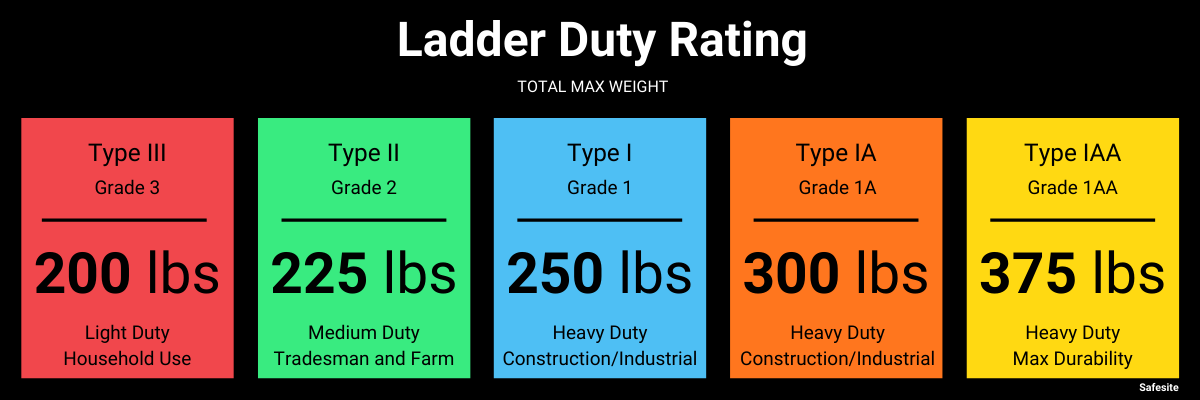
Ignoring your step ladder’s weight capacity is like driving with bald tires—it works until it catastrophically fails. The CSA grade stamped on your ladder isn’t just paperwork; it dictates whether your ladder can handle your weight plus tools. Many household ladders (Grade 3) collapse under 200 lbs total load—that’s you plus your clothes plus a paint can. Check your ladder’s side rail label immediately for these critical ratings:
- Grade 1AA (170 kg/375 lbs): Industrial construction sites only—never for home use
- Grade 1 (113 kg/250 lbs): Heavy-duty tasks like roofing or HVAC work
- Grade 3 (91 kg/200 lbs): Standard household ladders—most common failure point
Your total load includes your body weight, work boots, tool belt, and any materials. A 180-lb person carrying a 25-lb toolbox already exceeds a Grade 3 ladder’s limit. Always choose the next highest grade if you’re near the weight threshold. When in doubt, upgrade to Grade 2 (102 kg/225 lbs)—the safest choice for most homeowners doing painting or repairs.
The 30-Second Pre-Use Inspection That Prevents 90% of Accidents

Skipping this checklist causes ladder collapses even on “easy” jobs. Stand the ladder fully open on a level surface and methodically check these points:
How to Spot Dangerous Structural Damage
- Rails: Run your palm along both sides—feel for hairline cracks (common in aluminum ladders) or splinters (wood ladders). Any bend wider than your thumb means retirement.
- Locking hinges: Shake the ladder gently. If spreader bars click or shift, the locks are failing. Never use a ladder where hinges don’t snap audibly into place.
- Feet: Press down firmly on each foot. If rubber pads slide or feel loose, replace them immediately. Test grip by dragging the ladder on concrete—sliding feet cause 40% of slips.
Critical “Hidden” Defects Most People Miss
- Step integrity: Stand on the second-highest step (never the top!) and shift your weight side-to-side. Spongy movement means broken welds or rot.
- Label legibility: Faded weight ratings or missing safety instructions mean the ladder has been exposed to UV damage—replace it.
- Corrosion: Check hinge pins for rust flaking. Surface rust is acceptable; powder-like rust means structural weakness.
If any component fails this inspection, stop immediately. No DIY repair makes a damaged ladder safe. Rent or buy a new one—the $200 cost beats a $20,000 hospital bill.
Step Ladder Setup: Positioning Mistakes That Cause Instant Collapses

Where you place your ladder matters more than strength. These setup errors trigger falls before you even climb:
Why “Level Ground” Isn’t Enough
Concrete seems stable but often slopes subtly. Place a level across the top step—if the bubble isn’t centered, do not climb. Use adjustable leg levelers (sold for $15) or dig a shallow trench for the high-side foot. Never shim with bricks or wood scraps—they compress under load.
The 4:1 Rule for Step Ladders (Most People Get This Wrong)
Unlike extension ladders, step ladders require a different angle calculation:
– Measure from the floor to your work surface (e.g., ceiling height)
– Position the ladder base 1 foot back for every 4 feet of height
– Example: For an 8-foot ceiling, place the base 2 feet from the wall
If the ladder feels “tippy” when open, the angle is wrong. Close it, reposition, and recheck locks before climbing.
Climbing & Working: The 3-Point Contact Technique That Prevents Falls
Overreaching causes 65% of ladder accidents. Follow these exact procedures:
How to Maintain True 3-Point Contact
- Climbing: Always face the ladder. Keep two hands gripping side rails while moving one foot up. Never carry tools in your hands.
- Working: Keep your belt buckle inside the side rails. If you can’t reach your target without leaning, descend and reposition the ladder.
- Tool handling: Use a tool belt with magnetic holders or hoist tools in a bucket with a rope. Never hand tools to someone on the ladder.
Safe Standing Heights You’re Probably Ignoring
CSA standards forbid standing on the top platform or top two steps—but most users do it daily. Here’s your exact maximum safe height based on ladder size:
| Ladder Height | Maximum Standing Level | Danger Zone to Avoid |
|---|---|---|
| 4-foot ladder | 2 feet from top | Top 2 steps + platform |
| 6-foot ladder | 4 feet from top | Top 3 steps |
| 7-foot ladder | 5 feet from top | Top 3 steps |
| 10-foot ladder | 8 feet from top | Top 4 steps |
Stand one step lower if using power tools or working above slippery surfaces. If you need to stand higher, get a taller ladder—never stack objects under it.
5 Deadly Mistakes That Turn Step Ladders Into Fall Traps
These common errors cause emergency room visits every single day:
Why You Should Never Use a Metal Ladder Near Electricity
Aluminum conducts electricity instantly. If your ladder contacts a live wire (like attic wiring), current travels through the rails straight to your body. Always use fiberglass ladders for electrical work or near power lines. Check for “Non-Conductive” labels—some “fiberglass” ladders contain metal reinforcements.
The Doorway Danger Most DIYers Ignore
Placing a ladder in front of an unlocked door is a top cause of multi-person accidents. Someone opening the door knocks the ladder sideways. Block doors with wedge stops or lock them shut. If working in high-traffic areas, set up caution tape 6 feet around the base.
Why Two People on a Ladder Is Never “Just This Once”
Ladder weight ratings account for one person only. A 200-lb Grade 3 ladder user plus a 150-lb helper creates 350 lbs of force—more than double the limit. The spreader bars buckle instantly. If you need a spotter, have them stand clear and communicate verbally.
When to Ditch the Step Ladder for Safer Alternatives
Step ladders become death traps for tasks taking over 15 minutes or requiring frequent repositioning. Immediately switch to these solutions:
- Painting ceilings: Use a rolling scaffold with guardrails—rent for $40/day
- Gutter cleaning: Extendable poles with gutter scoops eliminate climbing
- Electrical work: Insulated bucket trucks for heights over 8 feet
- Roof access: Prefabricated stairs with handrails (OSHA-compliant)
If you’re hesitating to climb down to reposition the ladder, you’ve already exceeded safe usage time. Professional painters descend every 5 minutes to move their ladders—that’s why they rarely fall.
Final Note: Your step ladder is a temporary height solution, not a workstation. By rigorously following CSA weight limits, conducting the 30-second inspection, and respecting the belt buckle rule, you’ll avoid the 90% of accidents caused by preventable errors. Remember: the top step exists only for stability during transport—never as a standing surface. For tasks requiring extended work above 6 feet, invest in proper scaffolding. Safety isn’t inconvenient—it’s what lets you finish the job without becoming a statistic. Keep this checklist visible in your workshop: inspect weight limits, verify 4:1 angle, maintain 3-point contact, and never stand above the safe height line. Your future self will thank you when both feet land firmly on the ground.


