
If your muscles feel tight after a tough workout or long workday, you’re probably wondering how to use FitRx massage gun properly to get real relief. Many people buy these powerful recovery tools only to use them incorrectly, wasting their potential benefits or even causing injury. The FitRx massage gun delivers targeted percussive therapy that can significantly reduce muscle soreness and improve flexibility—but only when used correctly. This guide gives you the exact techniques professionals use to maximize recovery while avoiding common mistakes that could set back your progress.
Most users don’t realize that improper technique can actually trigger muscle spasms instead of relieving them. By learning the right attachments, pressure levels, and timing for each body part, you’ll transform your FitRx from an expensive paperweight into your most valuable recovery tool. Whether you’re a weekend warrior or full-time athlete, these evidence-based methods will help you unlock faster muscle recovery, reduce DOMS (Delayed Onset Muscle Soreness), and maintain peak physical performance.
First-Time FitRx Setup: Getting to Know Your Massage Gun Controls
Before you start massaging, take five minutes to properly set up your FitRx device. Locate the power button on the handle—most models place it within easy thumb reach for one-handed operation. Check the charging port (usually USB-C) and ensure your device has a full charge before first use. Turn on your FitRx to familiarize yourself with the weight distribution and vibration patterns at different speeds.
Most FitRx models feature an LCD screen or LED indicators showing speed levels from 1-5. Start by testing each speed setting while holding the device against your palm to feel the intensity progression. Notice how the lowest setting provides gentle pulses while the highest delivers powerful percussions. This knowledge prevents accidental overuse when you begin your first session. Pro Tip: Practice turning the device on and off quickly with one hand—this skill proves invaluable when targeting sensitive areas that require immediate pressure adjustment.
Choosing the Right FitRx Attachment for Each Muscle Group
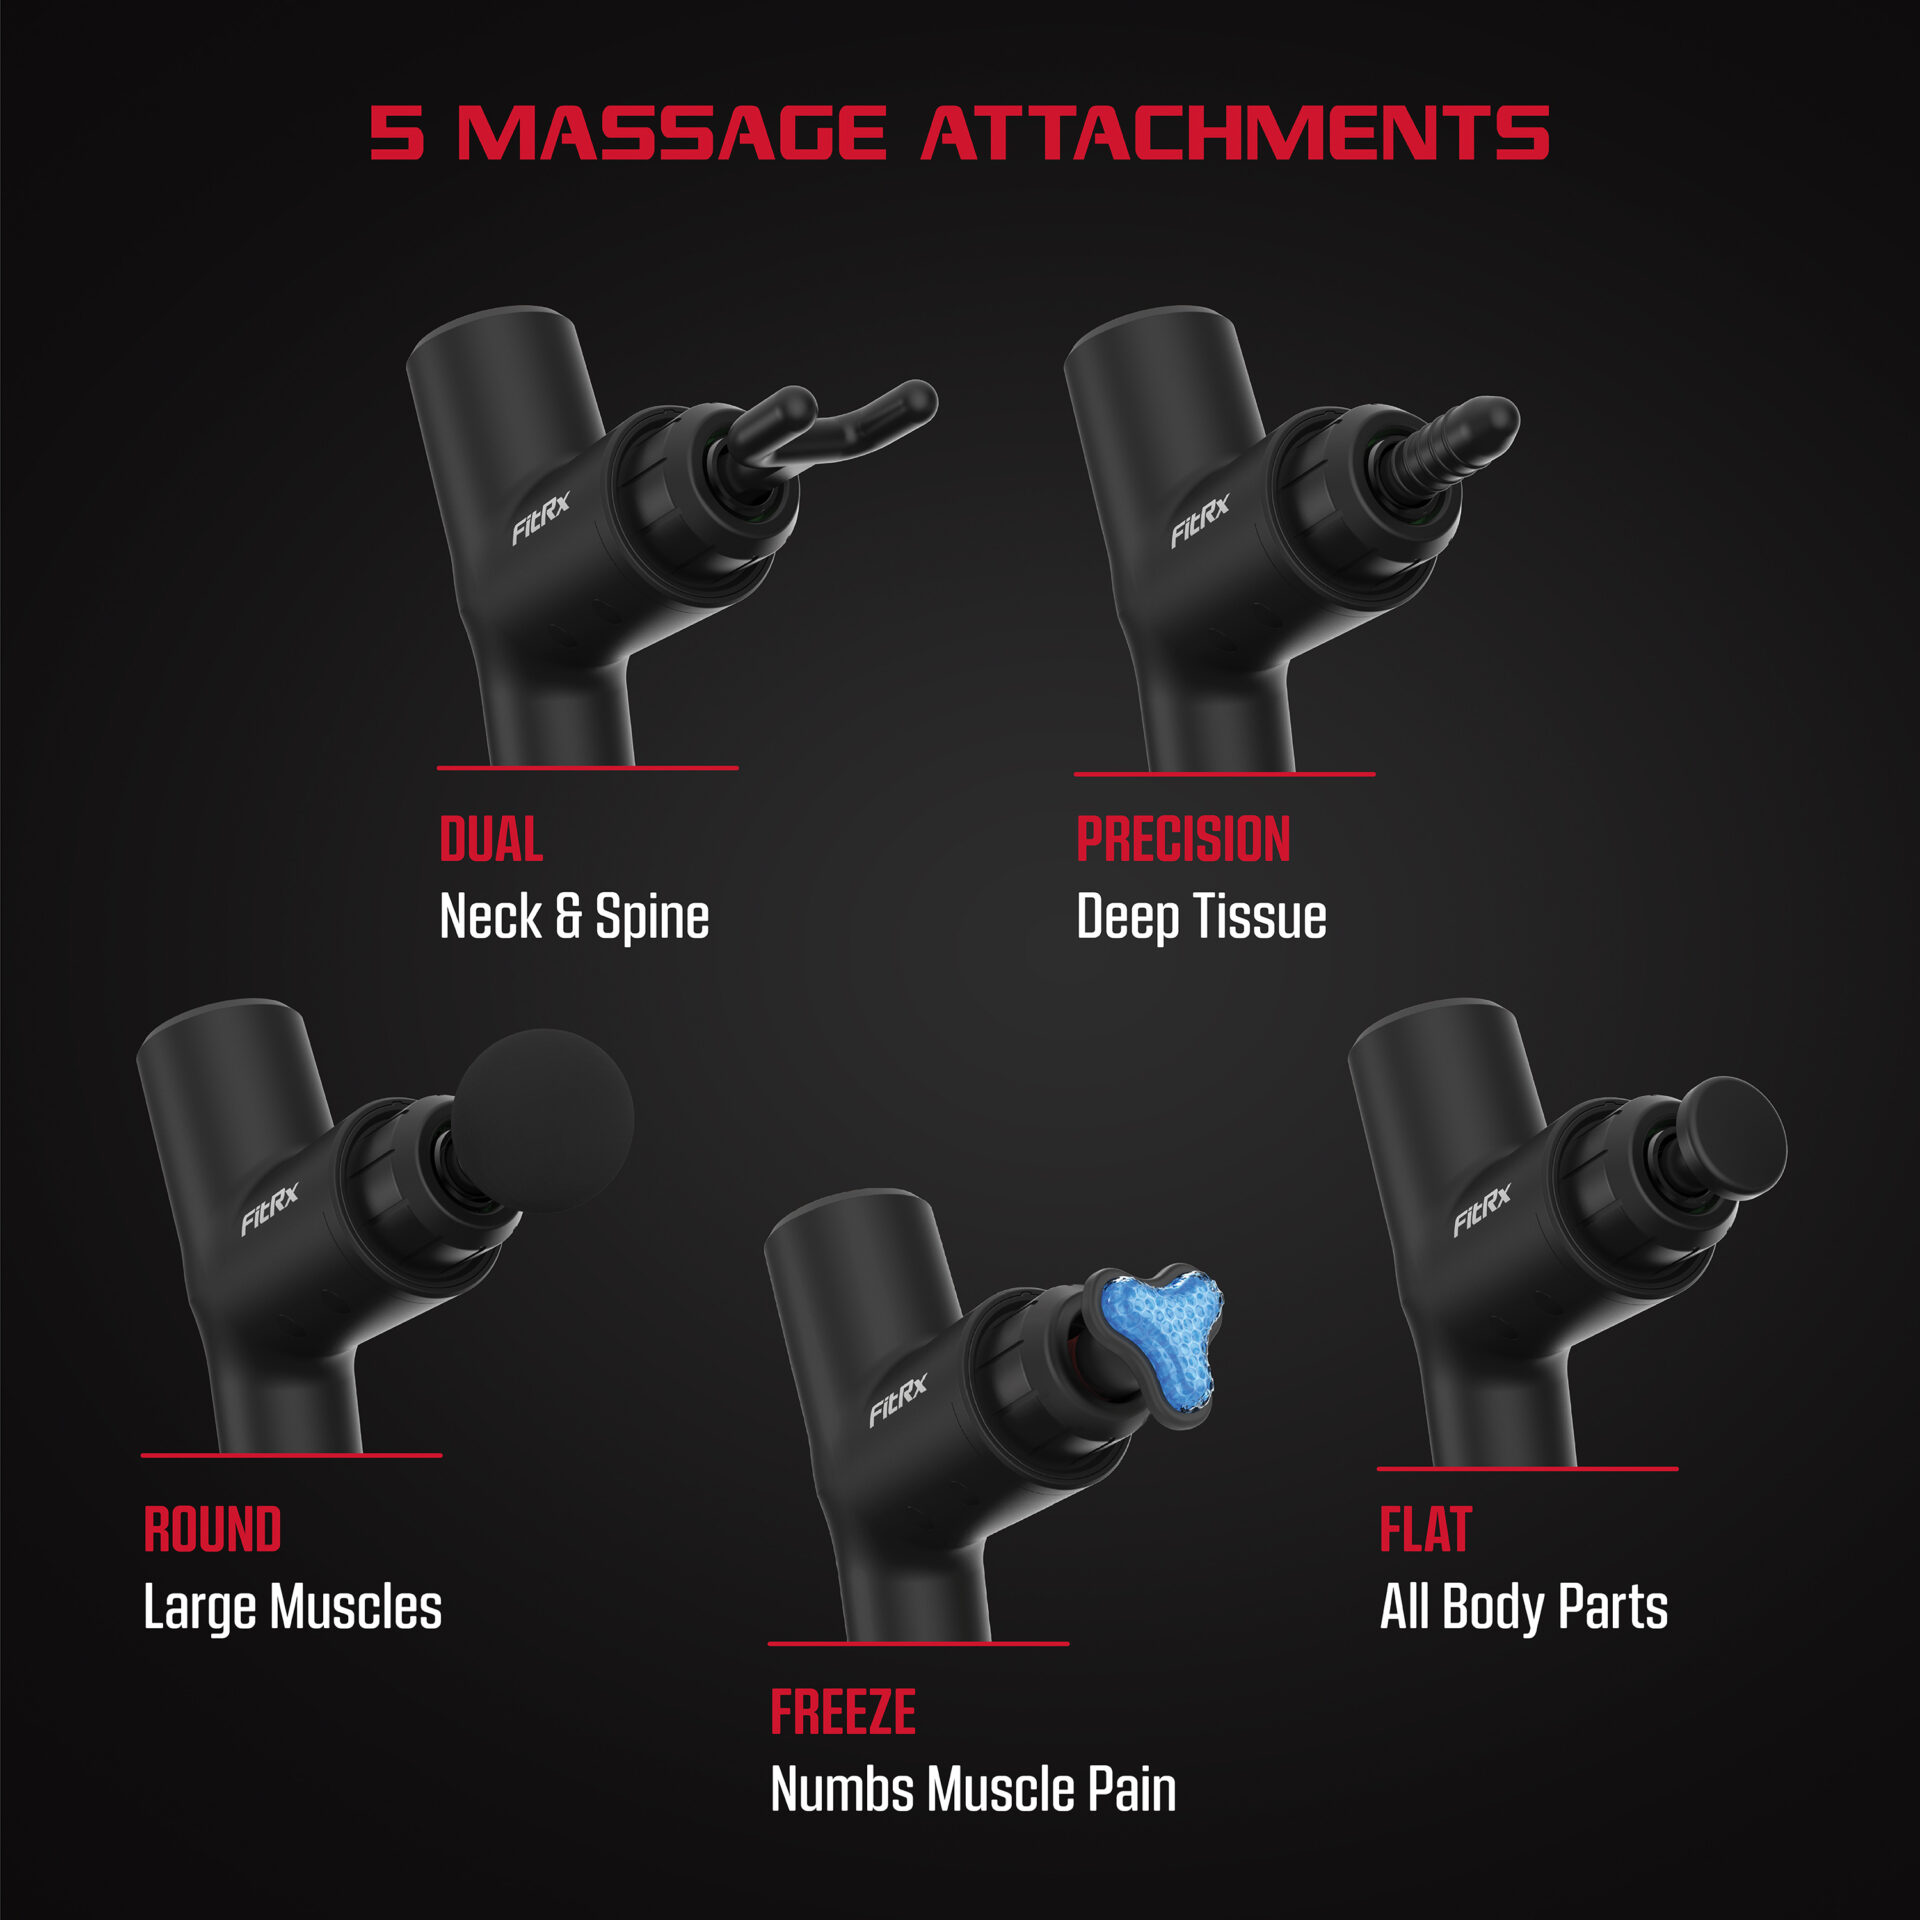
Your FitRx comes with multiple attachments designed for specific muscle groups—using the wrong one reduces effectiveness and risks injury. The large round ball attachment works best for substantial muscle groups like quads, glutes, and hamstrings where broad surface contact maximizes blood flow. For your calves and forearms, the forked head straddles the muscle perfectly, avoiding direct pressure on sensitive shin bones.
When targeting trigger points between shoulder blades or in upper traps, the bullet/conical attachment delivers precise penetration without excessive force. The flat head attachment provides even pressure distribution across wide areas like your lats or thigh muscles. Critical Warning: Never use the bullet attachment on your neck or lower back—opt for the cushioned head instead to protect delicate spinal structures. Before each session, lay out your attachments and match them to your target areas using this quick reference:
- Large muscle groups (quads, glutes): Round ball or flat head
- Calves/forearms: Forked head
- Trigger points (shoulders, back): Bullet/conical
- Sensitive areas (neck, spine): Cushioned head
Proper FitRx Technique: Gliding, Pinning, and Pressure Control
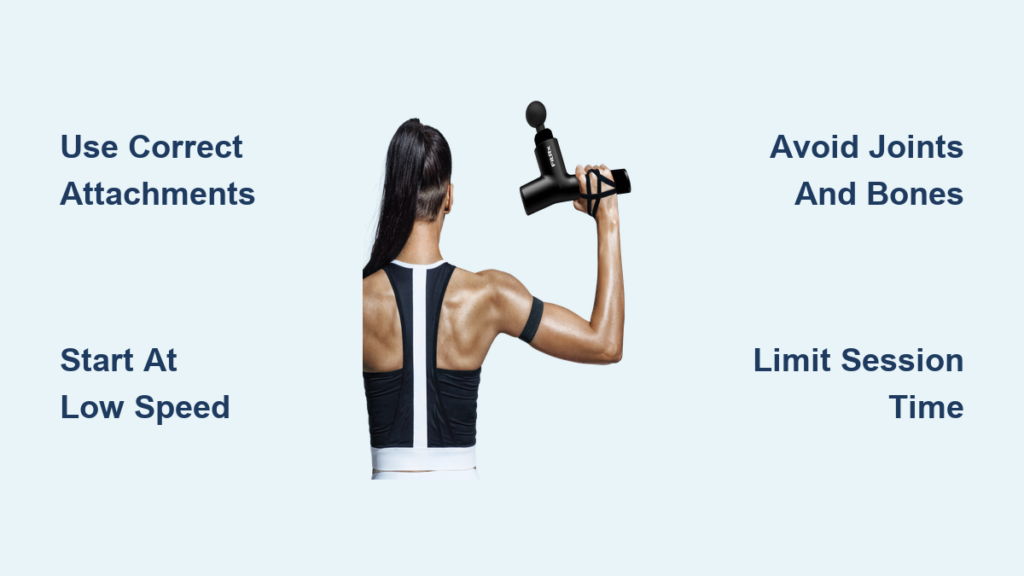
Start every session at the lowest speed setting, especially if you’re new to percussive therapy. Place your chosen attachment against the muscle belly (not near joints or bones) and let the device’s weight provide sufficient pressure—never force it downward. Many users mistakenly apply excessive pressure, triggering protective muscle spasms that counteract recovery benefits.
The gliding technique works best for general warm-up: move the FitRx slowly (2-3 inches per second) along muscle fibers, covering the entire muscle group in overlapping passes. For stubborn knots, switch to pinning—hold the attachment stationary on the tight spot for 15-30 seconds until you feel the muscle release. Key Insight: Your FitRx should never cause sharp pain; aim for a “good hurt” sensation that eases within 30 seconds of stopping. Track your progress by testing range of motion before and after treatment—effective sessions yield immediate flexibility improvements.
FitRx Post-Session Care: Cleaning and Storage Best Practices
After each use, wipe attachments with a dry microfiber cloth to remove skin oils and sweat—avoid harsh chemicals that could degrade rubber components. Pay special attention to crevices where the attachment connects to the device head. Let all parts air dry completely before storing to prevent moisture buildup that could damage internal electronics.
Store your FitRx in its included case with attachments properly seated to prevent damage during transport. Check the charging cable regularly for fraying and replace if damaged—using compromised cables risks electrical hazards. Pro Maintenance Tip: Every two weeks, inspect the attachment connection point for hair or debris accumulation that could affect performance. A quick blast of compressed air keeps this critical junction functioning smoothly.
Targeting Specific Areas: FitRx Techniques for Hamstrings, Back, and Shoulders
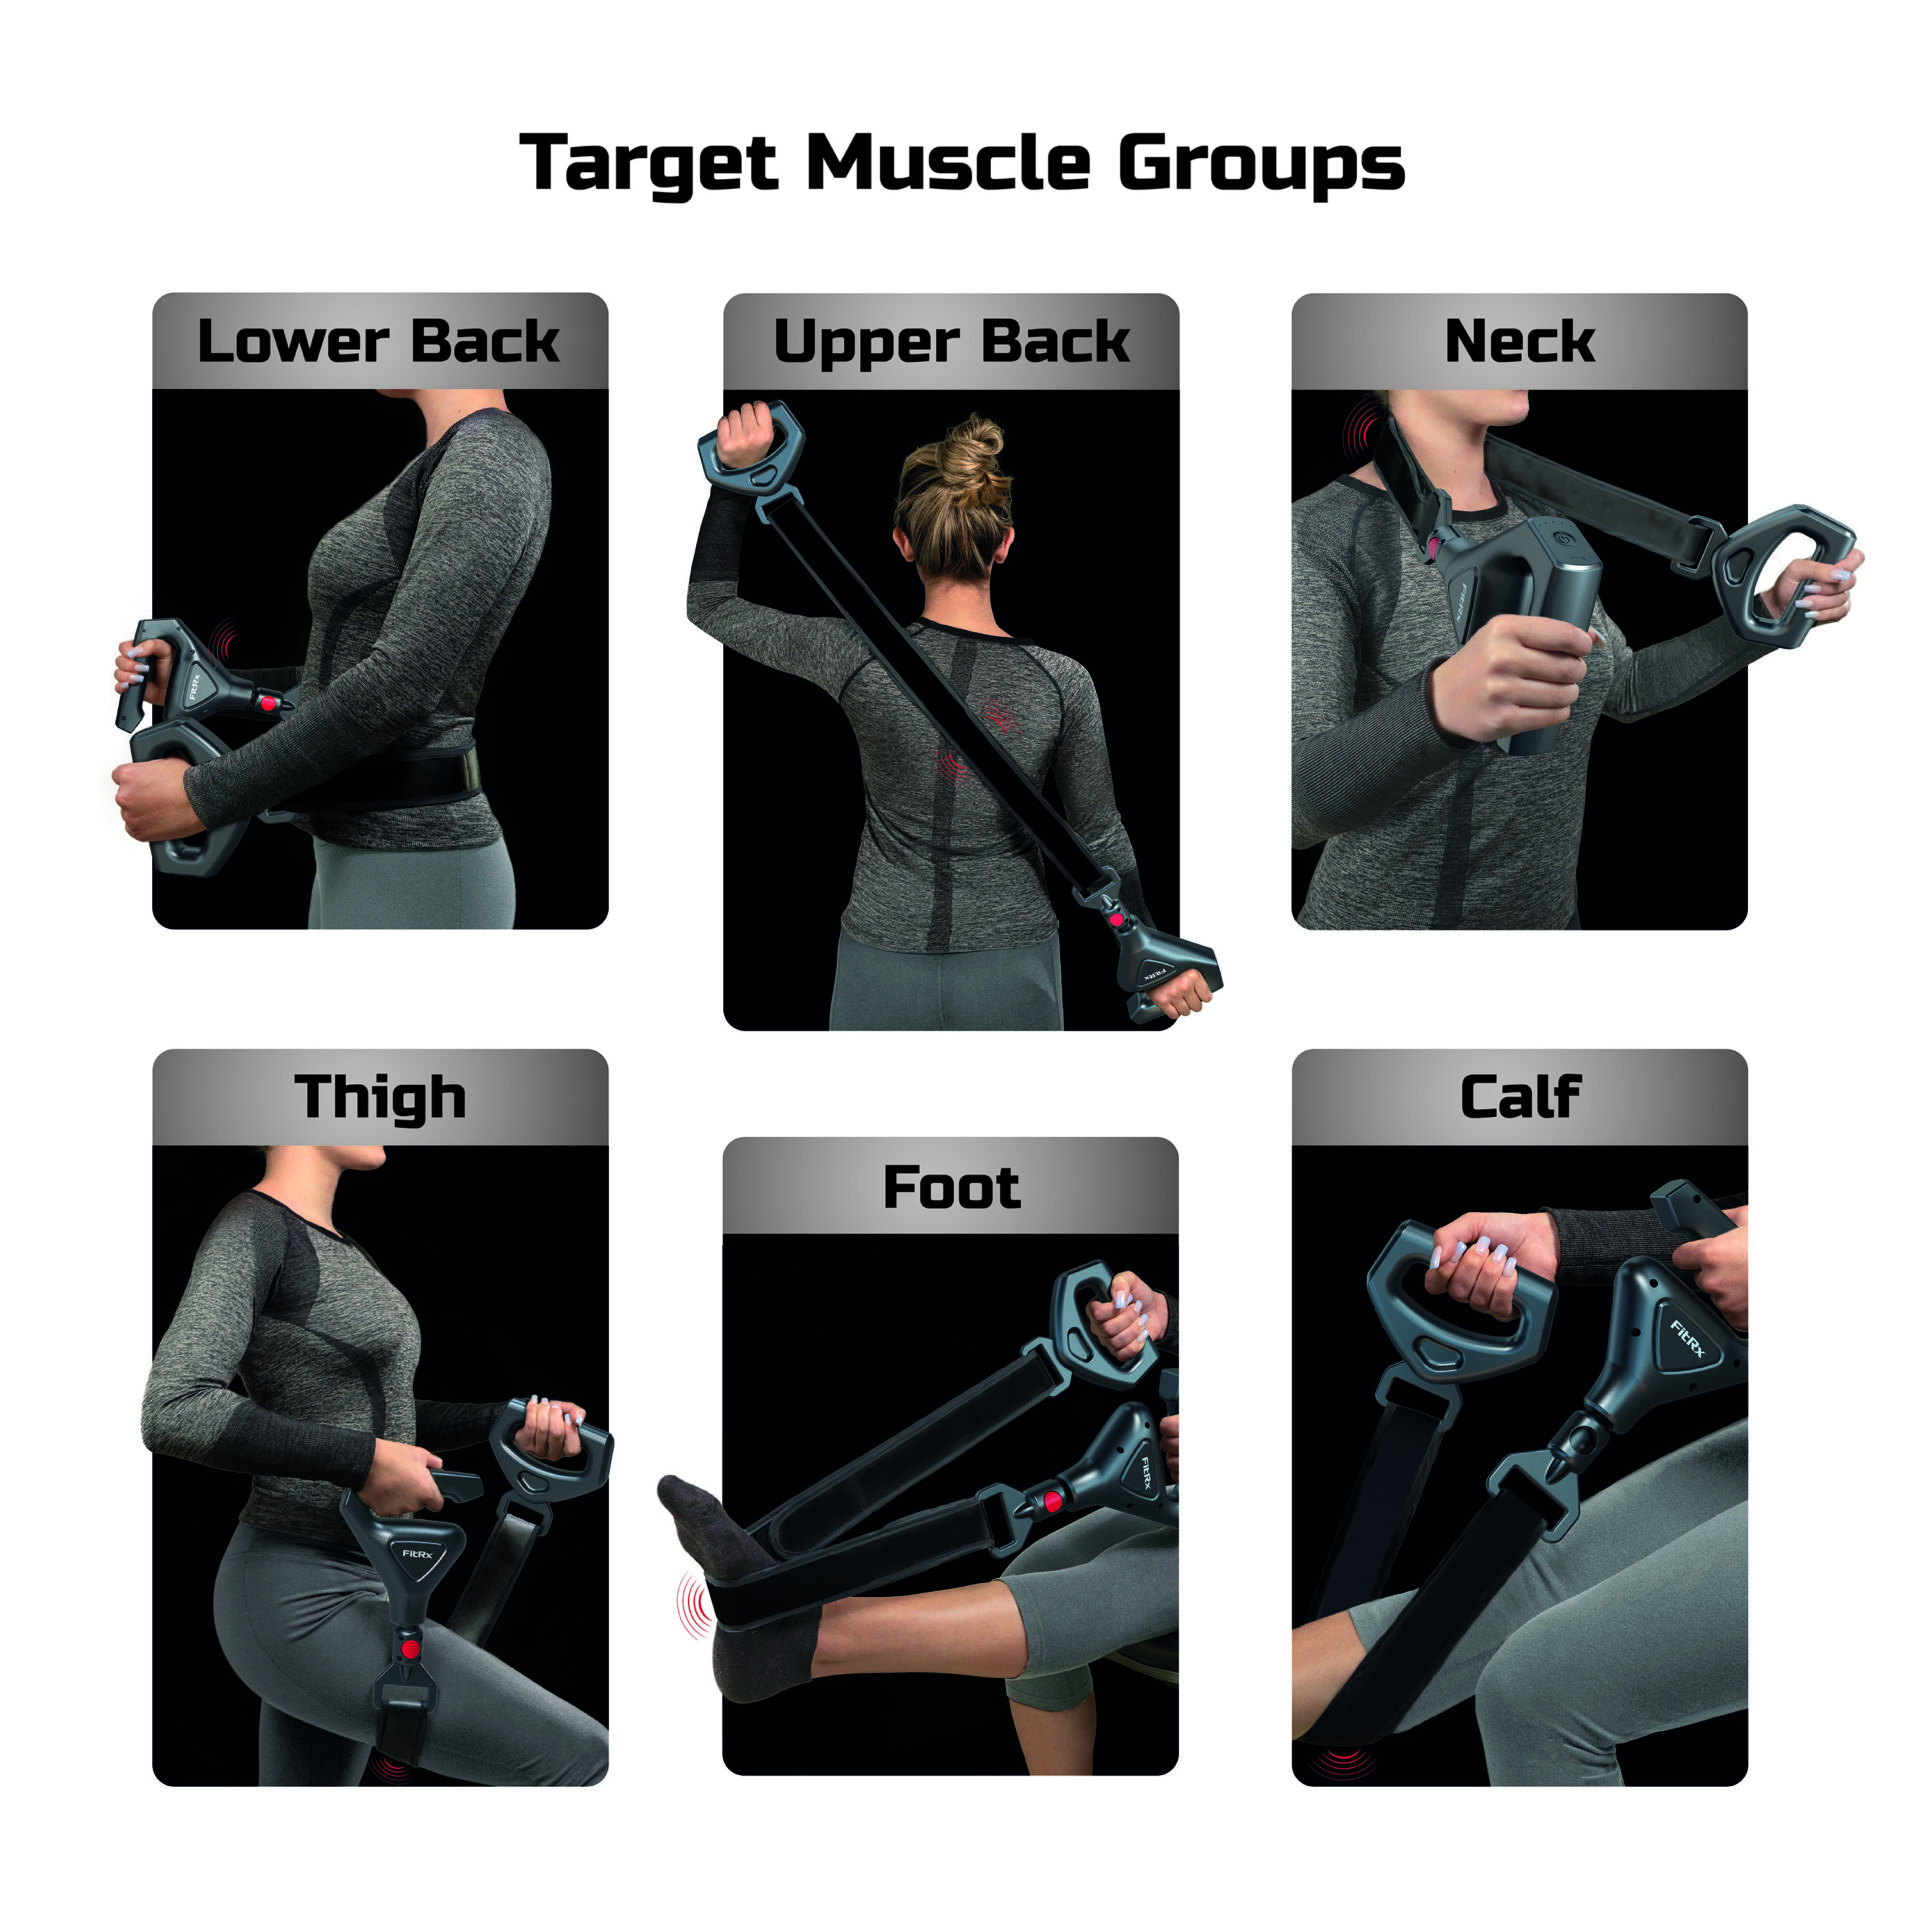
For tight hamstrings, sit on a chair with your leg extended and use the flat head attachment. Start at the glute connection point and glide downward toward the knee, avoiding the sensitive area behind the joint. Apply 30 seconds of stationary treatment on particularly tight spots before continuing the glide pattern. Common Mistake: Users often press too hard on hamstrings—let the device’s weight do the work while maintaining light hand pressure.
When treating upper back tension, position the forked attachment to straddle your spine, targeting the rhomboids and traps on either side. Move vertically along the muscle fibers from shoulders to mid-back, spending no more than 20 seconds per spot. Safety Note: Never place any attachment directly on your spine—maintain at least 2 inches of clearance from the vertebral column at all times.
Timing Matters: How Long to Use FitRx on Each Body Part
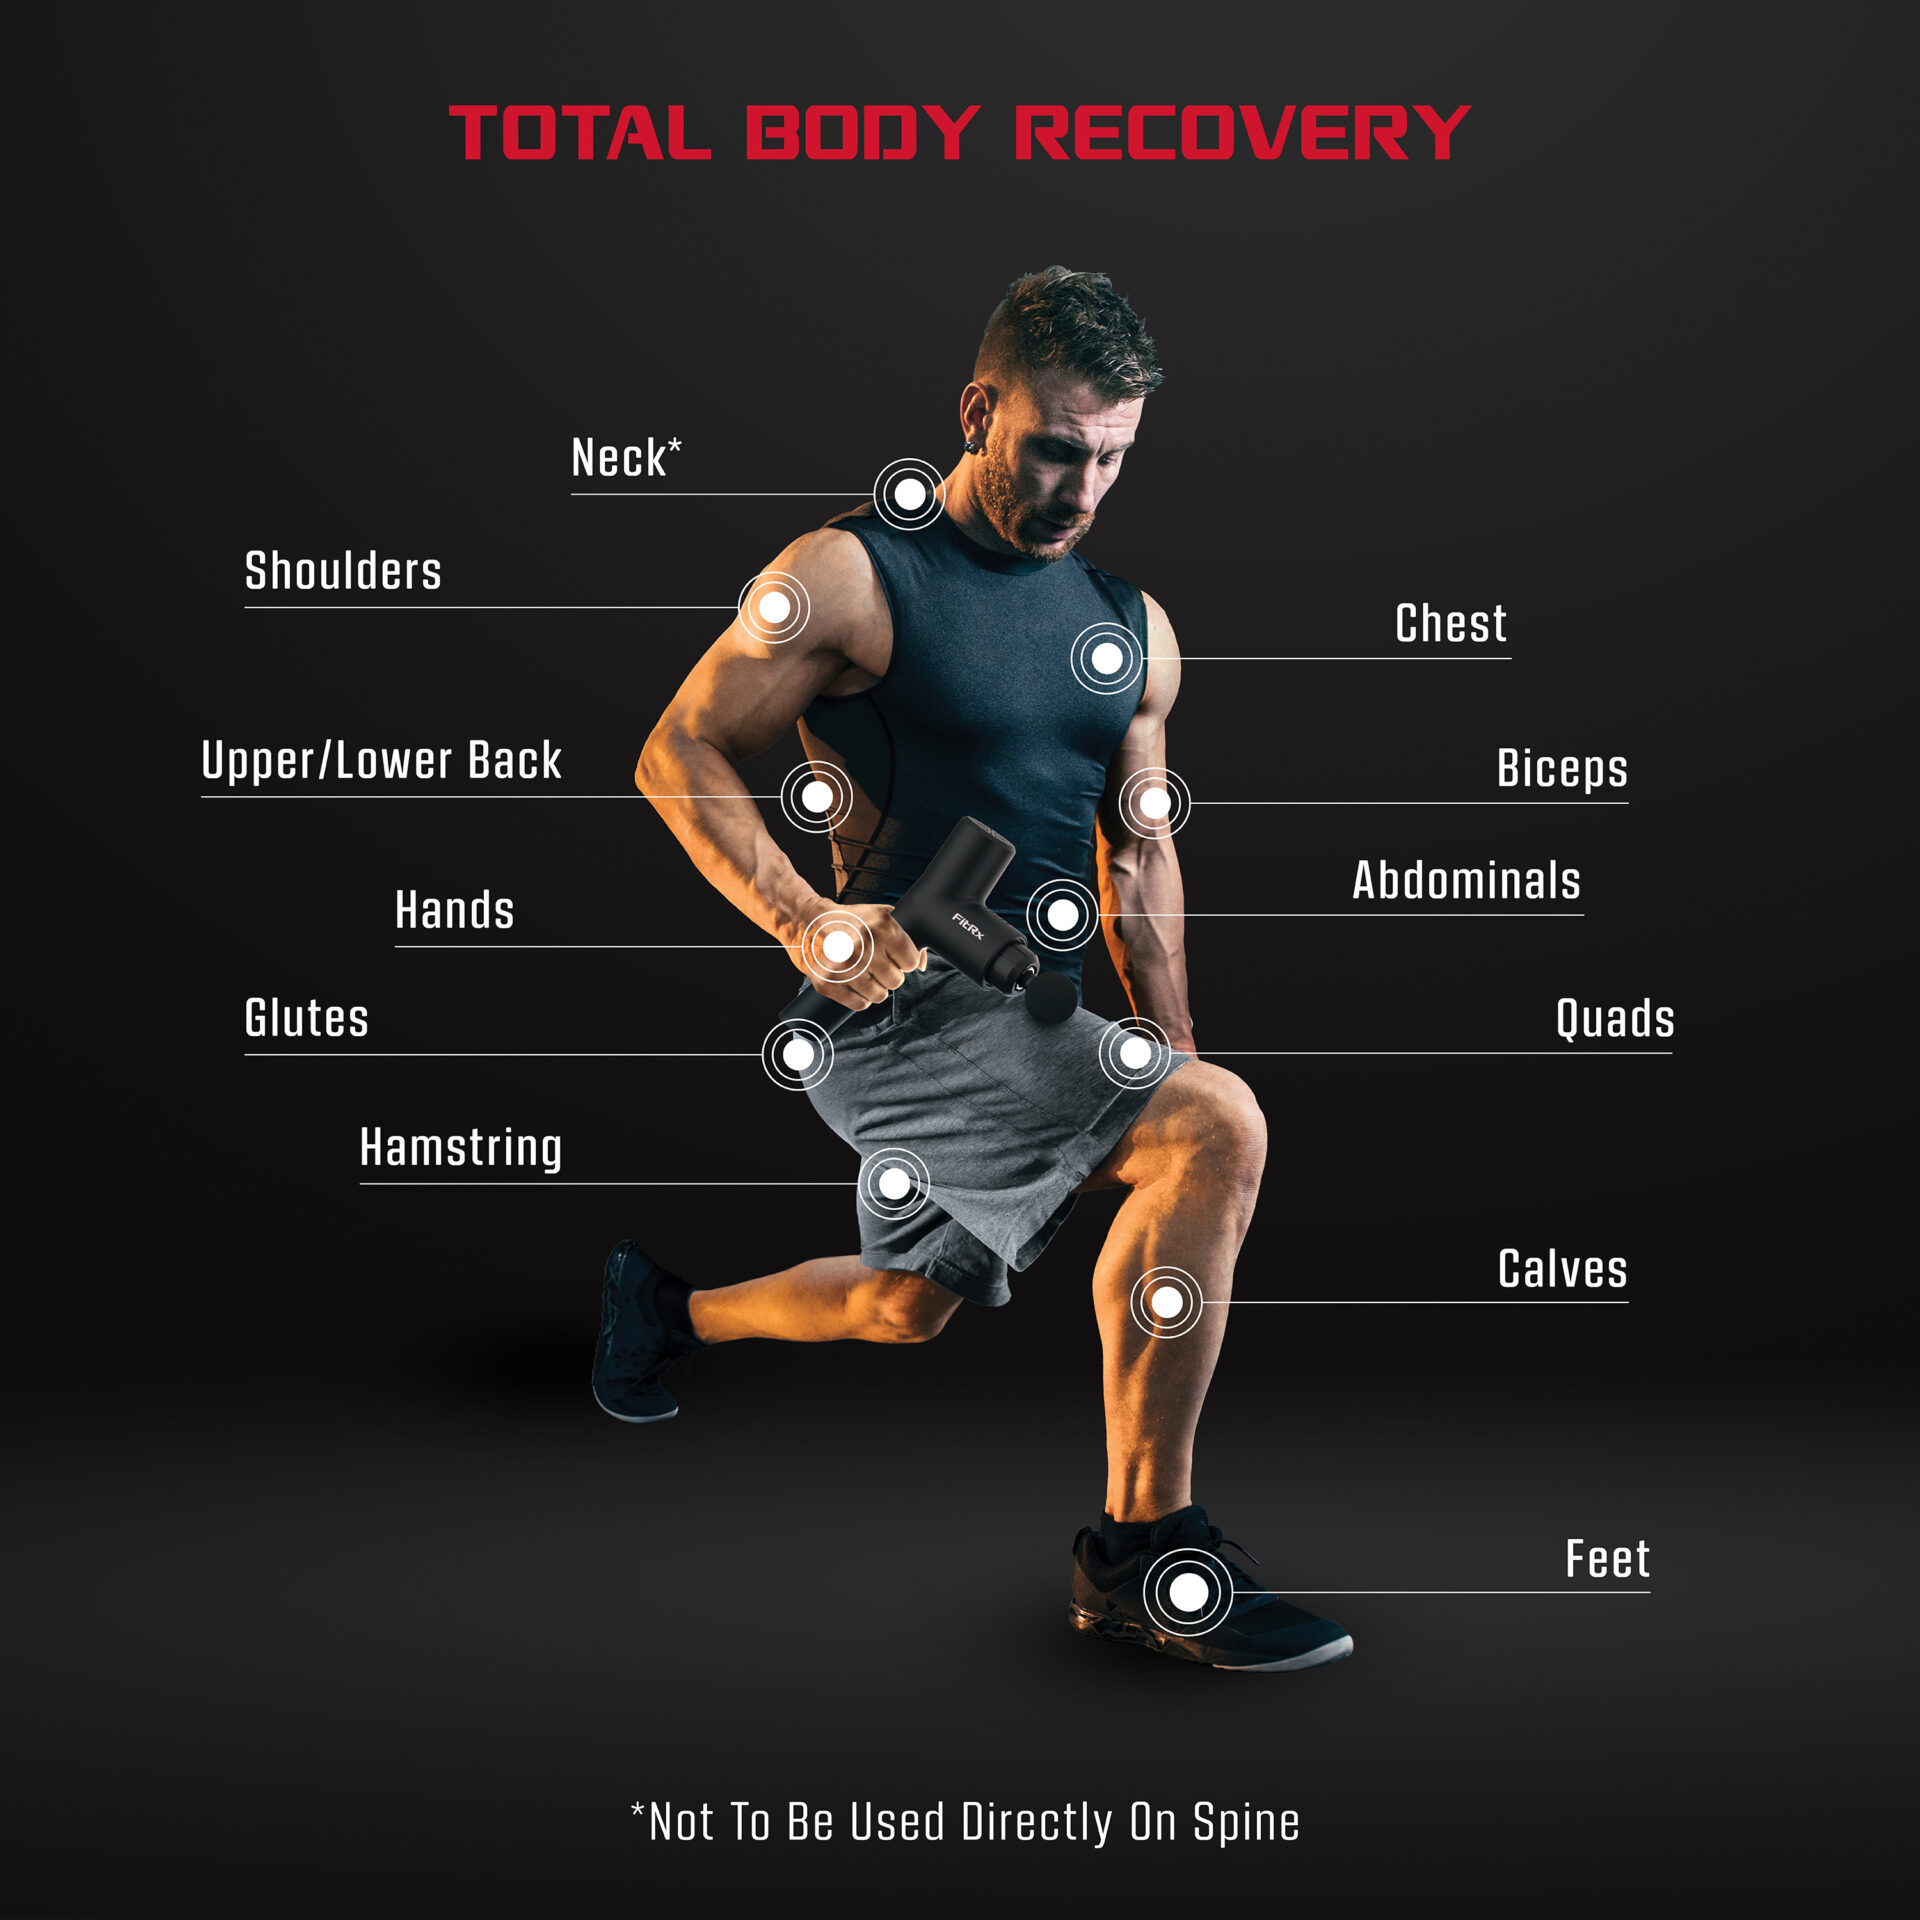
Overusing your FitRx causes tissue damage that counteracts recovery benefits. Limit sessions to 2 minutes maximum per large muscle group (quads, glutes), 90 seconds for medium groups (calves, shoulders), and just 60 seconds for sensitive areas (neck, feet). Critical Rule: Never treat the same spot continuously for more than 30 seconds—rotate positions to prevent localized tissue trauma.
Schedule treatments strategically: use 30-second bursts on major muscle groups before workouts to increase blood flow and flexibility. Post-exercise, target sore areas for 90-second intervals to reduce DOMS. On rest days, employ the cushioned head at lowest settings for full-body maintenance sessions not exceeding 10 minutes total. Warning Sign: If you notice redness or bruising after use, you’ve exceeded safe duration—reduce time by 50% in subsequent sessions.
Advanced FitRx Recovery Methods: Pulsing, Smashing, and Vibration
For deep-seated knots that resist standard treatment, try the pulsing technique: apply the bullet attachment to the trigger point, activate the FitRx for 20 seconds, then turn it off for 10 seconds. Repeat this cycle 3 times without moving the attachment. This intermittent approach prevents muscle guarding while gradually releasing tension.
The smashing technique floods tissues with oxygenated blood: hold the flat head stationary against your thigh for 30 seconds at medium speed, then follow with downward gliding strokes. Finish with light vibration at the lowest setting for 60 seconds to enhance circulation. Expert Tip: Combine these methods after foam rolling for synergistic effects—treat areas that remain tight despite traditional myofascial release.
5 Critical FitRx Mistakes That Cause Injury (And How to Avoid Them)
Mistake #1: Using maximum speed on sensitive areas
Starting at high intensity triggers protective muscle spasms that worsen tightness. Always begin at speed level 1 and increase only if needed—most recovery occurs at medium settings.
Mistake #2: Treating bones and joints directly
Applying the FitRx to knees, elbows, or spine causes inflammation. Stay strictly on muscle bellies, maintaining 1-2 inches clearance from all joints.
Mistake #3: Ignoring pain signals
Discomfort is normal, but sharp pain indicates tissue damage. Stop immediately if you experience stinging sensations or increased pain during use.
Mistake #4: Over-treating the same area
Exceeding 2 minutes per muscle group causes microtrauma. Set a timer for each zone and move systematically through your treatment plan.
Mistake #5: Using on injuries or compromised circulation
Never apply percussive therapy to acute injuries, varicose veins, or areas with poor circulation. Consult a physical therapist before using FitRx with pre-existing conditions.
Maximizing Your FitRx Investment: Daily Maintenance and Long-Term Use
Incorporate your FitRx into a comprehensive recovery protocol for lasting benefits. Use it daily for 5-7 minutes post-workout, focusing on your most overworked muscle groups. Pair treatments with proper hydration and light stretching to enhance nutrient delivery to treated tissues. Pro Strategy: Keep your FitRx visible in your workout space—out of sight means out of mind for many users who skip valuable recovery sessions.
Track your progress with a simple journal noting which attachments, speeds, and durations yield the best results for specific activities. Most users discover they need less intense treatments over time as their muscles adapt to regular percussive therapy. Replace worn attachments every 6-12 months to maintain optimal performance—frayed rubber reduces effectiveness and risks uneven pressure distribution.
By following these precise techniques, you’ll transform how to use FitRx massage gun from a confusing novelty into your most trusted recovery ally. Remember: consistency with proper form beats occasional intense sessions. Within two weeks of correct usage, you’ll notice reduced soreness, improved flexibility, and faster return to peak performance after demanding physical activity.


