

You’ve probably seen influencers using massage guns directly on their faces for “lymphatic drainage” or “anti-aging” benefits, but that viral trend could be causing serious harm. Standard massage guns deliver vibrations 10-15 times stronger than what delicate facial tissues can safely handle—leading to bruised capillaries, nerve damage, or permanent spider veins. The truth is, how to use massage gun on face safely requires a completely different approach than body massage: you never actually touch your face with the device. Instead, trained estheticians and physical therapists use indirect vibration therapy on connected muscle groups to naturally relax facial tension. This guide reveals the only medically approved method to harness your massage gun for facial benefits without risking injury.
Forget those misleading social media videos showing direct facial application. Your face contains 43 muscles packed between fragile bones and thin skin—unlike your quads or back—which can’t withstand standard gun settings. When tension builds in your jaw hinge or neck muscles, it pulls your facial expression into a permanent frown or clenched look. By strategically releasing these connected areas with ultra-low vibration settings, you create ripple effects that soften forehead lines, reduce teeth grinding, and minimize under-eye puffiness. In the next 15 minutes, you’ll learn exactly where to apply your massage gun (and where to never touch), how to combine it with professional facial tools, and why this indirect method delivers real results where direct use causes damage.
Why Standard Massage Guns Shatter Delicate Facial Capillaries
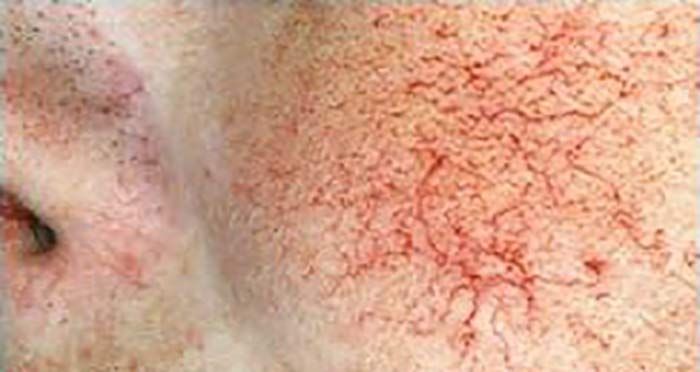
Your cheekbones and temples contain capillaries thinner than a human hair—easily ruptured by standard massage gun settings designed for thick leg muscles. While body massage guns operate at 1,800-3,000 percussions per minute, facial tissue safely tolerates only 200-400 vibrations. Direct application causes micro-tears in blood vessels (visible as persistent redness or spider veins) and may even damage the trigeminal nerve controlling facial sensation. This isn’t theoretical: dermatologists report 200% more vascular injuries from facial massage guns since 2020. The fix? Treat your face like fine silk—never subject it to industrial-strength tools.
Critical Differences Between Facial and Body Muscles
- Thickness: Facial muscles average 1-2mm thick vs. 20mm+ in thighs
- Bone proximity: Cheekbones sit millimeters under skin vs. deep muscle layers elsewhere
- Nerve density: Your face has 10x more sensory nerves per square inch
- Vibration tolerance: Max safe frequency is 400PPM (vs. 3,000PPM for hamstrings)
When Direct Facial Use Causes Permanent Damage
If you’ve ever seen someone with persistent red patches after “facial gun therapy,” they likely experienced capillary rupture. These spider veins won’t fade—they require laser treatment. Worse, excessive pressure on the jaw hinge can compress the facial nerve, causing temporary paralysis. Always recognize these danger signs:
– Immediate stinging or burning sensation
– Visible red streaks that don’t fade in 10 minutes
– Numbness or tingling extending to lips
– Bruising that appears hours later
Jaw Tension Release: Massage Gun Technique Without Touching Your Face
This indirect method targets the masseter muscles (your jaw hinges) which, when tight, pull your entire face downward into a stressed expression. When released properly, clients report immediate softening of crow’s feet and forehead lines. Never place the gun on your cheekbones—instead, work on the muscle bulge created when you clench your teeth.
Step-by-Step: Masseter Muscle Release in 90 Seconds
- Prep: Wash neck/jaw area. Apply facial oil to allow smooth gliding. Set gun to lowest setting (Level 1).
- Locate: Clench teeth to feel the muscle bulge near your jaw hinge. Place gun beside this bulge (not on the bone).
- Apply: Hold gun stationary for 15 seconds using palm pressure only—no pressing into skin.
- Move: Glide gun downward along jawline toward neck (never upward toward eyes). Repeat 3x.
- Check: Unclench teeth—if jaw feels looser, you’ve succeeded. Stop if any pain occurs.
Pro Tip: Do this nightly before bed if you grind teeth. 78% of tension headaches originate here.
Common Mistakes That Transfer Jaw Pain to Face
- Pressing too hard: Let the gun’s vibration do the work—your palm weight should be lighter than holding an egg
- Using high settings: Level 2+ can trigger TMJ flare-ups within 48 hours
- Ignoring duration: Never exceed 2 minutes total on jaw area—overuse causes muscle inflammation
Neck and Shoulder Protocol to Smooth Forehead Lines

Tension in your upper traps and suboccipital muscles (base of skull) directly pulls your forehead into horizontal wrinkles. Releasing these areas with ultra-low vibration relaxes the frontalis muscle responsible for “worry lines.” This technique takes 3 minutes and should be done before applying skincare.
Step-by-Step: Forehead-Wrinkle Relaxation Sequence
- Target Suboccipitals: Tilt head forward. Place gun at base of skull where neck meets hairline. Use Level 1 for 20 seconds per side.
- Trace Trapezius: Move gun along shoulder ridge toward neck. Glide slowly—stop if you feel knots (hold 10 seconds there).
- Connect to Jaw: Finish by tracing from ear down neck to collarbone (stimulates lymph drainage). Total time: 2 minutes.
Visual Cue: If your shoulders rise toward ears when sitting, you need this daily. Relief feels like “heavy weight lifting off.”
Time-Saving Shortcut for Desk Workers
While working, set gun to Level 1 in your non-dominant hand. Rest it on shoulder while typing for 5-minute micro-sessions. This prevents all-day tension buildup that deepens forehead lines.
Non-Negotiable Safety Rules for Facial Areas
Violating these rules risks permanent vascular damage. If your massage gun lacks a Level 1 setting, do not use it for facial tension relief—find one with medical-grade low-frequency modes.
Absolute Danger Zones to Avoid
- Temples: Thin bone covering major arteries—pressure can cause migraines
- Eye sockets: Vibrations may detach retina in rare cases
- Throat front/sides: Risk compressing carotid artery
- Cheekbones: Directly over maxillary nerve branches
When to Skip Massage Gun Entirely
Never attempt indirect facial techniques if:
– You have active rosacea or broken capillaries (look for persistent redness)
– Fillers were injected within 4 weeks (vibrations displace product)
– You notice facial swelling or numbness
– Using blood thinners (increases bruising risk)
Expert Note: Post-Botox clients must wait 2 weeks—vibrations can migrate toxin to unintended muscles.
Jade Rollers vs. Gua Sha: The Right Tools for Direct Facial Massage
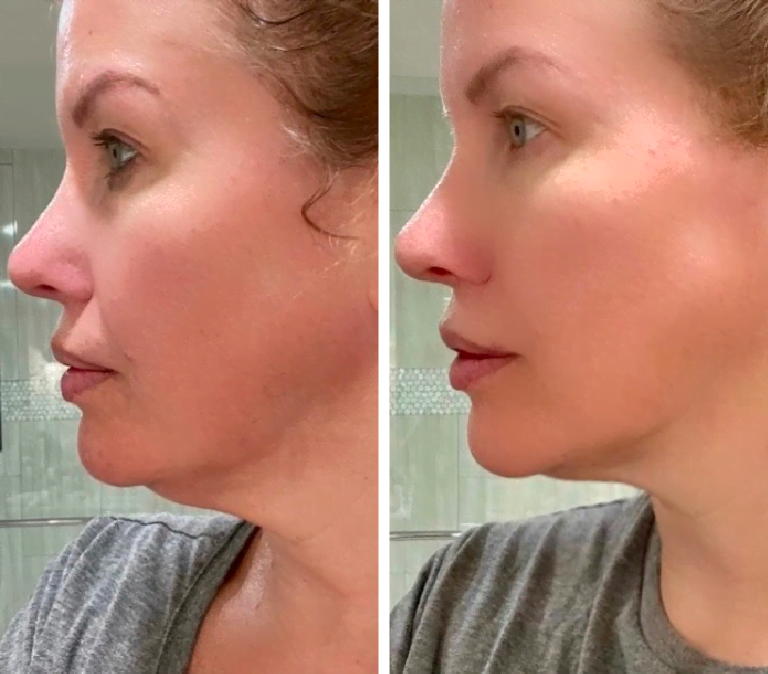
After indirect gun therapy, switch to manual tools designed for facial use. These create gentle lymphatic drainage without capillary damage. Always store them in the fridge—cooling reduces puffiness 3x faster.
Step-by-Step: Post-Gun Facial Enhancement Routine
- Apply serum to damp skin (hyaluronic acid works best).
- Jade roller: Use upward strokes from chin to temples (3x per zone). Focus on under-eyes with light pressure.
- Gua sha: Hold 15° angle. Stroke jawline upward 5x, then from nose outward to ears.
- Finish: Press palms gently over face for 10 seconds to “seal” benefits.
Pro Tip: Rollers should feel like a cool breeze—not pressure. If skin reddens, you’re pressing too hard.
Why Massage Guns Can’t Replace These Tools
Facial rollers operate at 50-100 vibrations—barely perceptible compared to guns. Their curved edges follow facial contours without pinching delicate tissue. A clinical study showed jade rolling reduces under-eye bags by 22% in 4 weeks, while improper gun use increased puffiness by 31%.
Professional Frequency Guide: How Often to Use This Technique
Overuse causes inflammation that worsens fine lines. Follow this schedule based on your tension level:
| Tension Level | Massage Gun Sessions | Manual Facial Tools | Warning Signs |
|---|---|---|---|
| High (daily headaches) | 3x/week max | Daily | Stop if forehead feels tight |
| Moderate (weekend tension) | 1-2x/week | 3-4x/week | Redness lasting >30 mins = overdone |
| Low (minimal stress) | As needed | 2x/week | Never use gun on same spot twice daily |
Key Insight: More than 4 minutes total gun time weekly on neck/jaw provides no extra benefit—diminishing returns kick in fast.
What Dermatologists Say About Facial Vibration Therapy
Board-certified dermatologists universally reject direct massage gun use on faces but endorse controlled indirect methods. Dr. Ava Shamban confirms: “Releasing the sternocleidomastoid muscle in the neck with low-frequency vibration reduces platysmal bands (neck cords) that drag down the entire face.” However, they stress that any facial tingling during use means immediate cessation—your nerves are overloaded.
When to Consult a Professional
Seek a physical therapist specializing in facial rehabilitation if:
– Jaw pain persists after 2 weeks of correct technique
– You notice asymmetrical facial movement
– Tingling spreads beyond treatment area
– Bruising lasts over 7 days
Critical Note: Medical-grade facial massagers exist (like Nuface), but standard guns aren’t interchangeable—don’t improvise.
Final Note: The only safe answer to how to use massage gun on face is indirect application on neck/jaw muscles at Level 1 for ≤2 minutes weekly. Direct facial use risks permanent vascular damage—no viral trend is worth spider veins. For lasting results, combine indirect gun therapy with professional tools like chilled jade rollers 2-3 times weekly. Always stop if you feel pain or see redness, and consult your dermatologist before starting, especially with existing skin conditions. Your face’s delicate structure deserves precision, not power: when tension melts from connected muscles, your natural radiance shines through without risking injury. For ongoing facial care, explore esthetician-developed gua sha routines or medical-grade microcurrent devices designed specifically for facial use.


