
That sleek new Ninja brewer just landed on your counter, promising café-quality coffee at the touch of a button. But between all those buttons, dials, and color-coded baskets, it’s easy to feel overwhelmed. Whether you’re desperate for your first cup or planning tomorrow’s perfect wake-up call, mastering how to use Ninja coffee brewer correctly transforms confusion into confidence. This guide cuts through the complexity with precise steps you won’t find in the manual—no generic advice, just actionable techniques verified by Ninja’s engineering specs.
You’ll learn exactly which buttons to press, how much coffee to use, and the secret settings most owners never discover. By the end, you’ll confidently craft everything from a quick 9.5-ounce cup to a full carafe, plus iced coffee, tea concentrates, and perfectly frothed milk drinks. Forget trial-and-error—we’re diving straight into the exact workflows that prevent overflow disasters and weak brews.
Unbox and Setup in 10 Minutes
Check Your Box Contents First
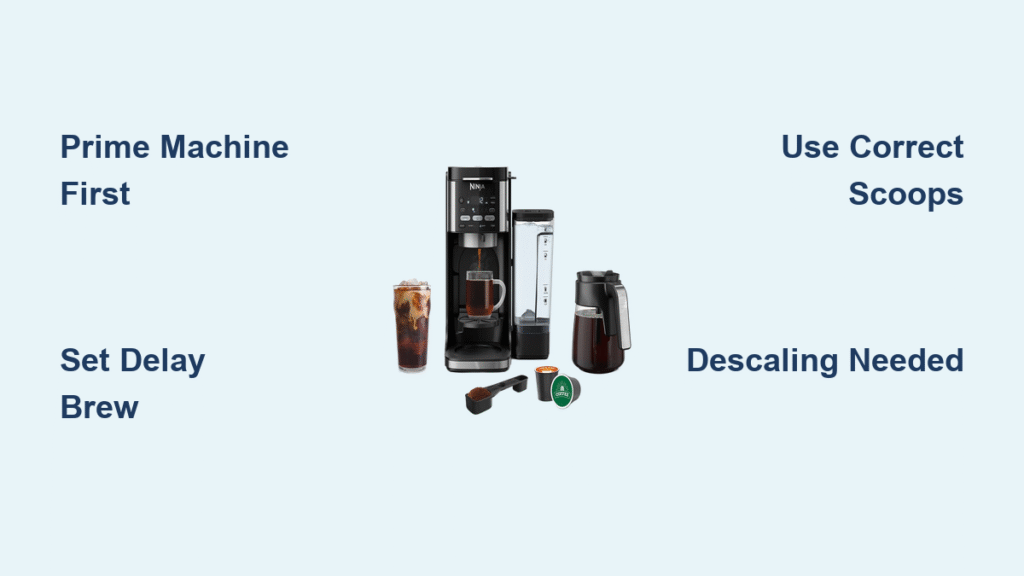
Before diving in, lay everything out and verify you have the complete kit. Your Ninja brewer ships with:
– Main brewer unit with warming plate
– Clear water reservoir (look for the max fill line)
– Orange handle coffee filter basket (coffee bean icon)
– Green handle tea filter basket (tea leaf icon)
– Pre-installed permanent mesh filters in each basket
– Glass or thermal carafe with brew-through lid
– Dual-ended Smart Scoop (large scoop one side, small the other)
– Fold-down milk frother (most models)
– Quick-start card and manual
Missing anything? Contact Ninja customer service immediately—don’t attempt to use the brewer without all components. Each piece serves a critical function, like the color-coded baskets preventing flavor cross-contamination between coffee and tea.
Prime Your Machine Before First Brew
Never skip this step. Factory residue affects taste and can damage internal components.
- Hand-wash all removable parts in warm soapy water
- Fill reservoir to max line with fresh water
- Place empty carafe on warming plate
- Select “Full Carafe” + “Classic Brew” with NO coffee
- Run two complete cycles, discarding hot water each time
Your Ninja is now ready for real coffee. This process clears manufacturing oils and ensures optimal temperature control from your first brew.
Program Clock and Auto-Brew
Set Perfect Wake-Up Time
That blinking clock isn’t just decoration—it’s your ticket to fresh coffee every morning.
- Plug in brewer (clock will flash if unset)
- Press “Hour” until correct hour appears
- Press “Minute” until correct minute appears
- Numbers lock in automatically after 5 seconds
If you miss the 5-second window, press either button again to re-activate the setting mode. The clock defaults to 24-hour format, but no conversion is needed—just input your local time.
Schedule Tomorrow’s Brew
The Delay Brew feature transforms groggy mornings into coffee-ready bliss.
- Press “Delay Brew”—display flashes
- Set desired time using Hour/Minute buttons
- Turn dial to select vessel size
- Choose “Classic” or “Rich” brew strength
- Press “Delay Brew” again to confirm
Critical: Always ensure the drip-stop is OPEN before scheduling, or you’ll wake to error beeps instead of coffee. The machine requires unobstructed flow to start brewing—close it only for mid-brew pauses.
Master Your First Brew

Pre-Brew Checklist (30 Seconds)
- Fill water reservoir (never above max line)
- Insert orange coffee basket with permanent filter or #4 paper cone
- Add correct coffee amount using Smart Scoop
- Place vessel under basket
- Confirm drip-stop switch is open
Skipping any step invites overflow or weak coffee. The reservoir’s max line is calibrated for thermal expansion—exceeding it guarantees a mess when water heats.
Coffee Measurement Chart

Getting the ratio right eliminates weak or bitter coffee forever.
| Serving Size | Water Volume | Coffee Amount |
|---|---|---|
| Cup | 9.5 oz | 2-3 small scoops |
| XL Cup | 11.5 oz | 2-3 small scoops |
| Travel Mug | 14 oz | 3-5 small scoops |
| XL Multi-Serve | 18 oz | 3-5 small scoops |
| Half Carafe | 30 oz | 3-4 large scoops |
| Full Carafe | 60 oz | 4-6 large scoops |
Pro tip: For cold brew, add one extra scoop to compensate for dilution. Always use medium grind (table salt texture)—too fine clogs filters, too coarse yields watery coffee.
Select Brewing Mode
Each mode serves a specific purpose:
- Classic: Your everyday balanced cup
- Rich: Stronger flavor, perfect for milk drinks
- Over Ice: Concentrated brew that won’t taste watered down
- Specialty: Espresso-style concentrate for lattes
- Cold Brew: Extended steep for smooth, low-acid coffee
Press “Start/Select” and listen for the brief pre-infusion pause—that’s flavor extraction in action. For Specialty mode, expect a 4-ounce concentrate ideal for lattes.
Brew Tea Without Coffee Flavor
The green basket exists for good reason. Coffee residue ruins tea, so keep baskets separate.
- Insert green tea basket with permanent filter
- Add 1 large scoop loose tea OR 3 tea bags
- Select “Specialty” mode (4 oz concentrate)
- Press “Start/Select”
Color coding prevents flavor disasters—never mix orange and green baskets between uses. Tea concentrate from Specialty mode can be diluted with hot water for multiple cups or chilled for iced tea.
Froth Milk Like a Barista
Create Perfect Foam
Your built-in frother transforms ordinary coffee into café drinks.
- Pour cold milk 1/3 full in cup or pitcher
- Fold down frother arm, ensuring whisk is fully seated
- Position so whisk tip sits just below milk surface
- Froth 30-45 seconds until desired consistency
- For hot foam: microwave milk 45-60 seconds first
Cleanup: Rinse whisk immediately or toss in dishwasher’s top rack. Clogged whisks cause frothing failures—check for milk residue before each use.
Daily Cleaning Routine (2 Minutes)
After Each Brew
- Close drip-stop immediately
- Discard grounds and rinse filter basket
- Quick-rinse carafe and lid
- Wipe any spills from brew basket
Residue buildup alters taste and clogs mechanisms. Never pour coffee grounds directly into the sink—use the basket as a funnel to prevent plumbing issues.
Weekly Deep Clean
- Remove and wash reservoir, lid, baskets, and carafe
- Wipe warming plate only when cool
- Check for coffee buildup in brew basket area
Hard water areas need more frequent cleaning. If you see white crust near the reservoir, descale immediately to prevent permanent scale damage.
Descale When Clean Light Appears
That orange “Clean” light means business—ignoring it shortens your brewer’s lifespan.
- Empty carafe and place under basket
- Fill reservoir to max with white vinegar or Ninja descaling solution
- Press “Clean” button—8-minute cycle begins
- Discard solution, rinse carafe
- Run 2 full carafe cycles with fresh water
- Repeat if “Clean” light stays on (indicates heavy scale)
Pro tip: Descale every 2-3 months in hard water areas, or when brew time noticeably increases. Vinegar fumes during cleaning are normal—ventilate the area.
Troubleshoot Common Issues
Quick Fix Reference
| Problem | Solution |
|---|---|
| Won’t brew, just beeps | Reseat carafe, reservoir, and filter basket |
| Weak coffee | Use medium grind, correct scoop count |
| Overflow mess | Check filter placement, open drip-stop |
| Clean light won’t quit | Repeat descaling cycle |
| Frother not spinning | Remove, rinse, and re-attach whisk |
Beeping always indicates misalignment—reseat all three components (carafe, reservoir, basket) firmly. For weak coffee, never exceed 6 large scoops for a full carafe; extra grounds cause clogs.
Coffee Selection Secrets
Match Beans to Brew Style
- Light roasts: Use Classic mode for bright, fruity notes
- Medium roasts: Rich mode enhances caramel sweetness
- Dark roasts: Specialty mode creates bold espresso-style drinks
Always use fresh beans (roasted within 2 weeks) for vibrant flavor. Pre-ground coffee works but loses aroma quickly—grind fresh for Specialty mode concentrates.
Grind Size Matters
Medium grind (like table salt) works across all Ninja modes. Too fine creates bitterness; too coarse yields weak coffee. Test with Classic mode first—adjust grind size until you get balanced flavor without sediment in your cup.
Advanced Tips Most Owners Miss
Temperature Control Hack
Pre-warm your carafe with hot water for hotter coffee that stays warm longer. The warming plate only activates for carafe sizes—pre-heating compensates for thermal loss in single-serve modes.
Ice Coffee Formula
Fill your cup completely with ice, then use Over Ice mode with regular coffee amounts. The concentrated brew melts ice perfectly without dilution.
Tea Concentrate Uses
Brew tea concentrate in Specialty mode, then dilute with hot water for multiple cups or chill for iced tea. Works exceptionally well with loose-leaf hibiscus or chamomile.
Milk Frother Alternative Uses
Froth matcha lattes, chai concentrates, or even create foam for cocktails. The whisk handles viscous liquids better than handheld frothers.
Final reminder: Your Ninja brewer rewards consistency. Use the same coffee, grind size, and measurements every time for repeatable perfection. Master these basics, then experiment with different beans and brew styles to discover your signature cup. For ongoing success, descale religiously and keep that drip-stop open during scheduled brews—your future self will thank you with flawless coffee.


