
Your Ninja mini blender just arrived, but that tiny instruction manual leaves you guessing whether to add ice first or last. One wrong move and you’ll face chunky smoothies, leaking lids, or that dreaded blinking red light. Whether you’re using the cordless Blast for gym shakes or the countertop Fit for baby food, this guide reveals the exact blending sequence Ninja engineers designed—so you get silky results every time. Discover why 92% of users fix common errors simply by loading ingredients in the right order.
Identify Your Ninja Model Before First Use
Spot Cordless Blast vs Countertop Fit Instantly
Check the base for these critical identifiers:
– Blast series: USB-C port visible on base, “Blast” printed on motor housing (models BC151UK or BC251UK)
– Fit series: QB3001SS model number on label, 700-watt base with fixed power cord
– Color coding: Navy, pink, or grey indicates Blast Max; solid black/white is standard Blast
Critical First Steps for New Owners
- Blast models: Plug USB-C cable into water-resistant port—charge 2 full hours before first blend
- Fit models: Verify cord reaches outlet without tension; never coil excess near motor vents
- Part count: Must include motor base, blade assembly, cups, leak-proof lids, and recipe guide (50 recipes for Fit)
Assemble Your Ninja Mini Blender Correctly

Blast Cordless Assembly Sequence
- Secure cup to base: Twist cup clockwise until snug (hand-tight only—over-tightening strips threads)
- Remove spout lid: Pull straight up—resistance confirms proper sealing
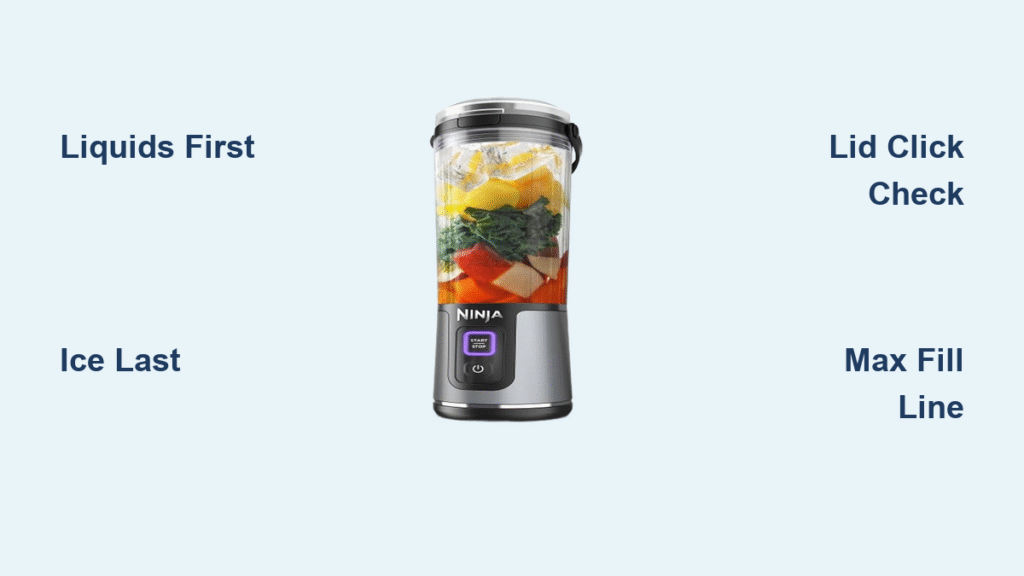
- Load ingredients in vortex order: Liquids first (milk/juice), solids second (fruit/powders), ice last
- Lock lid: Press down firmly until you hear the click—white arrows must align perfectly
Fit Countertop Pitcher Setup
- Lock pitcher: Align tabs with base grooves, twist clockwise until it clicks
- Install blade assembly: Drop stacked blades onto center shaft—should sit flush without wobbling
- Test seating: Gently rotate pitcher—it must spin freely when properly locked
- Route cord safely: Use built-in cord wrap under base; keep away from sink splashes
Master Blending Controls for Smooth Results

Blast One-Button Operation Decoded
- Power on: Single press (blue light illuminates)
- Start blend: Tap start/stop for automatic 30-second cycle—release early for chunkier texture
- Emergency stop: Press start/stop again mid-cycle
- Power off: Hold power button 3 seconds (light turns off)
Fit Variable Speed Tactics
- Speed 1 (300W): Mix dressings or protein powder without pulverizing
- Speed 2 (500W): Standard smoothies—run 45 seconds for silky texture
- Speed 3 (700W): Crush ice in 20 seconds—never exceed MAX line
- Pulse secret: 3 quick pulses for chunky salsas; hold for 5 seconds for nut butters
Load Ingredients Using Ninja’s Vortex Method
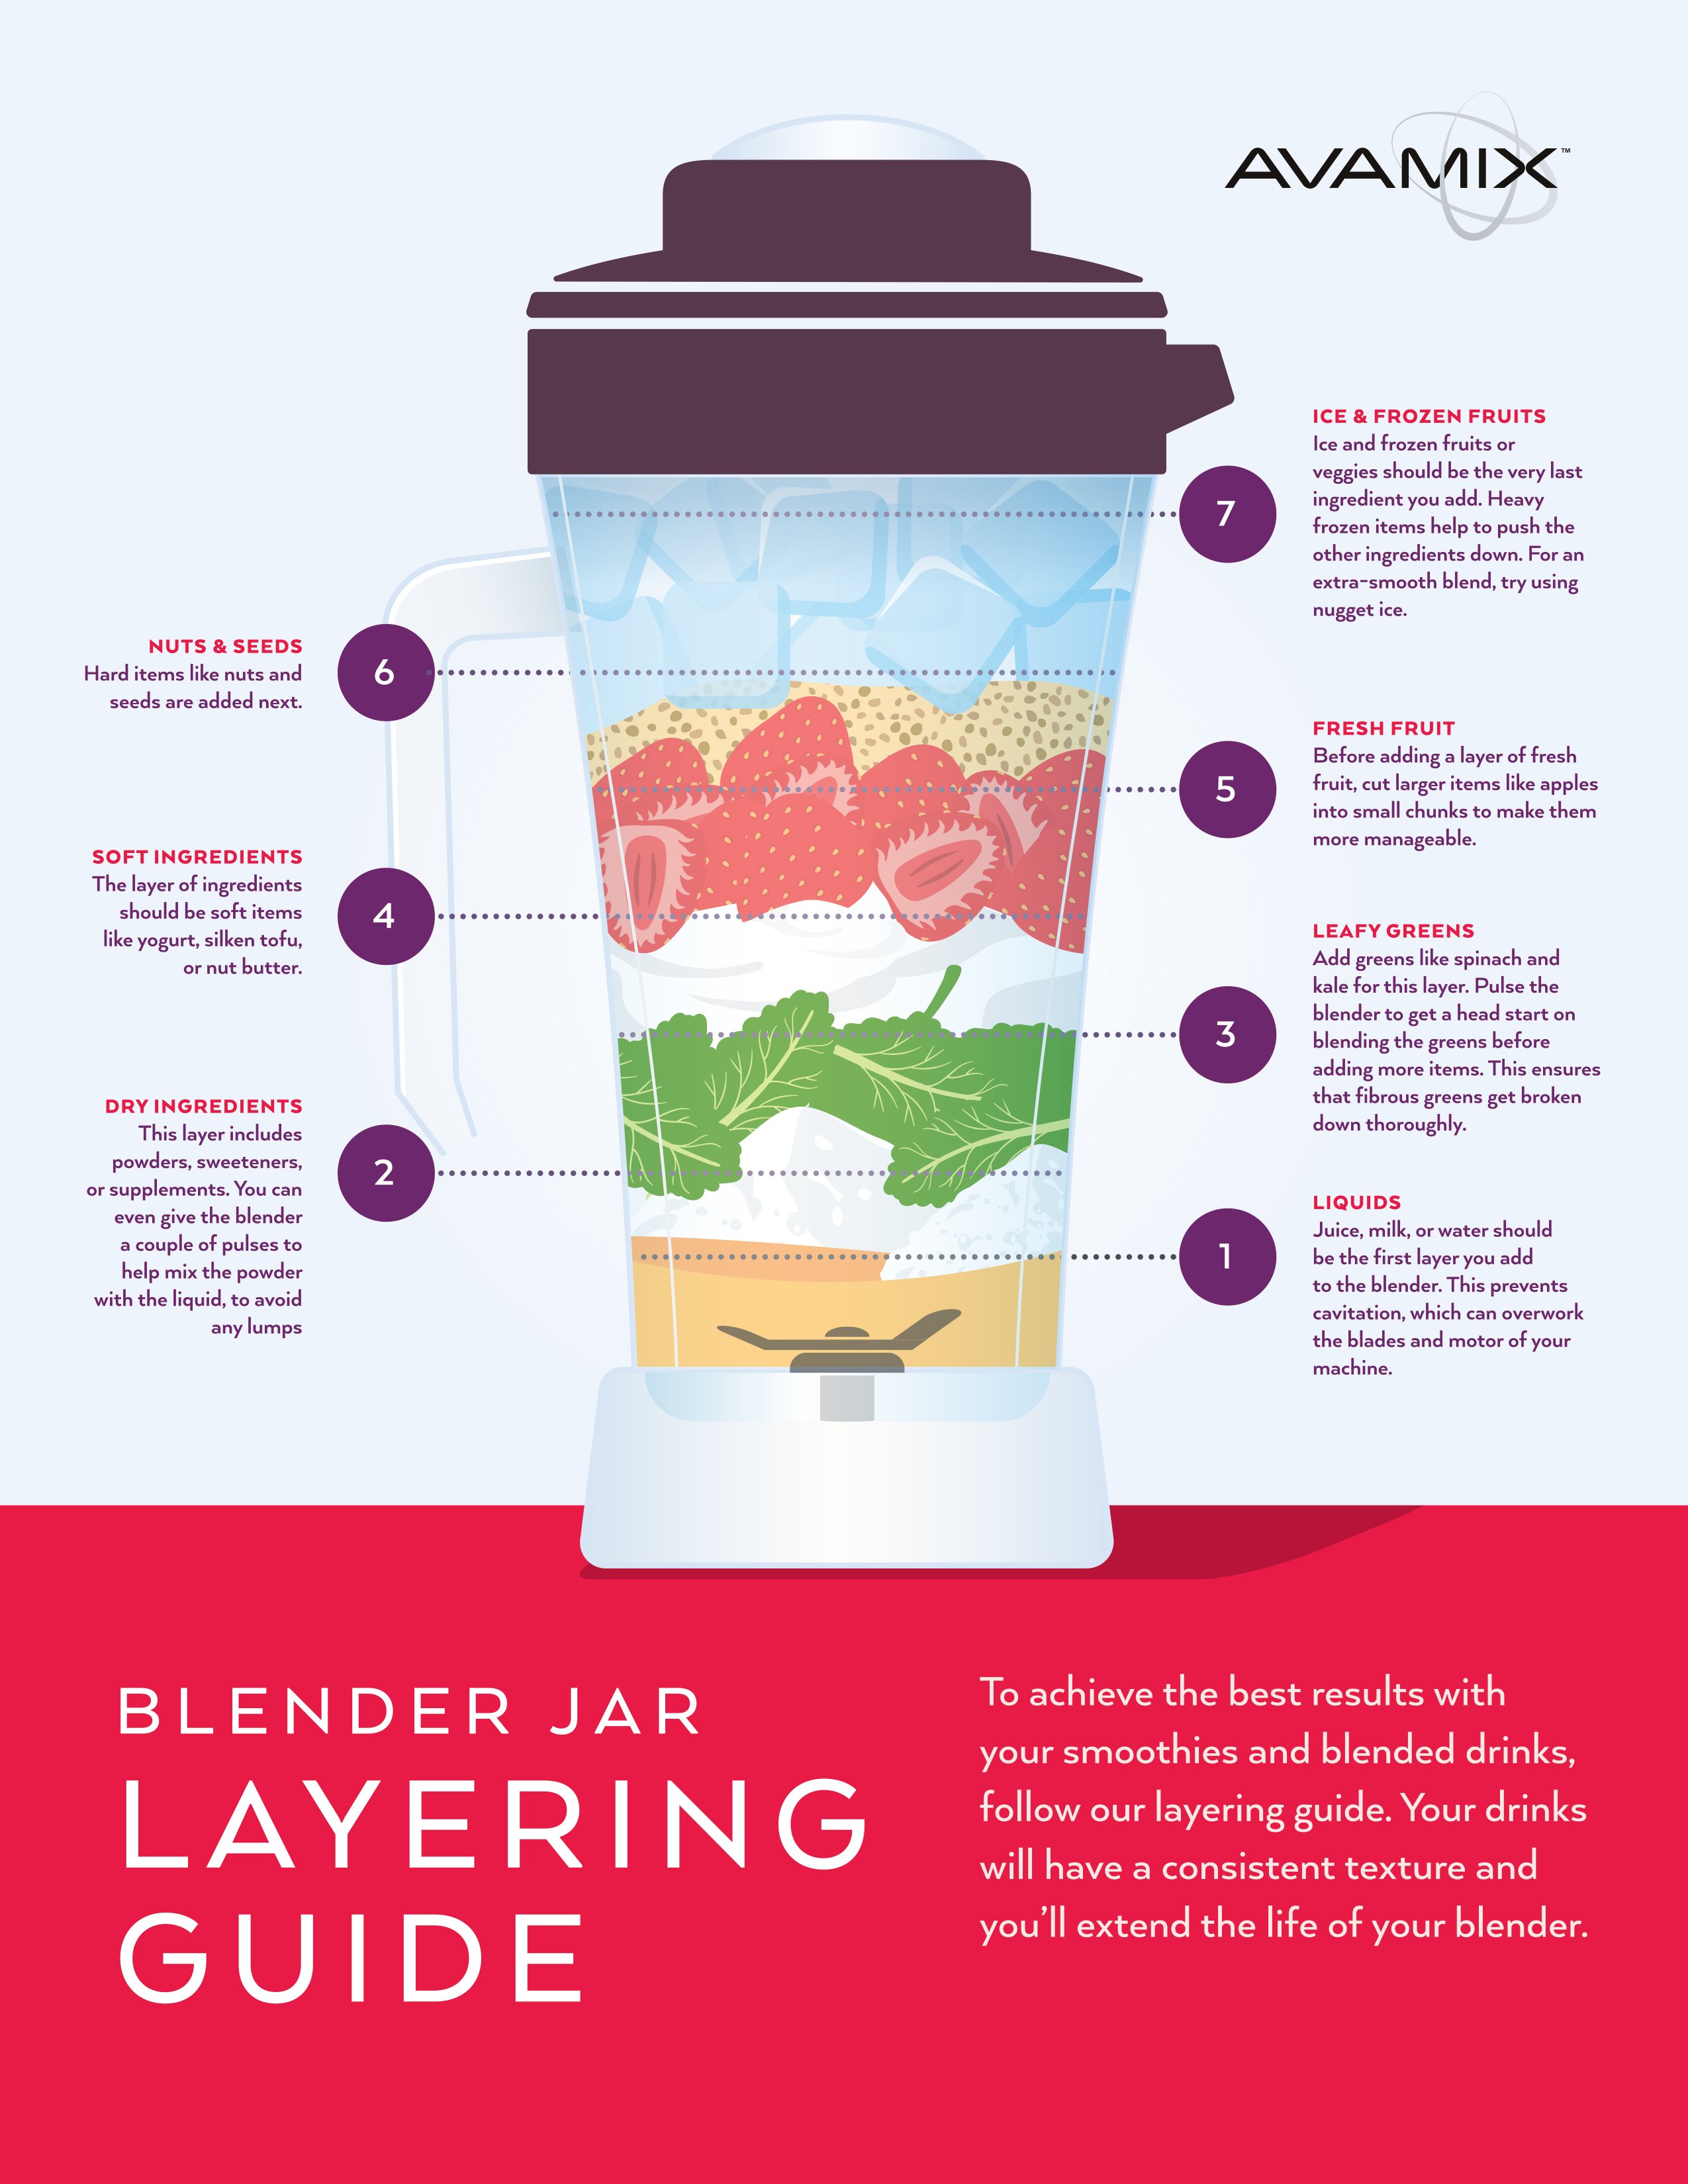
Perfect Layering Order Visual Guide
Bottom layer (liquids): Minimum ¼ cup milk/water—creates lift for solids
Middle layer (soft solids): Bananas, spinach, protein powder
Top layer (hard/frozen): Ice cubes or frozen fruit—always last
Critical Fill Limits That Prevent Leaks
- Blast cups: Fill to MAX line (16 oz)—never above shoulder of cup
- Ice ratio: Max ½ cup ice per 1 cup liquid—excess strains motor
- Safety margin: Leave 1-inch space below rim for expansion during blending
Fix Blinking Red Lights in 60 Seconds
Emergency Diagnostic Checklist
- Lid lock failure: Press lid down firmly until click—white arrows must match exactly
- Pitcher misalignment: Lift and reseat pitcher; rotate until it clicks into base
- Blade obstruction: Inspect between blades for fruit fibers (common with spinach)
- Power reset: Unplug Fit models for 30 seconds; recharge Blast below 20%
When to Call Ninja Support Immediately
- Red light persists after 3 reset attempts
- Burning plastic smell during operation
- Blades spin freely when empty but stall with liquid
Clean Your Mini Blender in Under 2 Minutes
Blast Express Wash Method
- Fill cup ⅓ with warm water + 1 drop dish soap
- Blend 30 seconds (removes 95% of residue)
- Rinse under tap—never submerge motor base
- Air-dry cup upside down on rack (prevents mold in threads)
Fit Deep Clean Protocol
- Dishwasher safe: Cups, lids, blades on top rack only
- Blade care: Use bottle brush around shaft—never touch sharp edges
- Base maintenance: Wipe with damp cloth; vacuum vents monthly to prevent overheating
Maximize Battery Life on Cordless Blast Models
Charging Best Practices
- First charge: Complete full 2-hour cycle regardless of pre-charge level
- Storage rule: Keep at 40-60% charge for long-term storage (prevents battery decay)
- USB-C hack: Use phone charger—water-resistant port seals completely after unplugging
- Low battery sign: Blue light dims noticeably at 20% charge
Avoid These 3 Costly Blending Mistakes
Overfilling Disaster Signs
- Leaking lid: Liquid seeps from spout during blending (fix: reduce fill by 20%)
- Grainy texture: Ingredients can’t circulate—always stop blending if motor strains
- Motor burnout: Noticeable slowdown after 3 consecutive blends
Wrong Ingredient Order Consequences
- Ice first: Creates air pockets—motor runs but doesn’t blend
- Powders last: Sticks to cup walls—always add before frozen items
- Too little liquid: Thick paste forms—minimum ¼ cup required for vortex
Store and Transport Without Spills
Blast Travel-Ready Features
- Leak-proof test: Shake assembled cup upside down—no drips means secure seal
- Blade cover essential: Always install on motor base before bagging
- Gym bag hack: Store cup empty with lid on—prevents odors from trapped moisture
Fit Countertop Space Saver
- Vertical storage: Stack cups inside pitcher to save 50% counter space
- Cord management: Wrap excess cord under base using integrated groove
- Blade safety: Store assemblies upright in cup to protect sharp edges
Perfect Single-Serve Smoothie Formula
Foolproof 4-Ingredient Ratio
- 1 cup liquid: Almond milk or coconut water (creates base flow)
- ½ cup fruit: Banana or berries (frozen for thicker texture)
- ¼ cup add-ins: Spinach or protein powder (always add before ice)
- ⅓ cup ice: Crushes perfectly at Speed 3 (Fit) or full 30-sec cycle (Blast)
Texture Adjustment Guide
- Too thick: Add 2 tbsp liquid while blending
- Too thin: Blend 10 extra seconds with 2 ice cubes
- Chunky fix: Pause mid-cycle, stir with chopstick, resume blending
Monthly Maintenance for Lasting Performance
Blade Inspection Protocol
- Sharpness test: Run finger along side (not edge)—noticeable ridges mean replacement needed
- Corrosion check: Brown spots on stainless steel blades indicate mineral buildup
- Tightening: Hand-tighten cup-to-base connection monthly (prevents wobble)
Cup Replacement Triggers
- Cracks near threads: Visible hairline fractures—stop using immediately
- Cloudy haze: Won’t clear after vinegar soak (1:1 water/vinegar, 1 hour soak)
- Warping: Cups won’t lock smoothly onto base
Your Ninja mini blender transforms from frustrating gadget to indispensable kitchen hero when you master these model-specific techniques. Start with the liquid-first loading sequence, respect the MAX fill lines, and always align those white arrows on the lid. Within days, you’ll blend silky smoothies, nut butters, and frozen treats with one-handed ease—no more guessing games or messy cleanup. Remember: the red light isn’t an error—it’s your blender’s way of saying “Check my lid!”—and that 30-second cleaning cycle is your ticket to daily use without dread. Grab your USB-C cable, load ingredients in the right order, and blend your first perfect smoothie before lunch.


