
You just unboxed your Ninja pressure cooker and now it’s staring back at you like a spaceship control panel. Don’t panic—that intimidating array of buttons is actually your ticket to fall-off-the-bone ribs in 45 minutes and weeknight dinners that taste like all-day braises. Unlike basic pressure cookers, your Ninja combines high-pressure cooking with air crisping (called TenderCrisp) to deliver restaurant-quality results at home. Within this guide, you’ll master everything from avoiding the dreaded “Burn” notice to converting your favorite recipes instantly—no culinary degree required.
The secret? Understanding how Ninja’s unique dual functions work together. While traditional pressure cookers only soften food under steam, your Ninja pressure cooker first locks in moisture under 11.6 psi pressure (reaching 243°F), then transforms surfaces with 400°F air crisping. This isn’t just about speed—it’s about texture magic where chicken emerges juicy inside with shatteringly crisp skin. By the end of this guide, you’ll confidently pressure-cook dried beans without soaking and air-crisp salmon skin to perfection.
Essential Safety Checks Before First Use
Skipping these five checks causes 90% of beginner failures. First, inspect the silicone sealing ring for twists or food debris—it must sit perfectly in the lid’s channel (run your finger around it to verify). Next, test the black pressure-release valve: it should click smoothly between SEAL and VENT positions with no resistance. Confirm the inner pot is fully inserted and never filled above the ⅔ line (½ line for beans or rice). Finally, align lid arrows until you hear a distinct “click,” then check the red float valve moves freely. These 30 seconds prevent steam leaks and locked lids.
Why Steam Escapes Around Your Lid
If steam hisses from the edges during pressurization, cancel cooking immediately. The culprit is always a misseated ring—remove the lid, firmly press the ring into its channel, and relock. Replace cracked rings immediately; most models include a spare. Never force a stuck lid—if it won’t open after natural release, briefly toggle the valve to VENT to release residual pressure.
Liquid Requirements That Prevent Burn Notices
Your Ninja needs at least 1 cup of thin liquid (water, broth, or wine) to build pressure safely. Thick liquids like tomato sauce or cream will scorch and trigger “Burn” errors. For large roasts or 60+ minute cooks, use 1½ cups. Pro tip: layer starchy foods like rice or pasta above the liquid instead of stirring them in—place them on the trivet or float them on a bed of veggies. This prevents sticking and creates perfect texture without constant monitoring.
Fixing the Dreaded “Burn” Message
If “Burn” flashes mid-cook, cancel immediately. This happens when food sticks after sautéing or when thick sauces coat the pot bottom. Always deglaze thoroughly after browning: pour in ½ cup liquid and scrape the bottom with a wooden spoon until all browned bits release. For future recipes, dilute tomato-based sauces with equal parts broth.
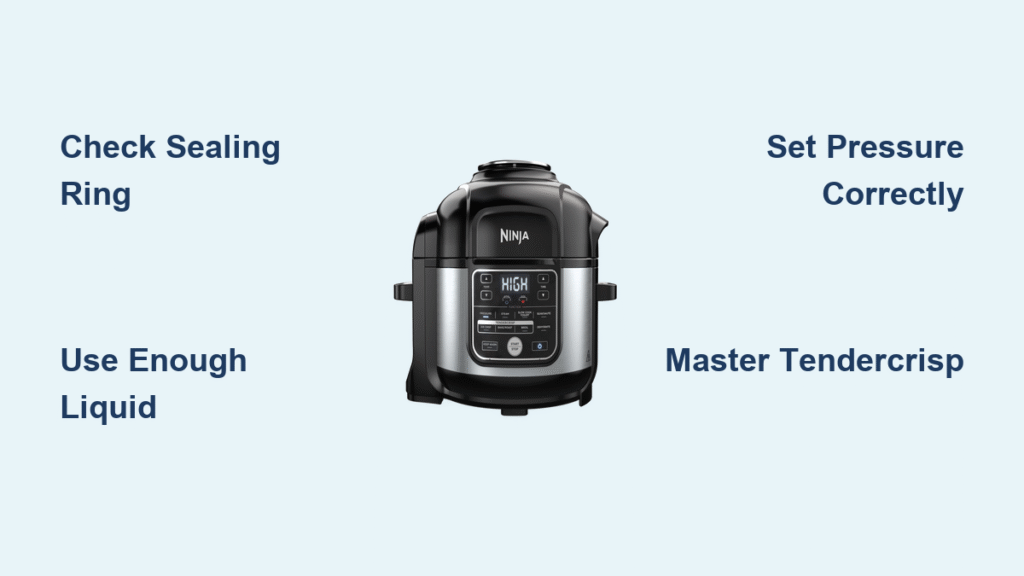
Locking the Lid and Setting Pressure Correctly

Alignment is non-negotiable. Match the arrow on the lid with the base arrow, then twist clockwise until you feel resistance and hear a solid “click.” The black valve must point to SEAL—this is why 70% of users’ pots never reach pressure. Press the PRESSURE button once for HIGH (11.6 psi, default for 95% of recipes) or twice for LOW (7.2 psi for delicate dishes). Set time using +/- buttons, then hit START. The display showing “ON” means it’s building pressure—this takes 5-15 minutes depending on food volume.
Troubleshooting Pressure Build-Up Failures
If the float valve never rises after 20 minutes, cancel and check:
– Is the sealing ring properly seated?
– Is the black valve set to SEAL?
– Did you add enough liquid?
– Is the inner pot overfilled past the ⅔ line?
Never force cooking with these issues—correct them first to avoid error messages.
Natural vs Quick Release: Which Method Saves Your Meal
Your release choice makes or breaks texture. Quick Release (QR) turns the valve to VENT immediately—ideal for vegetables or when stopping cooking fast. Natural Release (NR) lets pressure drop slowly for 5-45 minutes, crucial for lean meats like chicken breasts to retain juices. Most recipes use Hybrid Release: 10 minutes NR followed by QR. For starchy foods like beans, pulse-release instead: open the valve for 2 seconds, close for 3 seconds, repeat 3-4 times to prevent explosive spitting.
When to Avoid Quick Release
Never QR large cuts of meat or bone broth—you’ll get dry, stringy results. NR for at least 15 minutes allows fibers to relax. For soups with potatoes or pasta, QR is safe since ingredients are submerged, but pulse-release if you see foam near the valve.
Mastering the TenderCrisp Function

This is where your Ninja outshines standard pressure cookers. After pressure cooking, swap to the air fryer lid for golden, crispy exteriors. Pat proteins bone-dry with paper towels, spray lightly with oil, then air crisp:
– 3-5 minutes at 400°F for skin crisping (whole chicken, salmon)
– 8-12 minutes at 400°F for full browning (pork chops, tofu)
The magic happens because pressure cooking creates impossibly tender interiors, while air crisping delivers that crave-worthy crunch traditional methods can’t match.
TenderCrisp Shortcuts for Busy Nights
For frozen wings: pressure cook 12 minutes NR 5 minutes, then air crisp 10 minutes at 400°F with sauce added in the last 2 minutes. For store-bought meatballs: pressure cook 5 minutes QR, then air crisp 8 minutes for restaurant-quality results. Always pat surfaces dry before air crisping—moisture is the enemy of crispness.
Time Conversion Cheat Sheet for Any Recipe
Convert stovetop times instantly: pressure time = ⅓ of traditional wet-cook time. A 60-minute pot roast becomes 20 minutes under pressure. But always adjust down first—it’s easier to re-pressurize than fix overcooked food. At elevations over 2,000 feet, add 5% time per 2,000 feet (e.g., +10% at 4,000 feet).
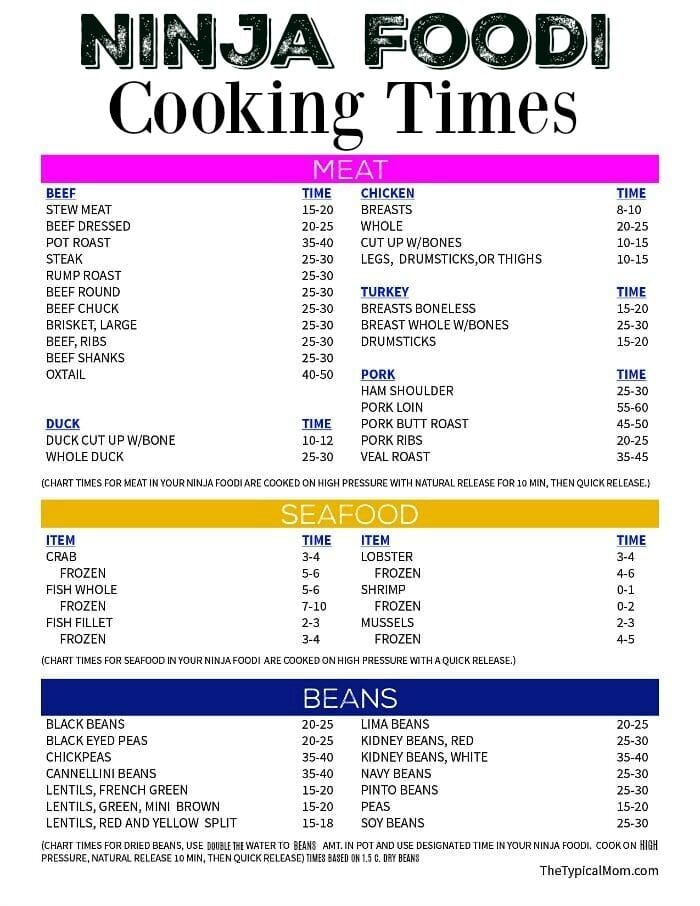
Must-Know Timing References
| Food | Traditional Time | Ninja Pressure Time | Release Method |
|---|---|---|---|
| Chicken breasts | 15 min simmer | 4-6 min | NR 5 min |
| Dried beans (no soak) | 2 hours | 25-30 min | NR 20 min |
| Hard-boiled eggs | 10 min boil | 4 min | QR → ice bath |
| Pasta (penne) | 9 min boil | 2 min | NR 5 min |
Common First-Week Mistakes to Avoid
Overfilling the pot is recipe suicide—liquids expand under pressure. Never exceed the ⅔ line (½ line for beans/rice). Using dairy as base liquid causes scorching; add milk or cream after cooking. Forcing the lid open risks steam burns—wait for the float valve to drop completely. If food sticks after cooking, soak the inner pot immediately; never use metal utensils that scratch the nonstick coating.
Why Your Food Turns Mushy
Overcooking happens two ways: setting pressure time too long or extending Natural Release unnecessarily. For chicken thighs, 8 minutes pressure + 5 min NR is perfect—20 minutes NR turns them to shreds. Always check meat 2 minutes early; you can always re-pressurize for 1-2 minutes.
Cleaning and Maintenance That Prevents Odors
The silicone ring absorbs smells—remove and wash it with warm soapy water after every use. Air-dry completely before reinstalling (never store damp). Monthly, deep-clean the lid components: remove the sealing ring, steam-release valve, and anti-block shield, then soak in 1:1 vinegar-water for 10 minutes to dissolve mineral deposits. Hand-wash the inner pot—dishwasher use accelerates nonstick wear.
Fixing Lingering Onion/Garlic Smells
Soak the ring in baking soda paste (3 parts soda, 1 part water) for 30 minutes, then rinse. For stubborn odors, boil 1 cup water + 2 tbsp lemon juice in the pot for 5 minutes after cooking, then air crisp 2 minutes to evaporate residue.
Advanced Techniques for Power Users
Unlock layered meals with Pot-in-Pot cooking: place a heatproof bowl on the trivet with rice or cheesecake, while chicken simmers below in broth. Both finish perfectly together. For infused stocks, pressure-cook herbs in broth 5 minutes, then QR and strain for intensely flavored bases. Some models even make yogurt: pressure-scald milk, cool to 110°F, add culture, then use Keep Warm mode for 8 hours.
Your Ninja pressure cooker isn’t just a time-saver—it’s a texture transformer. Master these fundamentals, and you’ll create meals that seem impossible for weeknights: crispy-skinned salmon with fork-tender interiors, or 20-minute “slow-cooked” ribs that fall off the bone. Start with simple recipes, respect the release methods, and soon you’ll wonder how you ever cooked without it. The real magic happens when you combine pressure cooking’s speed with air crisping’s perfection—creating dishes traditional methods simply can’t replicate.


