

You just unboxed your Ninja Woodfire Electric BBQ Grill & Smoker and now face that familiar moment of uncertainty—how do you actually use this sleek machine to create authentic smoked barbecue? Unlike traditional smokers requiring constant fire management, your Ninja delivers wood-fired flavor with electric precision. This guide cuts through the confusion with exactly what buttons to press, when to add pellets, and how to achieve competition-worthy results from your first cook.
Stop wondering why your neighbor’s ribs look like they came from a Texas smokehouse while yours turn out dry. The difference lies in mastering the Ninja’s unique woodfire pellet system and understanding its specific cooking workflow. Whether you’re smoking brisket on your apartment balcony or air-frying wings for game night, this complete guide gives you the insider knowledge to transform your outdoor cooking immediately.
Position Your Ninja Smoker for Optimal Performance
Your location choice determines cooking success and safety compliance. Place the unit on a stable, heat-resistant surface at least 10 feet from any structures—this electric smoker still generates significant heat during operation. Balconies work perfectly since there’s no open flame, but verify your building’s regulations first.
Balcony-Friendly Setup Requirements
Ensure 6 inches of clearance on all sides for proper ventilation, critical for consistent smoke production. Position away from railings that might block airflow, and never place under overhangs where heat could accumulate. The Ninja operates safely on wood decks, concrete patios, or even metal balconies thanks to its contained electric heating system.
Safety Checks Before First Use
Before plugging in, inspect the power cord for cuts or exposed wires that could cause electrical hazards. Confirm all accessories came clean and dry from the box—residual moisture affects first cook performance. Test that the grease tray slides in smoothly and the smoker box lid closes with a secure click. These simple checks prevent 90% of beginner issues.
Install Cooking Accessories for Perfect Results
Your Ninja comes with three essential accessories, each engineered for specific cooking outcomes. The grill plate creates authentic sear marks on steaks while allowing smoke penetration. The crisper basket’s perforated design circulates hot air for restaurant-crisp wings without flipping. The flat griddle surface prevents delicate fish from sticking during cooking.
Choosing the Right Accessory for Your Recipe
Select your accessory based on desired outcome: Use the grill plate for ribeye steaks needing char marks, the crisper basket for frozen fries requiring maximum crispness, and the griddle for breakfast items like bacon that benefit from even heat distribution. Never skip this step—using the wrong accessory creates uneven cooking and frustration.
Proper Installation Technique
Slide your chosen accessory into the designated slots until it sits perfectly level with no wobbling. An uneven surface causes hot spots that burn food in some areas while undercooking others. For the crisper basket, position the handle toward the front for easy removal. Close the lid firmly before proceeding—any gap disrupts temperature control.
Master the Ninja Woodfire Pellet System
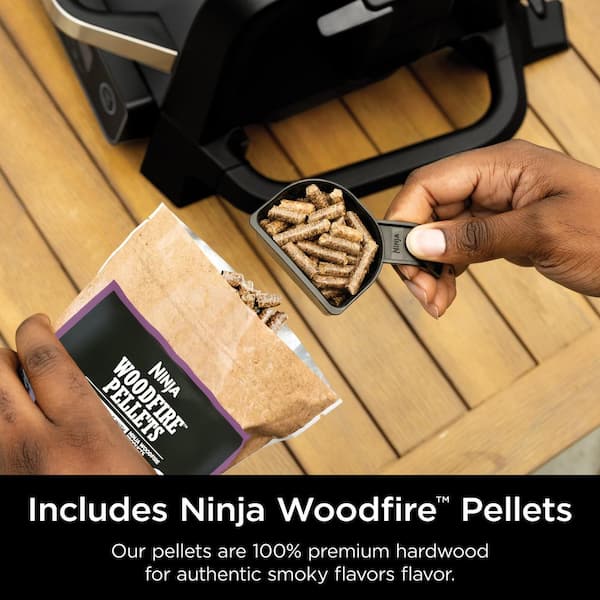
Only Ninja Woodfire Pellets work safely in this system—using wood chips or other brands risks damaging the heating element and voids your warranty. The Robust Blend delivers intense hickory notes ideal for beef brisket, while the All-Purpose Blend offers subtle sweetness perfect for salmon or vegetable smoking.
Selecting the Right Pellet Blend for Your Dish
Match pellet flavor intensity to your protein: Use Robust Blend for pork shoulder that can handle bold smoke, but switch to All-Purpose for delicate items like mac and cheese that turn bitter with strong smoke. Each 1.1 lb bag provides approximately 20 smoking sessions, making flavor experimentation cost-effective.
Perfect Pellet Loading Technique
Fill the included scoop completely, then level off excess with a straight edge for consistent smoke output. Hold the smoker box lid open with one hand while pouring pellets evenly across the chamber—uneven distribution creates hot spots. Close the lid until you hear the distinct click, then verify no pellets obstruct the seal. This precise technique ensures maximum smoke production without waste.
Controlling Smoke Intensity Like a Pro
Adjust smoke levels based on food type: Use one full scoop for substantial meats like ribs, but reduce to just 2-3 tablespoons for sensitive dishes like cream cheese dips. For extra smokiness, add pellets before the current load fully burns out, then press the ignite button. Remember—”Smoke, like salt, is seasoning; too much ruins dishes.”
Execute the 9-Step Ninja Cooking Workflow
Skipping any step in this sequence causes inconsistent results. Begin by selecting your cooking accessory, then add pellets only if smoking. Choose your cooking function, activate smoke if desired, set temperature, program time with a 2-3 minute buffer, wait for the “Add Food” notification, cook with lid closed, and finally rest meats properly.
Preheat Times by Function Type
Smoking and broiling modes activate immediately, while air crisp and bake functions require just 3 minutes to reach temperature. The grill function needs 12-20 minutes to preheat fully—colder weather extends this time. Never place food in before the “Add Food” notification appears, as premature cooking creates uneven results.
Pro Model Temperature Control Features
On Pro/Pro Connect models, insert the thermometer probe through the thickest part of meat (avoiding bone), then connect to the grill’s jack. Select your desired final internal temperature, and the grill automatically stops cooking when reached. This eliminates guesswork for perfect medium-rare steaks every time.
Perfect Temperature Settings for Every Protein
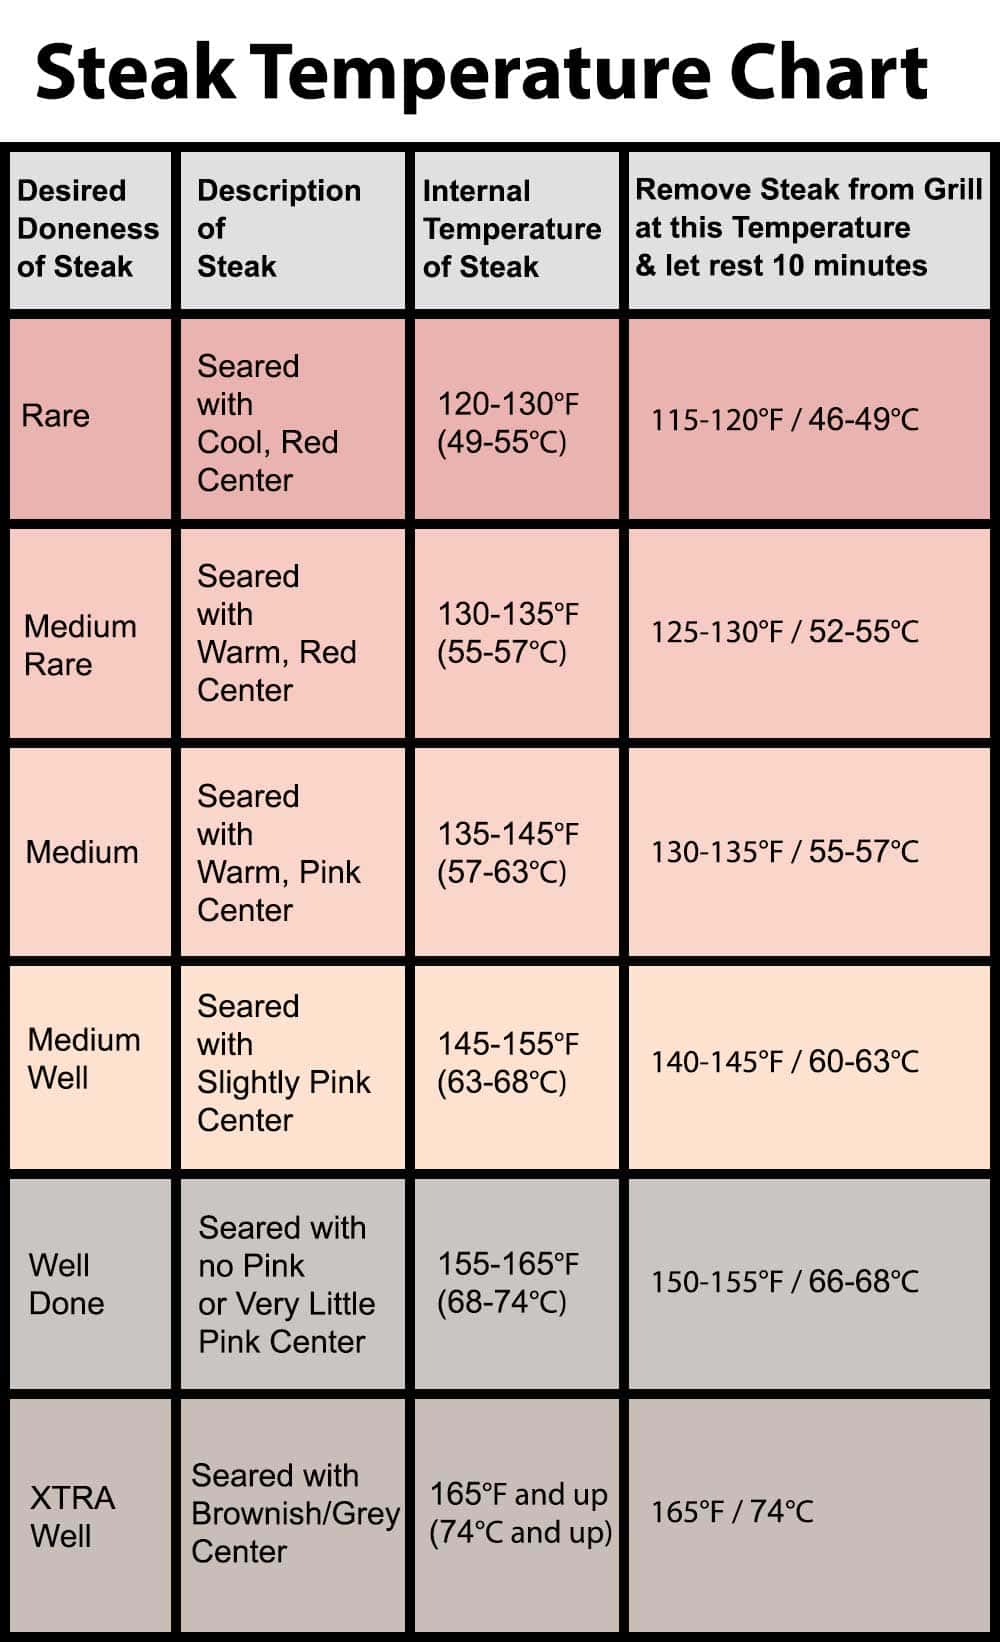
Your brisket fails when you guess temperatures—these tested settings guarantee success. Baby back ribs need 300°F for 1 hour 45 minutes to reach 200°F internally, while brisket requires 225°F for 5.5 hours until hitting 205°F. Chicken wings transform when air crisped at 390°F for 20 minutes, then finished at 450°F for 5 minutes.
Poultry Cooking Guide
For juicy chicken breasts, grill at medium heat for 19-22 minutes until reaching 165°F internally. Wings achieve maximum crispness through a two-stage process: air crisp at 390°F for 20 minutes, then boost to 450°F for the final 5 minutes. Whole chickens smoke perfectly at 375°F for approximately 1 hour per 2 pounds.
Beef Mastery Settings
Filet mignon reaches perfect medium-rare at 130°F when grilled medium for 9-12 minutes. Prime rib requires smoking at 250°F for 1 hour 30 minutes, followed by a 15-minute sear at 400°F. Brisket demands patience—225°F for 5.5 hours until internal temperature hits 205°F with probe-tender texture.
Pork Perfection Guidelines
Pork butt transforms at 250°F for 6.5 hours until reaching 200°F internally. Baby back ribs need 300°F for 1 hour 45 minutes, while St. Louis style requires lower 250°F for 2-4 hours. Unlike traditional smokers, no foil wrapping is needed—the Ninja’s precise temperature control prevents drying out.
Clean Your Ninja Smoker Like a Professional
Cleaning improperly creates off-flavors in future cooks and damages non-stick surfaces. Always unplug and allow complete cooling before cleaning—rushing this step risks burns and warping components. The grease tray and smoker box must be emptied while warm but not hot for easiest residue removal.
Post-Cook Cleaning Protocol
Soak the grill plate and crisper basket in warm, soapy water for 10 minutes to loosen stubborn residue before gentle scrubbing. Remove the cooled smoker box and dispose of ash—this nutrient-rich material makes excellent compost for garden beds. Wipe the interior lid with a damp cloth, never abrasive cleaners that scratch non-stick coatings.
Maintenance Schedule for Longevity
Clean accessories and empty ash/grease after every use to prevent buildup. Perform a deep clean of interior surfaces weekly, especially if cooking fatty meats. Monthly, inspect the power cord for damage and verify all connections remain secure. Proper maintenance ensures your Ninja delivers consistent results for years.
Troubleshoot Common Ninja Smoker Issues
Smoke overpowering your mac and cheese? You’ve used too many pellets—delicate dishes need just 2-3 tablespoons instead of a full scoop. No smoke ring on your brisket? The electric heating element prevents the chemical reaction that creates smoke rings, but flavor remains identical to traditional smokers.
Why Your Smoke Might Be Overpowering
Reduce pellet quantity for sensitive foods like baked goods or dairy-based dishes. Start with minimal pellets and add more only if needed—smoke intensity builds quickly in the enclosed chamber. Remember that smoke flavor continues developing during resting time, so pull delicate items slightly early.
Understanding Smoke Ring Formation
Don’t worry about the absence of a smoke ring—this visual indicator forms from chemical reactions with open-flame heat sources. Your electric Ninja creates identical flavor compounds without the ring, a tradeoff for consistent temperature control and balcony-friendly operation.
Your Ninja Woodfire smoker delivers restaurant-quality barbecue with apartment-friendly convenience. Start with simple recipes like smoked chicken wings to build confidence, then progress to brisket once you’ve mastered pellet management. Within weeks, you’ll be hosting smoke sessions that have neighbors asking for your secrets—no pitmaster certification required. The key lies in respecting the 9-step workflow, controlling smoke intensity precisely, and cleaning thoroughly after each cook. Now fire it up and create your first masterpiece.


