

Your Ninja Ultima blender sits on your counter like a professional powerhouse, but knowing how to harness its cyclonic blade technology can transform your daily blending from frustrating guesswork into effortless precision. Whether you’re struggling with chunky smoothies or wondering why your frozen margaritas resemble snow cones, mastering this high-performance blender unlocks restaurant-quality results at home. This guide walks you through every step—from your first assembly to advanced techniques that make the Ultima sing—so you’ll learn exactly how to load ingredients properly, which speed conquers ice, and simple tricks that prevent the dreaded red blinking light.
Position Your Ninja Ultima for Optimal Performance
Create Proper Workspace Setup
Place your Ultima on a stable, flat surface with at least 6 inches of clearance on all sides for ventilation. The motor generates significant heat during operation, especially when crushing ice, so avoid cramped corners or under-cabinet spaces that restrict airflow. Never use extension cords or power strips—plug the unit directly into a standard 120V grounded outlet to ensure proper power delivery for the high-wattage motor.
Secure Pitcher Attachment Process
Align the pitcher with the motor base and rotate clockwise until you hear the distinctive click indicating secure attachment. Test the fit by gently rotating—the pitcher should move smoothly without wobbling. This secure connection is your first line of defense against the red light indicator that appears when safety protocols detect improper assembly. If the pitcher doesn’t lock properly, your blending session will immediately stop as a safety precaution.
Master Speed Settings for Perfect Results

Speed 1: Gentle Foundation for Delicate Tasks
Use low speed for incorporating dry ingredients or creating chunky salsas without over-processing delicate herbs. This setting ensures even distribution throughout your mixture while preserving texture—ideal for pesto where you want visible basil leaves rather than a completely smooth puree. Start with Speed 1 when blending hot soups to prevent dangerous steam pressure buildup.
Speed 2: Standard Power for Daily Blending
Medium speed handles 80% of your blending tasks including smoothies, milkshakes, and vegetable purees. This balanced power develops consistent texture without excessive aeration that creates foamy drinks that separate quickly. For perfect smoothies, blend at Speed 2 for 30-45 seconds after following the proper ingredient loading order—you’ll achieve creamy texture without air pockets.
Speed 3: Maximum Performance for Tough Jobs
High speed pulverizes ice cubes into snow-like consistency within 10 seconds. Use this setting for frozen fruit, nut butters, and ultra-smooth purees that rival professional equipment. When making nut butter, run at Speed 3 for 2-3 minutes with brief rest periods between bursts to prevent motor overheating. Never exceed 60 seconds of continuous high-speed blending without a 60-second cooling break.
Pulse Function Control for Precision Texture
Hold the pulse button for controlled bursts that chop vegetables or create chunky guacamole. Release immediately when desired texture appears—this prevents over-processing nuts into butter when you want chopped texture instead. Pulse is your secret weapon for hummus with visible chickpea pieces or chunky salsa with distinct vegetable textures.
Load Ingredients in the Correct Sequence
Follow the Professional Loading Order
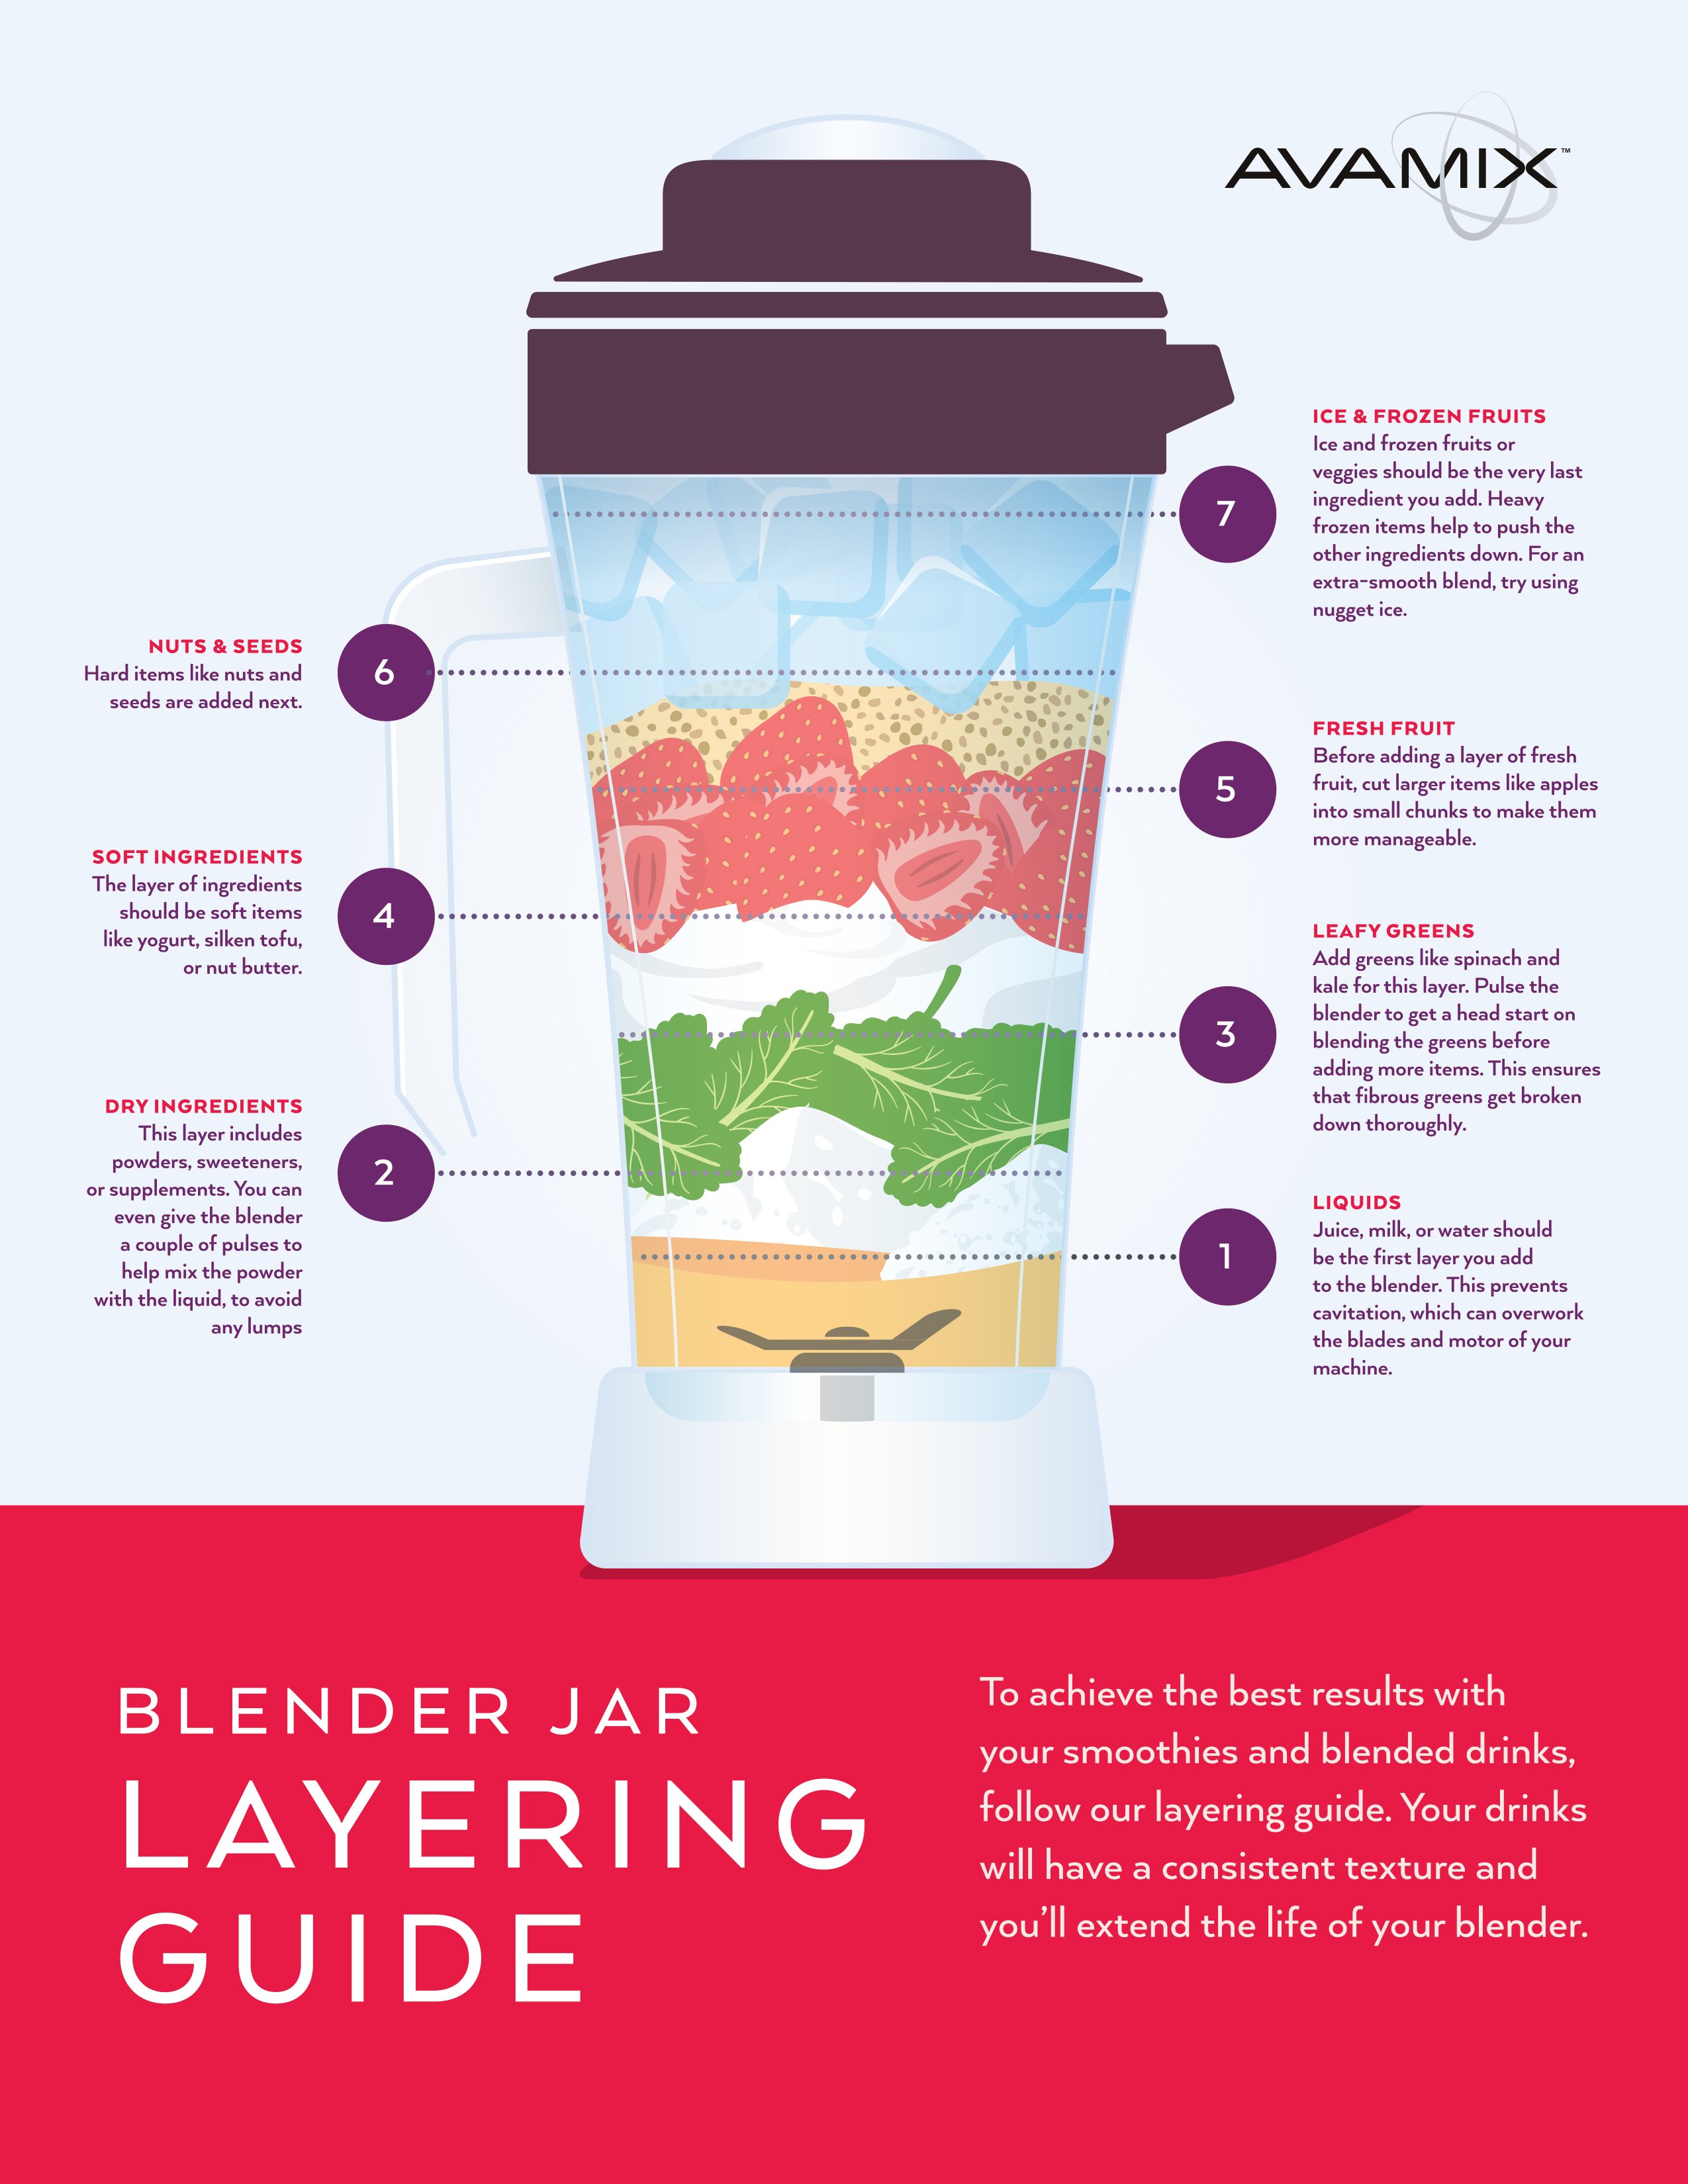
- Liquids first: Water, juice, or milk creates the initial vortex that pulls ingredients downward
- Soft ingredients: Fresh fruits and vegetables like bananas and spinach
- Powders and seeds: Protein powder or chia seeds added mid-stack to prevent clumping
- Frozen items last: Ice and frozen fruit sit on top for optimal blending action
Avoid Overfilling and Pressure Buildup
Never exceed the 72-ounce maximum fill line marked on the pitcher interior. Overfilling creates dangerous pressure buildup that triggers safety locks and results in uneven blending. When processing hot ingredients, remove the center cap from the lid to allow steam escape and prevent pressure from forcing the lid open. For thick mixtures like nut butter, add liquid gradually through the pour spout while blending rather than overfilling initially.
Fix Red Light Safety Issues Immediately
Lid Lock Verification Protocol
Press down firmly around the entire lid perimeter until you hear the locking mechanism engage. The lid must create a complete seal with no visible gaps—partial locks trigger the safety system. If the red light blinks, release the lid and reposition it fully before attempting to blend again. This simple step resolves 80% of red light issues.
Arrow Alignment Check for Safety Interlock
Locate white arrows on both the lid and pitcher handle. Rotate the lid until these arrows align perfectly—the safety interlock won’t engage otherwise. Misaligned arrows are the second most common cause of red light issues. The arrows must face the same direction for the blender to recognize proper lid positioning.
Base Repositioning Technique
Remove and reseat the pitcher, ensuring it clicks into place and rotates smoothly. Wobbly connections indicate improper seating that triggers safety shutdowns. If the pitcher doesn’t rotate freely after seating, lift it slightly while rotating to achieve proper alignment with the motor base drive shaft.
Clean Your Ultima Without Damaging Components
Immediate Rinse Protocol After Use
Run hot water through the assembled unit immediately after use. This prevents residue from hardening in the stacked blade crevices where food particles accumulate. Pay special attention to the area around the blade assembly where fibrous ingredients like kale can get trapped. Never attempt to remove the blade assembly—it’s permanently sealed for safety.
Safe Hand Washing Procedure
Fill the pitcher with hot, soapy water and blend on low for 30 seconds to clean between blade levels. Use a bottle brush for stubborn residue in hard-to-reach areas—never use abrasive scrubbers that can scratch the pitcher interior. Rinse thoroughly with warm water until all soap residue is removed, as leftover detergent affects taste in future blends.
Dishwasher Guidelines for Longevity
While top-rack safe, hand washing extends component life significantly. High heat dulls blade edges and degrades plastic over time. If using the dishwasher, place blades and lids on the top rack only and avoid harsh detergents. The motor base requires only periodic cleaning with a damp cloth—never submerge it in water.
Prevent Common Blending Problems
Fiber Management for Leafy Greens
Chop kale, celery, or fibrous vegetables into 1-inch pieces before adding. This prevents fiber wrapping around the blade assembly that creates uneven textures and strains the motor. For green smoothies, add leafy greens after liquids but before frozen items to ensure proper incorporation.
Thick Mixture Solutions for Nut Butters
When making almond or peanut butter, add oil gradually through the pour spout while blending at Speed 3. This maintains vortex formation and prevents motor strain that triggers safety shutdowns. Stop every 30 seconds to scrape down sides with a silicone spatula—never use metal utensils that can damage the pitcher.
Between-Session Cooling Requirements
Allow 60 seconds cooling time between extended blending sessions. This prevents motor overheating that shortens appliance lifespan and triggers automatic shutdowns. For multiple blending tasks, space them out with brief cooling periods to maintain peak performance throughout your kitchen session.
Quick Reference: Ninja Ultima Speed Guide
| Task | Speed | Time | Technique |
|---|---|---|---|
| Ice crushing | 3 | 10 seconds | Pulse initially, then steady |
| Green smoothies | 2 | 30-45 seconds | Continuous blend |
| Chunky salsa | 1 | 15 seconds | Pulse to control texture |
| Nut butter | 3 | 2-3 minutes | Add oil gradually, rest between bursts |
| Hot soup puree | 2-3 | 60-90 seconds | Remove center cap for steam escape |
Master Your Ninja Ultima Today
Your Ninja Ultima blender transforms from intimidating appliance to kitchen workhorse when you understand its unique capabilities. The stacked blade system demands respect but rewards precision—with proper loading order, correct speed selection, and immediate post-use cleaning, you’ll achieve professional results daily. Start with simple smoothies using the liquid-first loading technique, then progress to frozen desserts and nut butters as your confidence grows.
Remember: the red light isn’t a malfunction—it’s your safety guardian ensuring proper assembly. When it blinks, check lid lock, arrow alignment, and base positioning before proceeding. Within a week of following these techniques for how to use Ninja Ultima blender properly, you’ll wonder how you managed without this cyclonic powerhouse streamlining your meal prep and expanding your culinary possibilities. The key to mastering how to use Ninja Ultima blender effectively lies in respecting its power while working with its intelligent design—not against it.


