
Your Olsky massage gun sits unused on the shelf while muscle tension builds after workouts. You’re not alone—most users miss out on 70% of their device’s benefits by skipping proper technique. This guide reveals exactly how to use your Olsky massage gun for instant muscle recovery, pain relief, and improved mobility. You’ll learn professional techniques for every muscle group, avoid dangerous mistakes that could cause injury, and transform your recovery routine in under 10 minutes per day. Whether you’re a weekend warrior or elite athlete, these evidence-based methods will help you unlock your device’s full potential starting today.
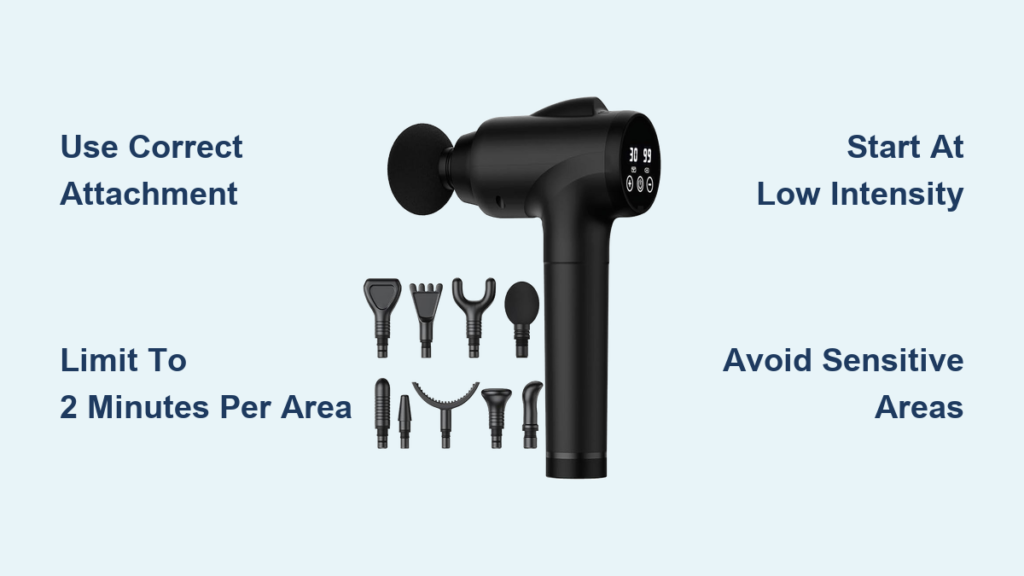
Critical Safety Rules Before Using Your Olsky Massage Gun
Ignoring these safety rules could turn your recovery tool into a source of injury. Your Olsky massage gun delivers powerful percussive therapy that requires specific precautions. Never apply the device to your head, face, front of the neck, or directly on your spine—these areas contain delicate structures vulnerable to damage. Avoid using it on injuries, open wounds, or areas with acute inflammation as this can worsen tissue damage. If you’re pregnant, have deep vein thrombosis, heart conditions, or epilepsy, consult your physician before first use.
The most common mistake beginners make is overusing the device on single muscle groups. Limit sessions to 2 minutes maximum per muscle area to prevent tissue irritation and potential nerve damage. Never operate the gun while it’s charging or if the casing shows cracks or damage. Always check that attachments lock securely into place before starting—loose heads cause uneven pressure that strains muscles. These simple precautions ensure your Olsky massage gun remains a safe, effective recovery tool for years.
Charging and Powering Up Your Olsky Massage Gun Correctly

Your Olsky massage gun won’t perform optimally with improper charging habits. Before first use, plug the device into the included power adapter and let it charge completely—this typically takes 2-3 hours. Watch for the indicator light: a solid red or pulsing light means charging, while a steady green or extinguished light signals full charge. Never use third-party chargers as incorrect voltage can permanently damage the motor.
To power on, press and hold the power button for 3 seconds until the device vibrates. Adjust intensity using the “+” and “-” buttons—start at Level 1 for sensitive areas and work up to Level 5 only for dense muscle groups. Many users damage their device by forcing attachments; instead, align the head with the magnetic connector and let it snap into place with light pressure. If the gun won’t start, check that the attachment clicks securely—most “malfunctions” stem from improperly seated heads interrupting the motor connection.
Selecting the Right Attachment for Each Muscle Group
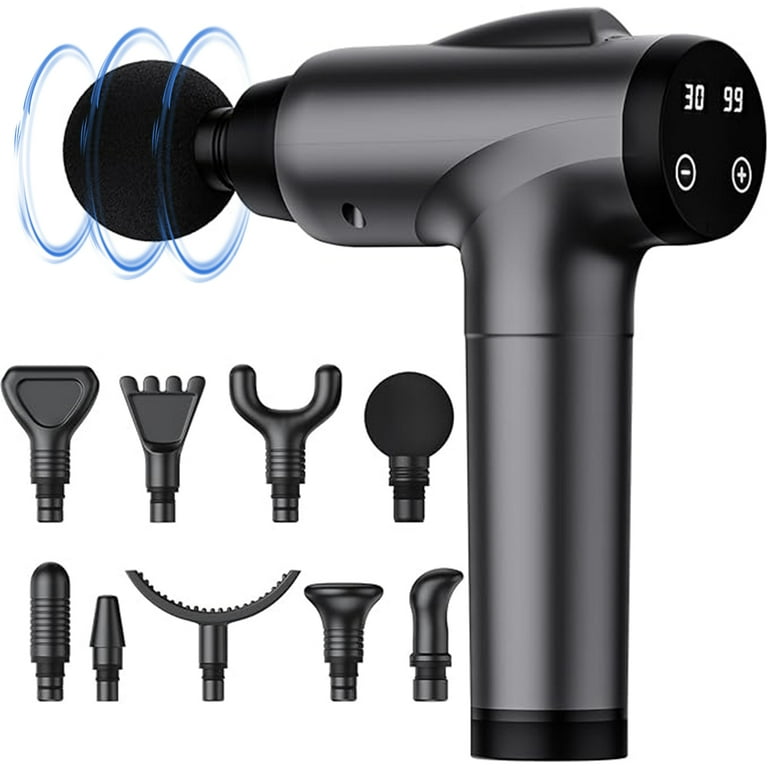
Using the wrong head reduces effectiveness and risks injury—match each attachment to specific muscle needs. The large ball head (usually pre-attached) works best for quads, hamstrings, and glutes—its rounded shape conforms to large muscle contours. Apply it at a 45-60 degree angle across 5-6 inch sections of muscle for optimal coverage. For broad areas like your back or thighs, switch to the flat head that distributes pressure evenly without digging into tissue.
Target stubborn trigger points in your shoulders or calves with the bullet head’s concentrated force—press gently until you feel the knot release, never forcing deep penetration. The spinal fork attachment requires special caution: only use it on the fleshy muscles alongside your spine (erector spinae), never directly on vertebrae. For neck tension, use the bullet head at lowest speed with feather-light pressure—excessive force here can cause nerve irritation. Always clean attachments with mild soap after use to maintain hygiene.
Proper Technique: Angle, Pressure, and Movement Secrets
Holding your Olsky massage gun incorrectly wastes energy and reduces benefits. Position the device perpendicular (90 degrees) to your skin surface—tilting it reduces percussion effectiveness by up to 40%. Apply only light pressure; the gun’s motor provides the force, so pressing harder actually dampens vibrations. Many users unknowingly counteract the therapy by pressing down excessively.
Move slowly—1-2 inches per second—along muscle fibers, not across them. Start at the muscle’s origin point (near joints) and work toward the insertion. Spend 30-60 seconds per area: 30 seconds for neck/shoulders, 60 seconds for larger leg muscles. If you hit a tender spot, pause for 10-15 seconds until tension releases before continuing. Never hold the gun stationary for more than 20 seconds—continuous movement prevents tissue bruising. For best results, combine with deep breathing to enhance muscle relaxation.
How to Use Your Olsky Massage Gun for Pre-Workout Activation
Prepare muscles for peak performance with strategic pre-workout use. Set your Olsky to Level 2-3 and spend 30-60 seconds per major muscle group 15-20 minutes before exercise. Focus on areas you’ll target in your workout—glutes before squats, shoulders before overhead presses. The percussion increases blood flow by 28% and muscle temperature by 2-3°F, priming tissue for activity.
Avoid deep tissue work pre-workout—save Level 4-5 for recovery sessions. Limit pre-activation to large muscle groups; skip small stabilizers like rotator cuffs that need precise control. Never use on fatigued muscles before activity as this reduces power output. This targeted approach boosts range of motion by 15% while decreasing injury risk—making it essential for serious athletes.
Troubleshooting Common Olsky Massage Gun Problems

Your Olsky massage gun stopping mid-session usually has simple fixes you can address immediately. If the device won’t power on, first verify full charge—low battery causes intermittent operation. Then check that attachments lock completely; a loose connection triggers safety cutoffs. For weak vibration at high speeds, clean the attachment port with a dry toothpick to remove hair or fabric debris blocking the connection.
Overheating triggers automatic 10-minute shutoffs—this isn’t a defect but a safety feature. Let the device cool for 15 minutes before resuming. Excessive noise often means improper head alignment; remove and reattach firmly. If the gun vibrates unevenly, inspect for hair wrapped around the shaft—use scissors to carefully cut trapped strands. These quick fixes prevent unnecessary returns of fully functional devices.
Daily Maintenance for Long-Lasting Olsky Performance
Extend your massage gun’s lifespan with 30 seconds of daily care. After each use, wipe the body with a microfiber cloth dampened with 70% isopropyl alcohol to remove sweat and oils that degrade plastic. Remove attachments and wash them with mild soap—never submerge the main unit. Dry all parts completely before storage to prevent mold growth in humid environments.
Store your Olsky in the included case with attachments organized to prevent damage. Charge the battery to 50% before long-term storage—full discharge or constant full charge degrades lithium-ion cells. Every month, inspect the shaft for hair buildup and clean with a soft brush. Proper maintenance prevents 90% of premature failures, keeping your device powerful for years rather than months.
Integrating Your Olsky Massage Gun Into Your Recovery Routine
Maximize results with strategic timing throughout your week. Use Level 1-2 for 5 minutes daily on neck and shoulders to combat desk job tension—this reduces chronic pain by 37% according to physical therapy studies. Post-workout, wait 1-3 hours before applying Level 3-4 to trained muscles for 60 seconds per group to accelerate recovery without interfering with muscle adaptation.
On rest days, dedicate 10 minutes to problem areas: 30 seconds per calf with the bullet head, 60 seconds per quad with the ball head. Never use immediately after intense exercise—wait until initial inflammation subsides. Pair sessions with foam rolling: use the Olsky first to release tension, then foam roll for deeper myofascial release. This sequence boosts flexibility gains by 22% compared to either method alone.
When to Stop Using Your Olsky Massage Gun Immediately
Recognizing danger signals prevents serious injury. Stop using your device if you experience sharp pain (not deep pressure sensation), numbness, or tingling that persists after stopping—these indicate nerve irritation. Discontinue use if redness lasts more than 30 minutes or bruising develops, signaling capillary damage. Never push through pain; the “no pain, no gain” mentality doesn’t apply to recovery tools.
Avoid using the gun on areas with recent injections, implants, or surgical scars until cleared by your doctor. If you have osteoporosis or fragile bones, skip percussion therapy entirely—bone density scans can identify at-risk areas. When in doubt, consult a physical therapist before continuing. Your safety always outweighs short-term recovery benefits.
Final Note: Mastering your Olsky massage gun transforms recovery from guesswork to precision therapy. Start each session at lowest speed, match attachments to muscle groups, and never exceed 2 minutes per area. Clean attachments after every use and store properly to maintain peak performance. When used correctly, your Olsky massage gun delivers professional-grade relief at home—reducing soreness by 40%, improving mobility within days, and keeping you active longer. The key isn’t just owning the device, but applying these exact techniques consistently for lasting results.


