
Your kitchen counter is cluttered with failed bread experiments—collapsed loaves, dense bricks, or crusts that crack like dry earth. What if you could transform your Ninja Foodi into a miniature artisan bakery? This revolutionary ninja bread recipe slashes traditional 6-hour baking marathons into a precise 100-minute process while cutting energy costs by 40%. Forget battling humidity that sabotages proofing; the Foodi’s sealed chamber creates bakery-quality steam and maintains exact temperatures. One tester reported her first loaf rivaled £4 sourdough from a local bakery—using ingredients costing under $1. Ready to unlock consistent golden crusts and pillowy interiors?
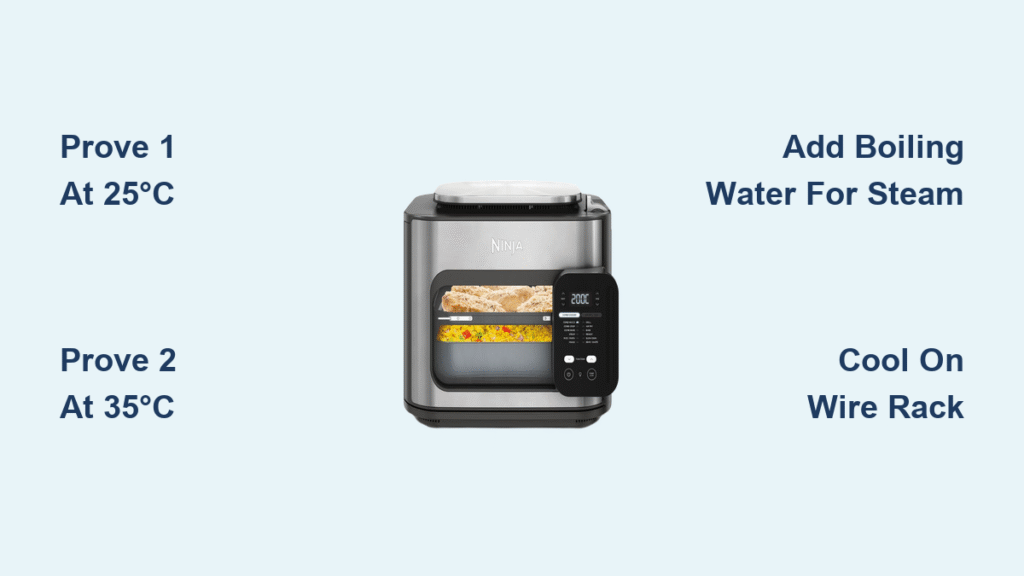
The magic isn’t just speed—it’s reliability. While conventional ovens demand perfect room conditions (230°C for 60 minutes), your Ninja Foodi bakes at a gentle 180°C with automated proofing cycles. No more guessing if dough doubled; no more oven hot spots burning one side. You’ll learn exactly how to leverage Prove 1 at 25°C for flawless initial rising and Prove 2 at 35°C for that perfect final puff. By the end of this guide, you’ll pull steaming, hollow-sounding loaves from your Foodi like a pro—every single time.
Why Ninja Foodi Eliminates Bread-Baking Failures
Traditional ovens force you to gamble on proofing conditions. A humid kitchen kills structure; cold drafts create leaden loaves. Your Ninja Foodi’s enclosed chamber maintains 25°C during Prove 1—guaranteeing yeast activates without overheating. This precision cuts rising time from 90 minutes to 60 while preventing collapse. During baking, steam injection mimics professional ovens, developing that coveted crackling crust impossible in dry conventional ovens.
Energy savings hit hard: 35 minutes at 180°C versus 60 minutes at 230°C slashes electricity use by 60%. Each ninja bread recipe costs under $1 versus $4 for store-bought artisan loaves. But the real win? Zero preservatives. Your loaf stays fresh 48 hours (vs weeks for store bread), demanding immediate enjoyment or freezing—a small price for pure, wholesome flavor.
Essential Tools & Ingredients for Perfect Results
Non-Negotiable Ingredients (500g Batch)
- 500g strong bread flour (all-purpose works in emergencies but yields denser crumb)
- 300ml lukewarm water (exactly 290-300g—use a scale for accuracy)
- 7g instant yeast (1.5 tsp) or 2¼ tsp active dry yeast (proof active dry in warm water first)
- 1.5 tsp fine salt (sea salt dissolves best)
- 25g butter or olive oil (creates tender crumb; skip for vegan version)
Game-Changing Upgrades
- 32g sugar transforms basic loaves into enriched brioche-style bread
- 2 tbsp milk powder for ultra-soft sandwich bread (ideal for kids)
- Rice flour dusting prevents sourdough sticking without gumminess
Critical Ninja Foodi Modifications
- Bend your bread tin: Use pliers to curve short sides upward and long sides outward—prevents collapse during rise
- Liner hack: Cut parchment paper into circles matching your Cook & Crisp™ basket size
- Scoring tool: A razor blade or bread lame creates clean slashes for controlled oven spring
Master the 5-Stage Ninja Bread Process
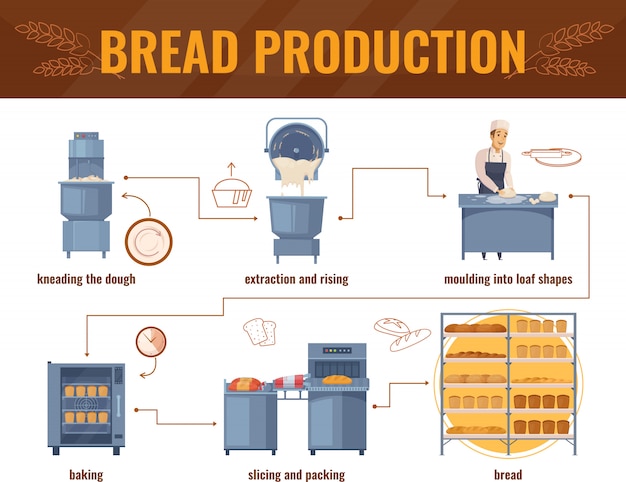
Mix Dough Like a Pro (7 Minutes Total)
Combine flour, salt, and yeast first—this prevents salt from killing yeast. Make a well, pour in lukewarm water (105-110°F—like baby’s bath) and melted butter. Mix until shaggy dough forms. For stand mixers: 5 minutes on low, rest 5 minutes, then 5 minutes medium speed. Hand-kneading? Fold and push for 10-15 minutes until smooth and passes the “window pane test” (stretches thin without tearing). Critical mistake: Adding yeast directly to water—always mix with flour first.
First Rise: Precision Proofing (60-90 Minutes)
Grease your Foodi’s inner pot, place dough seam-side down, and close the lid. Select Prove 1 at 25°C—no preheating needed. The dough doubles reliably without crust forming. No Prove function? Preheat Bake/Roast at 250°F for 5 minutes, cool until touch-safe, add dough with damp towel cover. Visual cue: Dough springs back slowly when poked; collapses if overproofed.
Shape with Tension for Oven Spring
Punch down risen dough gently—never knead aggressively. Fold edges toward center to create surface tension, then roll into a tight ball. For sandwich loaves: place seam-side down in modified tin. For boules: position in Cook & Crisp™ basket lined with parchment. Pro tip: Dust hands with rice flour to prevent sticking during shaping.
Second Rise: The Final Proof (45-50 Minutes)
Use Prove 2 at 35°C—this warmer setting accelerates final puffing. Dough should crest 1 inch above tin rim. Overproofed dough collapses when moved; underproofed yields dense crumb. Test: Press lightly—should leave a slow-rebounding indentation. Skip this step and your loaf won’t spring in the oven.
Bake for Crisp Crust & Hollow Sound (30-35 Minutes)
For 15-in-1 models: Use Steam Bread at 175-180°C for 35 minutes. Crucial step: Add 200ml boiling water to pot base with roasting grate before baking—creates steam for crackling crust. Score 1-inch deep slashes first! Basic models: Bake/Roast at 325°F for 30 minutes. Doneness test: Tap bottom—it should sound hollow. Pale loaves? Add 5 minutes uncovered.
Fix These 4 Ninja Bread Emergencies Immediately

Dense, Brick-Like Loaves? Extend Final Proof
Cause: Underproofed during Prove 2—dough didn’t double. Fix: Add 15-20 minutes to Prove 2 time. Prevention: Always check visual cues (1-inch above tin) over strict timing. Humid kitchens may need less time; cold rooms require more.
Pale, Soft Crust That Won’t Crisp? Boost Heat
Solution: Increase final bake temperature by 10°C or add 5 uncovered minutes. Steam Bread function users: Ensure 200ml boiling water was added pre-bake—this creates essential steam. Never skip scoring; uncut dough traps steam internally.
Soggy Bottom After Cooling? Trust the Process
Reality check: Moisture is normal post-bake—it evaporates during cooling. Critical error: Slicing too soon. Cool 20-45 minutes on a wire rack. Cutting hot bread traps steam, creating gummy texture. If still damp after cooling, return to Foodi for 3 minutes at 190°C.
Loaf Collapsed in Center? Proof Less Next Time
Cause: Overproofing during Prove 2—yeast exhausted itself. Fix: Reduce Prove 2 time by 10-15 minutes. Warning sign: Dough rises above tin but feels fragile to touch. Warm kitchens accelerate proofing; use Prove 2 only in cooler environments.
Model-Specific Settings Cheat Sheet
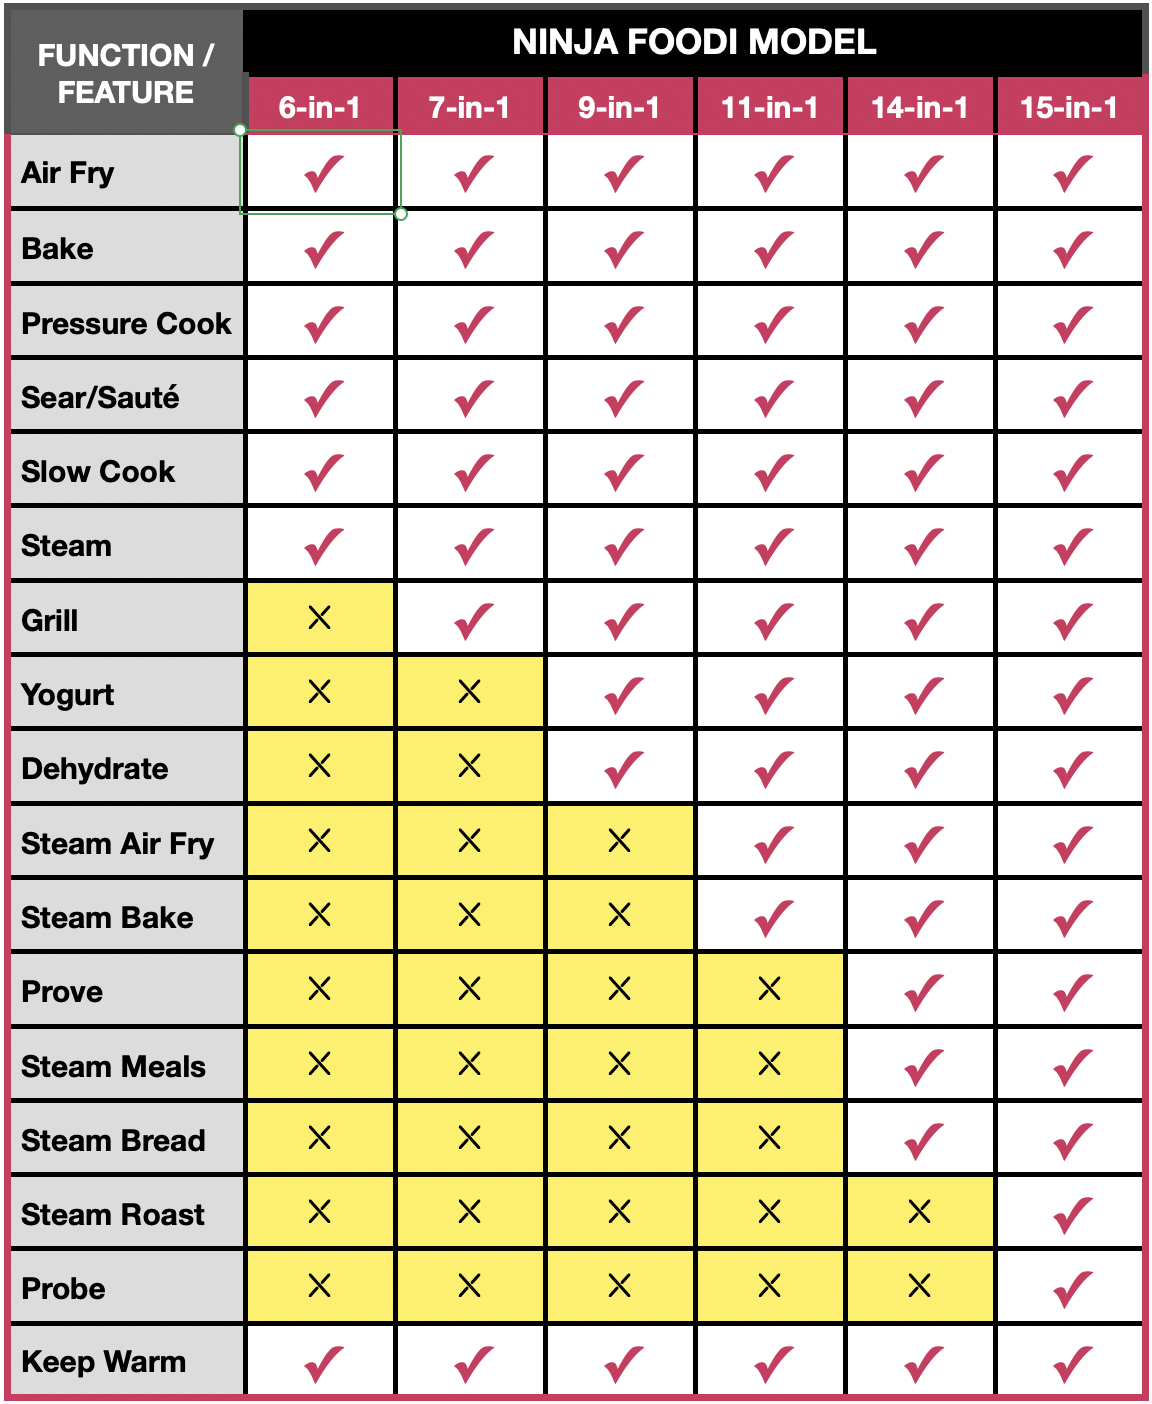
| Model | Function | Temp | Time | Pro Tip |
|---|---|---|---|---|
| 15-in-1 | Prove 1 | 25°C | 60-90 min | Use for initial rise; no water needed |
| 15-in-1 | Prove 2 | 35°C | 45 min | Watch for 1-inch dough crest |
| 15-in-1 | Steam Bread | 175-180°C | 35 min | Must add 200ml boiling water first |
| Basic Models | Bake/Roast | 325°F | 30 min | Place roasting grate over water for steam |
| All Models | Dehydrate | 105°F | 30 min | Alternative proofing if no Prove setting |
Adapt Your Ninja Bread Recipe in 3 Ways
Whole Wheat Loaves Without Sacrificing Texture
Replace 50% bread flour with whole wheat and increase water by 20ml. Expect denser crumb—add 1 tbsp vital wheat gluten for lift. Key adjustment: Extend Prove 1 to 90 minutes; whole wheat absorbs more moisture slowly. Bake 5 minutes longer for full doneness.
Sourdough in 18 Hours (Not Days)
Feed starter: Mix 40g starter + 40g water + 40g flour 3 hours pre-bake. Dough: 60g active starter, 500g flour, 320ml water, 5g salt. Process: Bulk ferment 12 hours room temp, shape, Prove 2 at 35°C for 50 minutes. Steam Bread at 175°C for 35 minutes. Dust with rice flour pre-bake to prevent sticking.
Double Batch Success (750g Flour)
Scale all ingredients by 1.5x—fits 7.5L capacity perfectly. Critical change: Extend baking time by 8 minutes. Doneness check: Internal temperature must hit 200°F (use instant-read thermometer). Under-baked double batches collapse when sliced.
Storage Secrets for Bakery-Fresh Bread Daily
Post-Bake Protocol That Prevents Gummy Slices
Cool completely on a wire rack—20 minutes for white bread, 45 for sourdough. Cutting early traps steam, ruining texture. Store cooled loaves in paper bags (not plastic!) for maximum 48 hours. Revival trick: Sprinkle stale slices with water, air fry 2 minutes at 180°C.
Freezing Like a Ninja Pro
Slice cooled loaves immediately. Separate slices with parchment paper in two freezer bags: one for “this week,” one for “long-term.” Game changer: Frozen slices pry apart easily with a butter knife—no thawing needed for toasting. Toast straight from freezer for fresh-baked flavor in 90 seconds.
Final Note: Your Ninja Foodi transforms bread-making from intimidating ritual to reliable daily joy. Master these techniques once, and you’ll never buy store bread again. That hollow thump when tapping your golden crust? That’s the sound of victory—crafted in under two hours, with 60% less energy. Start your next loaf tonight; by breakfast, you’ll be slicing into warm, homemade perfection.


