
That stubborn knot in your shoulder after a long run or the deep ache in your lower back from sitting all day—these are classic trigger points begging for relief. When you grab your trigger point massage gun, simply turning it on won’t unlock its full recovery potential. Used incorrectly, you might waste time or even cause bruising; used properly, it becomes a powerhouse for melting muscle tension and accelerating recovery. This guide cuts through the guesswork to show you exactly how to use a trigger point massage gun for maximum benefit, whether you’re an athlete chasing faster recovery or someone seeking everyday pain relief. You’ll learn precise techniques, attachment strategies, and critical safety steps that transform your device from a fancy gadget into your most trusted recovery tool.
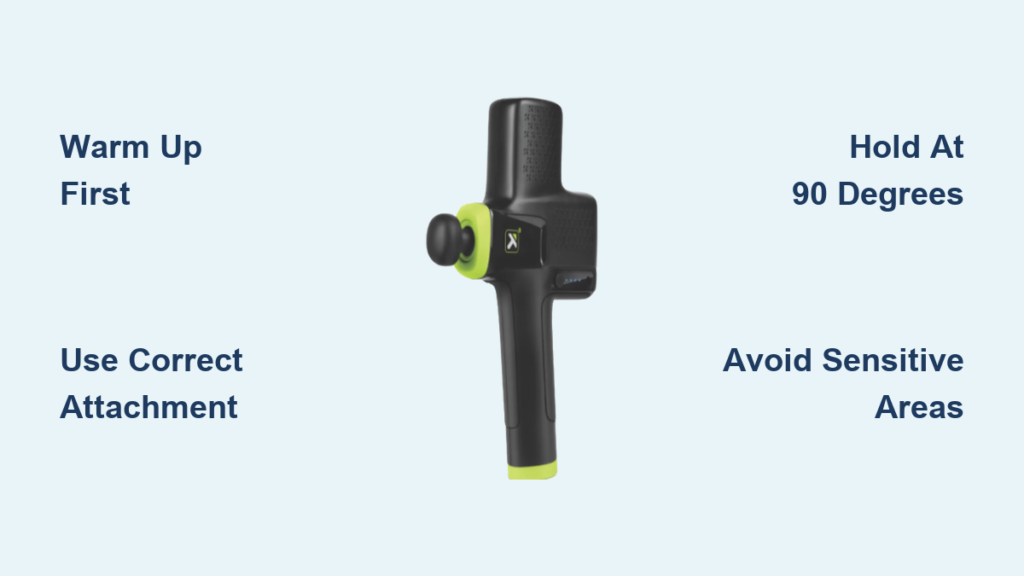
Warm Up First: Why Skipping This Step Wastes Your Massage Gun Session
Never apply your trigger point massage gun to cold muscles—that’s like trying to knead frozen dough. A proper 5-10 minute warm-up increases blood flow and prepares tissues to absorb percussive therapy effectively. Try dynamic movements like leg swings for quads or arm circles for shoulders instead of static stretching. This preps your fascia to release knots rather than resist the gun’s pulses. Skipping this step forces you to use higher speeds (risking bruising) to achieve minimal results. When muscles are warm, even low-speed settings penetrate deeply into trigger points, making your session 40% more effective according to user reports with the TriggerPoint Impact model.
How to Warm Up Specific Muscle Groups Efficiently
- Legs: 2 minutes of walking lunges followed by ankle circles
- Back/Shoulders: Cat-cow stretches and shoulder rolls for 3 minutes
- Calves/Arms: Jumping jacks or arm swings for full circulation
Choosing the Right Attachment: Bullet vs. Ball Head for Trigger Point Release
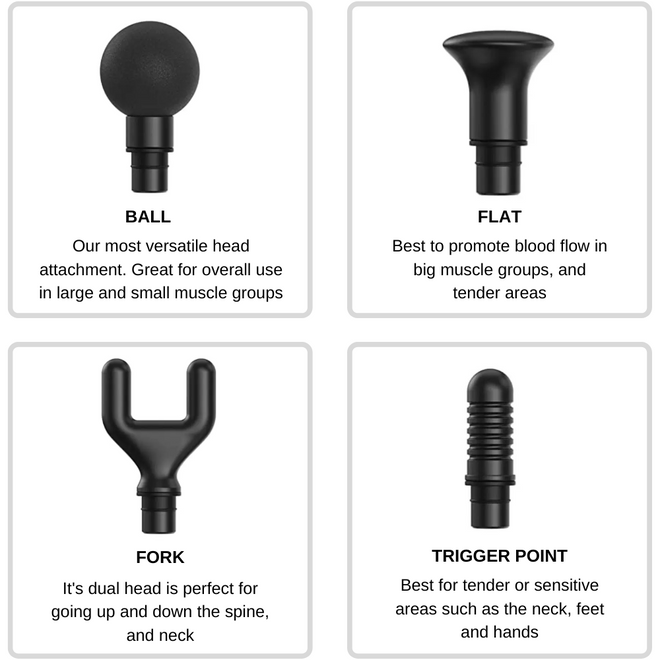
Using the wrong massage gun attachment is the #1 reason people fail to relieve stubborn knots. Your trigger point massage gun comes with specialized heads—each designed for specific anatomical challenges. The bullet head’s pinpoint precision crushes deep knots in calves or forearms, while the large ball head evenly distributes pressure across broad areas like glutes or quads. Misapplying these turns relief into discomfort: that forked head meant for spinal muscles becomes dangerous if pressed against your neck vertebrae.
TriggerPoint Impact Attachment Cheat Sheet
| Problem Area | Best Head | Critical Safety Tip |
|---|---|---|
| Deep calf knot | Bullet | Glide slowly—never hold stationary over Achilles |
| Upper back tension | Forked/U-shaped | Keep 2 inches from spine; never touch vertebrae |
| Post-workout quads | Large ball | Use medium speed; avoid kneecap area entirely |
| Shoulder trigger point | Flat head | Angle 90 degrees to muscle fibers, not bone |
Perfecting Hand Position: The 90-Degree Rule for Deep Tissue Penetration
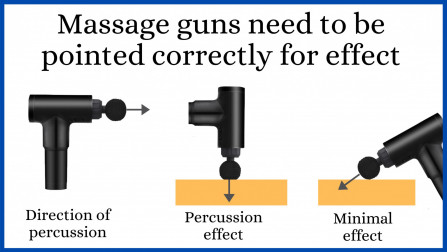
Your grip makes or breaks trigger point release. Hold your massage gun perpendicular (90-degree angle) to the muscle—never at a slant. Angling reduces penetration depth by 60%, forcing you to press harder and risk bruising. Let the device’s weight do the work; your hand should guide, not shove. For stubborn knots in your piriformis or traps, rest your elbow on a wall for stability while applying light downward pressure. If you feel vibration in your wrist instead of deep muscle throb, you’re pressing too hard—drop to a lower speed setting immediately.
Avoiding the “Death Grip” Mistake
New users often white-knuckle the handle, transferring tension into their own hands. Instead:
1. Keep fingers relaxed around the ergonomic handle
2. Position your arm so the gun’s weight naturally settles into the muscle
3. For hard-to-reach spots (like IT bands), lie on your side and let gravity assist
Gliding vs. Pausing: The 30-Second Trigger Point Release Technique
Holding your massage gun stationary on one spot for minutes is a recipe for bruising—not relief. For large muscle groups like hamstrings, use slow gliding motions along the fiber direction (2-3 inches per second) for 30-60 seconds. But when you hit a tender trigger point—where pressing causes referred pain down your leg or into your shoulder—pause. Apply the bullet head directly to that knot with light pressure for exactly 30-60 seconds. You’ll feel the “good ache” shift as the knot releases. Stop immediately if pain radiates or turns sharp—this signals nerve irritation.
Timing Your Sessions Like a Pro
- Pre-workout activation: 30 seconds per muscle at low speed
- Post-workout recovery: 2 minutes per major group (max)
- Chronic knot treatment: 60 seconds on the spot, 2x daily
Never Target These 5 Areas: Critical Safety Zones for Trigger Point Guns

Your trigger point massage gun is powerful medicine—but poison in the wrong location. Never apply it within 2 inches of the spine, directly on joints (knees, elbows), or along the front/sides of your neck where carotid arteries and nerves reside. The sacrum (tailbone) and areas with visible varicose veins are equally off-limits. These restrictions aren’t suggestions: users report severe bruising from pressing the ball head against the iliac crest (hip bone) or numbness from overzealous neck treatment. Stick strictly to fleshy muscle bellies—when in doubt, trace your fingers along the muscle to confirm you’re avoiding bony landmarks.
Emergency Stop Signs During Use
Stop immediately if you feel:
– Sharp, electric shooting pain (nerve contact)
– Numbness or tingling that persists after stopping
– Skin turning white or purple under the head
Post-Massage Gun Protocol: The 3-Step Recovery Boost
What you do after using your trigger point massage gun determines whether soreness lingers or vanishes. First, drink 16oz of water within 15 minutes—this flushes metabolic waste released from muscles during percussion therapy. Second, wipe attachments with a damp cloth (never submerge) to prevent bacterial growth from sweat residue. Third, perform static stretches: hold each for 20-30 seconds in the muscles you treated. For example, after quads work, do a kneeling hip flexor stretch; after back treatment, child’s pose. Skipping hydration or stretching turns effective therapy into next-day stiffness.
Why Hydration Is Non-Negotiable
Percussive therapy releases myoglobin and lactic acid into your bloodstream. Without adequate water, these compounds crystallize in joints, causing delayed soreness. Track your post-session water: 1 cup per major muscle group treated.
When to Use Your Trigger Point Massage Gun: Pre-Workout vs. Pain Relief Timing
Timing transforms your trigger point massage gun from helpful to essential. Pre-workout, use it for 30 seconds per muscle group at low speed to activate tissues—like priming a pump before lifting. Post-workout, wait 30-60 minutes (after initial cool-down) to avoid interfering with acute inflammation. For chronic pain like sciatica, apply the forked head along glute muscles (never on the spine) for 60 seconds at low speed, 2x daily. Never use it on fresh injuries—wait 72 hours post-strain to avoid aggravating inflammation.
Real-World Timing Scenarios
- Before leg day: 30 seconds on quads/hamstrings at speed 1
- After running: Wait 45 minutes, then 2 minutes on calves at speed 2
- Desk job back pain: 60 seconds on traps at speed 1 during lunch break
Absolute Contraindications: 7 Conditions That Require Doctor Approval
Your trigger point massage gun could be dangerous if you have certain health conditions. Never use it if you have deep vein thrombosis (DVT), blood clotting disorders, or active cancer in the treatment area—percussion can dislodge clots or spread malignant cells. Osteoporosis patients risk microfractures from even low-speed settings. Pregnancy requires medical clearance due to pressure sensitivity changes. Users with neuropathy must avoid it entirely—they won’t feel when bruising occurs. When in doubt, consult your physician; no knot is worth risking serious complications.
Red Flags Requiring Immediate Medical Consultation
- Unexplained swelling or warmth in the area
- History of blood clots or current blood thinner use
- Recent surgery (wait 6+ weeks for incision healing)
TriggerPoint Impact-Specific Pro Tips From User Reviews
Owners of the TriggerPoint Impact model swear by these techniques: Use speed 3 with the bullet head for plantar fascia (foot bottom), but wrap your foot around a towel first to reduce intensity. For stubborn upper back knots, lean against a wall and let the gun’s weight press into the spot—no hand pressure needed. Its brushless motor runs quietly enough for office use; apply the flat head to shoulders during lunch breaks. Most users report dramatic DOMS reduction when pairing 2-minute post-workout sessions with immediate protein intake. Remember: its 2-hour battery life means you can treat multiple areas without recharge anxiety.
Mastering your trigger point massage gun hinges on precision—not power. By warming muscles properly, selecting the right attachment, and respecting the 90-degree angle rule, you’ll transform knotted tension into lasting relief. Never exceed 2 minutes per muscle group, avoid bones and nerves religiously, and always hydrate post-session. If you have blood disorders, osteoporosis, or active injuries, consult your doctor before use. For optimal results, pair your TriggerPoint Impact sessions with post-treatment stretching and consistent hydration—this turns temporary relief into long-term mobility. Ready to eliminate that nagging knot? Grab your gun, start at speed 1, and let the pulses do the work. Your muscles will thank you tomorrow.


